How to use Microsoft Office Picture Manager on Windows 10
You may use the Microsoft SharePoint Designer (SPD) 2010 installer
![]() 2 min. read
2 min. read
![]() Updated on
Updated on
Share this article
Improve this guide
Read our disclosure page to find out how can you help Windows Report sustain the editorial team. Read more
Key notes
- If you’re a fan of the Microsoft Office Picture Manager, you can still get it on Windows 10.
- Unfortunately, Microsoft Picture Manager was discontinued by the company some time ago.
- You can still download and install the software on Windows 10 and it will work just fine.
- Note that the program doesn’t have that many features, but it can still do basic picture editing.

MS Office 2013 and 2016 users might have been surprised to find that those suites don’t include Microsoft Office Picture Manager.
Picture Manager was an application that was previously a part of MS Office that included photo management and image editing functionalities.
Back in the days, this was quite a well-rounded tool for simple picture tweaking and we’ll explain how to still use it now, on Windows 10.
How can I run Office Picture Manager on Windows 10?
- First, open the MS Office suite setup wizard.
- Get the product key for the Office suite ready.

- Enter the product key to launch the setup wizard.
- If you encounter a regional error while using your product key, don’t worry, you can solve it easily.
- Those who don’t have a previous MS Office setup wizard can use the Microsoft SharePoint Designer (SPD) 2010 installer instead.
- You can save the 32-bit version or the 64-bit version.
- Then open the SharePoint Designer 2010 setup wizard.
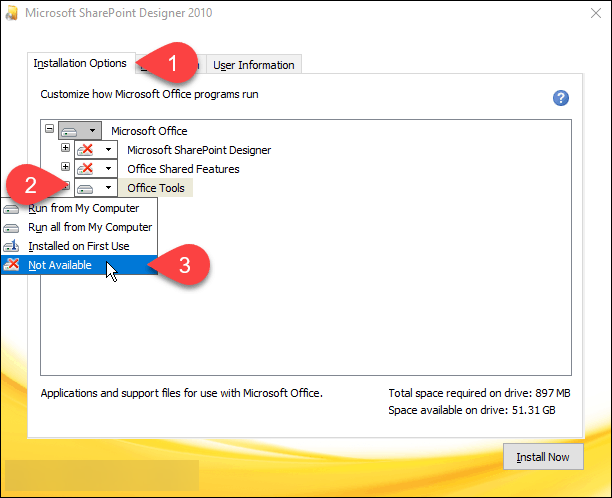
- Press the Customize button on that window to open the setup options below.
- Click each program listed on the Installation Options tab and select Not Available from the menus.
- Then click the + beside Office Tools and select Not Available for all Office Tools listed except MS Office Picture Manager.
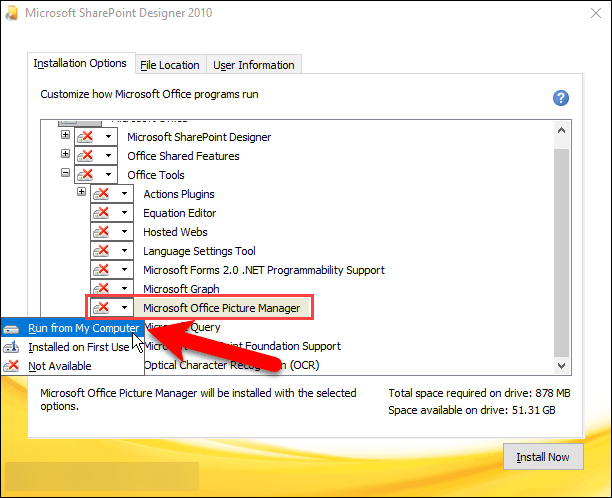
- You should then select the drop-down menu for Microsoft Office Picture Manager.
- Now select the Run from My Computer option on the Picture Manager menu.
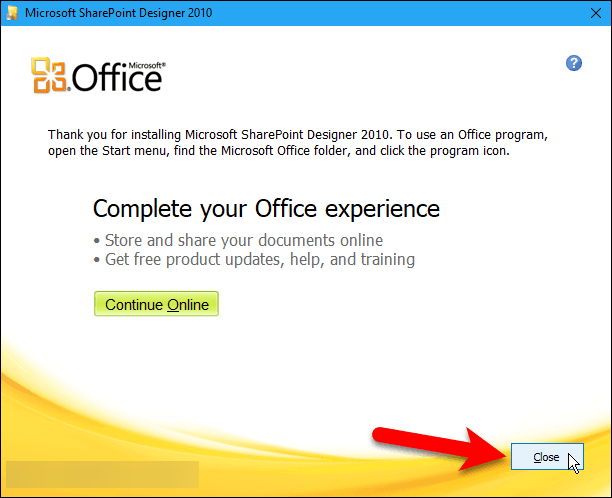
- Press the Install Now button on the setup wizard.
- Once the setup has finished, press the Close button and restart Windows.
- Now you should be able to open the Picture Manager.
- You should find it listed on the Start menu.


Microsoft Picture Manager for Windows 10 will let you edit your pictures once more. It’s certainly a handy application for organizing photos and basic image editing.
This tool didn’t have lots of editing tools, but its Resize, Crop, Rotate, Red Eye Removal, AutoCorrect, and Color options still came in handy. Even if Microsoft discontinued it, you can still use the software.
We also have a guide on how to download Microsoft Picture Manager, so don’t miss it.
As always, if you have any other suggestions or questions, don’t hesitate to leave them in the comments section below and we’ll be sure to check them out.


User forum
3 messages