What are the Best Practices Of Using Microsoft Planner?
Be clear about the goal of the task as this will set the right expectations
![]() 6 min. read
6 min. read
![]() Updated on
Updated on
Share this article
Improve this guide
Read our disclosure page to find out how can you help Windows Report sustain the editorial team. Read more
Microsoft Planner is an easy-to-use work management application that is a part of Microsoft 365. It helps you organize teamwork visually and is suitable for business teams of all sizes. To help you maximize the benefits of Microsoft Planner, we have discussed the best practices for using the workflow management tool to help your team stay productive.
What are the best practices for using Microsoft Planner?
1. Set clear goals
Whether you are managing an event, completing a product launch or coordinating with your team on daily tasks, define your objectives at the start.
Along with this, you must also set expectations about the end results and how will you measure the completion or success of the task.
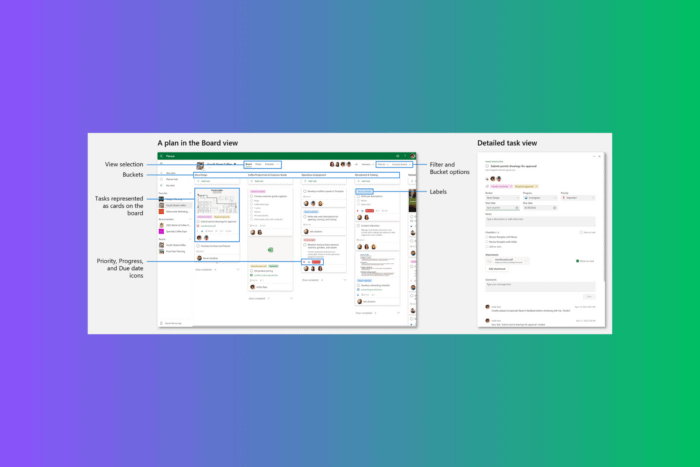
2. Organize tasks with buckets and labels
In order to group your tasks, you can use buckets and labels. Grouping can rearrange the clusters of tasks on the plan page for further analysis.
The default grouping is done by bucket and the advantage of using buckets for grouping is that you can define these categories of tasks.
You can also add up to six colorful labels and indefinite buckets for each plan. While adding bucket and label categories, think of priority, quality, task types, connection, distribution, and delivery methods.
3. Setup notifications and reminders
Make sure that team members get notifications about task assignments, changes and due dates. This can help keeping the team in loop and prevent them from missing deadlines.
Also, ensure to set reminders for future deadlines or progress changes, so that the tasks can get completed on time.
If your Microsoft Planner notifications are not working., it could be because notifications aren’t properly configured; read this guide to know more.
4. Use Checklist and Subtasks
You can add checklists to tasks to outline the steps that are needed to complete them. This approach will make tracking progress easier than ever.
If you think the task is complex, try breaking it into subtasks. This will help you managing even minute details of a task to ensure nothing is overlooked.
5. Be Specific
You should write tasks clearly with detailed information as it can set the right expectations.
Every task should be assigned to a team member, this will increase accountability. And, accountability can help track progress and is a good way to manage tasks effectively.
Also, mention due dates for all the tasks assigned to keep tasks on track and help the assignee prioritize work. You should always set realistic deadlines as this could motivate the team members and prevent them from being overburdened.
6. Integrate with Microsoft 365
You can integrate Microsoft Planner with Microsoft Teams, and it can help you manage tasks directly within you team’s communication hub. This will also allow you to keep tabs on task updates and have tasks related discussions in team chats.
Moreover, you can sync Planner with Outlook to keep an eye on your tasks and deadlines right in your calendar. This can help you manage your time effectively and makes sure you are on top of your schedule.
To create workflows that automate repetitive tasks and processes, you can use Power Automate.
7. Review regularly
It is advised to schedule periodic meetings to review tasl progress, address any issues, and adjust plans if required. This will help you keep your project on track.
You should always be flexible and update the task, deadlines, and change priorities according to the project’s needs.
8. Collaboration and communication
You can use comment feature to communicate updates, ask questions or provide feedbacks on a task. This can help keep the relevant information within the task.
Make sure you attach files related to a tasks and give all the connected people access to them, thereby streamlining the workflow and reducing the need to search for files.
If you want to learn how to use Microsoft Planner to keep track of tasks when working remotely, check out this guide for the details.
What are the other things that you can keep in mind?
Managing tasks
- Add a due date – Adding a deadline or a Due Date field can set the expectations right. The team members can choose to focus on a task depending on the due date mentioned.
- Include Progress field – You must add Progress field, it comes with three options – Not started, In Progress and Completed. This will help you track the progress of the task at hand.
- Add Labels – Planner comes with 25 color-coded labels which can help you organize tasks based on information specific to each plan.
- Priority – Another way to set the expectations and set priority is to add a Priority field, which comes with four options Low, Medium, Important, and Urgent.
Finding right tasks
- Filter – Filter is a combination of six attributes, Due date, Progress, Priority, Label, Bucket, and Assignment. You can use this to find the right task for you.
- Buckets – It is one of the primary categories to organize tasks. You can create as many Buckets as required to sort tasks by criteria like client names, process stages, or departments.
- Organize – You can also organize tasks using options like Due Date, Progress, Priority, Label, and Assignee.
Keep tracks of tasks
- Use built-in notiifcations– The notifications help you keep a track of tasks assigned to you along with upcoming deadlines
- Explore the Charts view – You can access it at the top of the plan. It can provide you visual representations of task status such as Tasks due tomorrow, marked as Urgent or pending review.
Microsoft Planner is a powerful tool that helps managing tasks and projects effectively and to get the most of it, you must set clear goals, write down the task clearly, use buckets and labels, and review the tasks regularly.
In case you want to learn how to create custom fields in Microsoft Planner, we have a detailed guide with instructions for you. You can also export data to Excel. Moreover, you can check out alternatives if Microsoft Planner doesn’t suit you completely.
If there is any other best practices for using Microsoft Planner that you use and you think could benefit others, feel free to share them in the comments section below. We will add it to the list.

User forum
0 messages