How to Create Custom Fields in the New Microsoft Planner
It can help you track progress of a project or task
3 min. read
Published on
Read our disclosure page to find out how can you help Windows Report sustain the editorial team. Read more

Microsoft Planner lets teams manage projects effectively; however, sometimes, you need more customization to fit your workflow. That’s why custom fields come into play. Custom fields capture unique data points like priority levels, project phases, and more.
In this guide, we will discuss how to create custom fields in Microsoft Planner. These fields will help you tailor tasks to better meet your team’s needs and improve project tracking.
How can I create custom fields in Microsoft Planner?
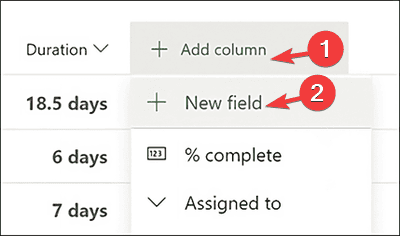
- Once you have a Premium Plan, go to the Grid view, choose Add column, then New field.
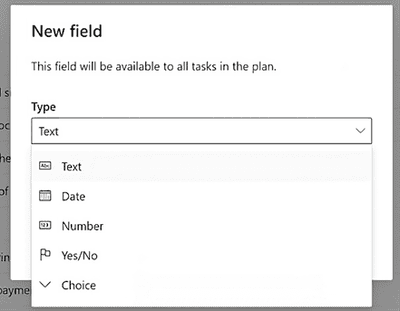
- Select an appropriate field Type:
- Enter a Field name, and select Create.
With the premium plan, you can create up to 10 custom fields. If you want to learn how to use Microsoft Planner to keep track of tasks when working remotely, you can check out this guide.
What are the types of custom fields?
- Text – It can contain any character. You can utilize it to add columns for notes, justifications, or other details.
- Number – It can only have numbers. You can also rollup options in subtasks with Min, Max, Average, and Sum calculations. When you create the number field, select the Rollup type. For instance, create an Estimate column with a Sum calculation to calculate the total work required.
- Date – Accepts any date, you can either type the date or choose it from a calendar. You can use it to track important dates, like approval dates.
- Yes/No -You can add a drop-down list with Yes and No options, which can help track progress and quality checks.
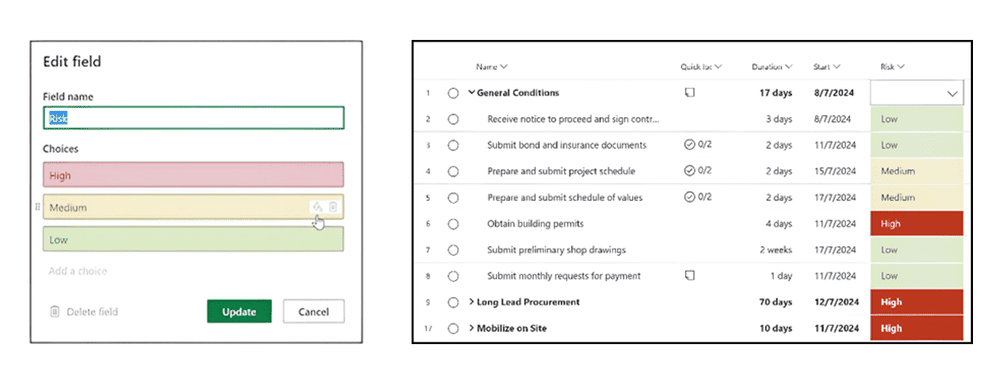
- Choice – It allows you to create a drop-down list with 2 to 20 options, including emojis and characters. For instance, you can add a Risk field with choices like High, Medium, and Low.
You can add emojis on Windows using Windows +; and on Mac, you need to press Control + Command + Space.
Furthermore, you can also use the paint bucket icon to add colors to each choice for easier visual identification. However, if you want to remove the colors, you can delete them by selecting the trash can icon.
If you want to edit any custom field you added, all you need to do is choose Edit from the custom column menu in the Grid view. You can also choose to add custom coloring or filtering based on the content in the custom fields.
If you often work remotely and want to learn how to assign tasks while working out of the office using Microsoft Planner, check out this guide.
How can I get started with Microsoft Planner in Teams?
If you are already using Microsoft 365 and Microsoft Teams, you should try out the new Planner app in Teams.
To check out the premium capabilities from within the Planner app, you can opt for a free 30-day trial of these advanced capabilities by clicking the diamond icon in the app. Once the trial is over and you decide to go with the premium license, you can request it.
If you want to understand the differences between Microsoft Project, Microsoft Planner, and Microsoft To-Do, we have a separate guide available.
Some users complained about Microsoft Planner notifications not working. If you are facing the same issue, read this guide to learn the solutions.
If you have any questions or suggestions about creating custom fields in Microsoft Planner, feel free to let us know in the comments section below. We’re happy to help!


User forum
0 messages