.NET Runtime Optimization Service High CPU [Why & Quick Fix]
Find out all you need to know to level out the CPU usage
4 min. read
Updated on
Read our disclosure page to find out how can you help Windows Report sustain the editorial team. Read more
Key notes
- The .NET Runtime Optimization Service is an important part of Windows that, once it’s done, usually goes away.
- However, sometimes it can use a lot of CPU power, which will slow down your computer.
- Check out how to optimize this process in order to stop it from using up your PC resources.

Some Windows OS processes can result in high CPU usage thus slowing down your computer. .NET runtime optimization service high CPU usage issue is among the most reported problems in the Microsoft community forum.
The occurrence of this issue is typically unpredictable, although it may also take place after an update to the .NET Framework has been applied.
If you are also troubled by this issue, here are a couple of troubleshooting tips to help you resolve it. Alternatively, you can opt to use one of the best CPU usage cleaner software to speed up your PC.
What is .NET runtime optimization services?
Windows has a component called NET runtime optimization service, which is also known as mscorsvw.exe.
This component helps your system perform more efficiently by accelerating the launch of applications and programs.
Why does .NET runtime optimization use so much CPU?
There is a possibility that your computer is infected with malicious software that is masquerading as the service itself, or that the service itself has been compromised thus causing the .NET Runtime Optimization Service server 2019 high CPU usage.
Moreover, it might be that the service has become corrupt; thus, you should attempt to restart it. Or, the performance of your computer is noticeably slower than usual; in this scenario, you will need to optimize it completely.
How can I fix .NET runtime optimization service high CPU issue?
1. Optimize the .NET framework process
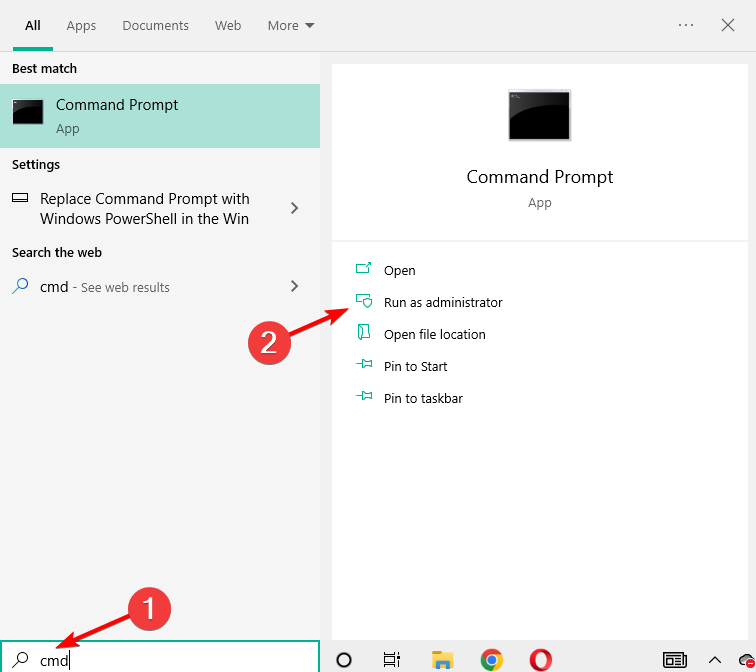
- Press Windows then type cmd and select the Run as administrator option.
- In the Command Prompt enter the following command one by one and then hit Enter to execute:
For 32-bit:cd c:Windows\Microsoft.NET\Framework\v4.0.30319For 64-bit:cd c:Windows\Microsoft.NET\Framework\64v4.0.30319 - Next, enter the following command and hit Enter:
ngen.exe executequeueditems - Close the command prompt and open the Task Manager by pressing Ctrl + Shift + Esc.
- Check if the .NET Runtime Optimization Service is still using the CPU at 100.
The above command will help you to optimize the process allowing it to make use of more CPU cores so that it can finish the process faster.
2. Check for malware infection
If your PC is infected with malware or virus, it can slow down your PC by using the CPU resources in the background. If you have an antivirus installed, make sure you run a full scan of your system.
This may take longer than a quick scan, however, it will help you find any malware in your system.
If you don’t have a specialized tool installed, try ESET HOME Security Essential, an excellent malware protection tool that quarantines suspicious files immediately.
When ESET HOME Security Essential detects any malware, click on Removed Selected option to quarantine the suspicious files.
Malicious programs usually hide in plain sight and look like normal system processes while getting a hold of your system’s resources. By performing a complete scan, you can find and remove any infection from your computer.
If you’re looking for the best antivirus solution to protect your Windows 10 PC, check out this list with the best options you have at this moment.
3. Restart NVIDIA Telemetry Container
Note: This step only applies to the computer that has the NVIDIA graphics card installed.
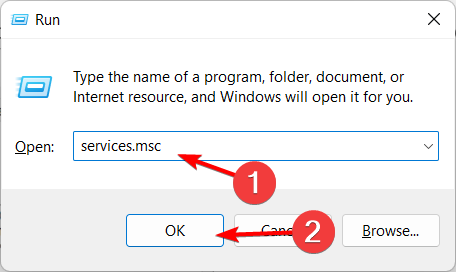
- Press Windows Key + R to open Run. Type services.msc and click OK. This will open the Windows Services window.
- Locate the NVIDIA Telemetry Container service on the list. Right-click on the service and select Properties.
- In the Properties window, under Service status, click on the Stop button. Next, click the Start button to restart the service again.
- Make sure the Startup status: is set to Automatic.
- Click Apply and OK to save the changes and fix the .NET Runtime Optimization Service high CPU usage after update.
4. Perform a clean boot
- Press Windows then enter msconfig and select System Configuration.
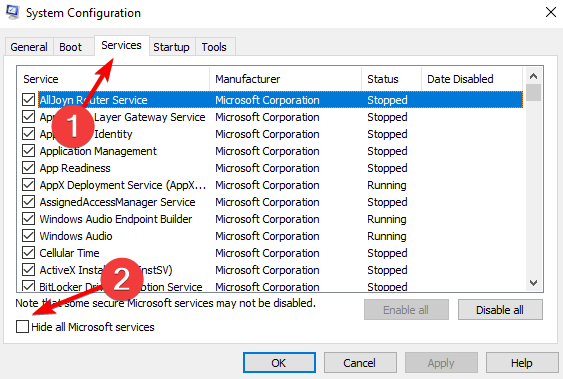
- Look for the Services tab and select Hide all Microsoft services.
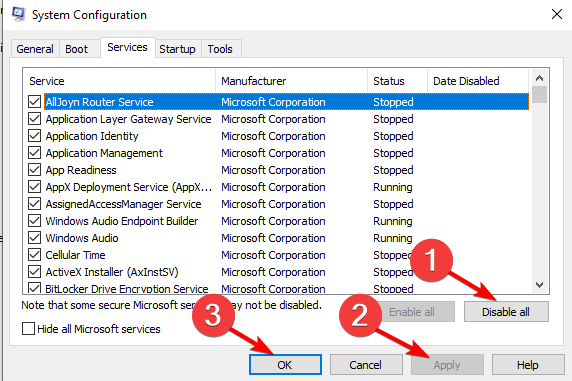
- Select Disable all followed by Apply and OK then restart your PC to fix the .NET Runtime Optimization Service high CPU Windows server 2012 r2 usage.
The .NET runtime optimization service is an essential Windows service and mostly goes away once it is done. However, in case it does not go away, you can follow the steps in this article to fix the high CPU usage issue caused by the process in Windows.
For more solutions, check out our guide on how to fix CPU at 100 for no reason.
If you have any other questions or suggestions, don’t hesitate to reach out in the comments section below.


User forum
0 messages