No Sound After Sleep Mode: Enable It With These 3 Solutions
Note that a driver update often works
Key notes
- Many users have reported that their PC loses the ability to playback sounds after exiting Sleep Mode.
- This issue may happen because of an outdated or corrupted driver, so be sure to begin by updating your audio driver.

You have found this guide because you are experiencing no sound after sleep mode on your Windows 10 PC. Let us show you how to resolve it.
Sound issues aren’t exactly an alien concept on the Windows platform, which also applies to the Windows 10 operating system. And a common problem experienced on Windows 10 PCs is the device going dumb each time it wakes up from sleep.
Curiously, the sound issue is non-existent when the device returns from hibernation or after a restart. Somehow it is only when the device is out of the sleep cycle that it tends to lose its audio abilities.
All of this makes it not too big of an issue, but one that can drive you nuts nonetheless; more so if you are a music buff and can’t resume your listening post-sleep mode.
Why is there no sound after Sleep Mode?
From what we gather from users who have passed through this problem, a few things may trigger this issue. At the top of these are the following:
- Outdated drivers – In most cases, this may be the case if the audio driver is outdated.
- Hardware problems – In some instances, this may be a sign of issues with your computer speakers.
- Problems with settings – Windows sound enhancement settings, for example, may trigger this problem. You should ensure that you have the best settings for all audio devices.
Here are some practical solutions, and they will also come in handy if the sound stops working after sleep mode, your HDMI audio stops working after sleep, or with brands like Dell, LG, HP, etc.
How can I fix no sound on Windows 10 after sleep mode?
Before you try any of these solutions:
- Try restarting the device. A restart will force problematic processes to stop and could fix the problem.
- You may also sign out of the account and sign back in. But if any of these do not work, go through these fixes.
1. Update the audio adapter
- In the Search box, type Device Manager and click on the app.

- From the list, click on Audio inputs and outputs.

- Right-click on the audio driver and hit Update Driver.
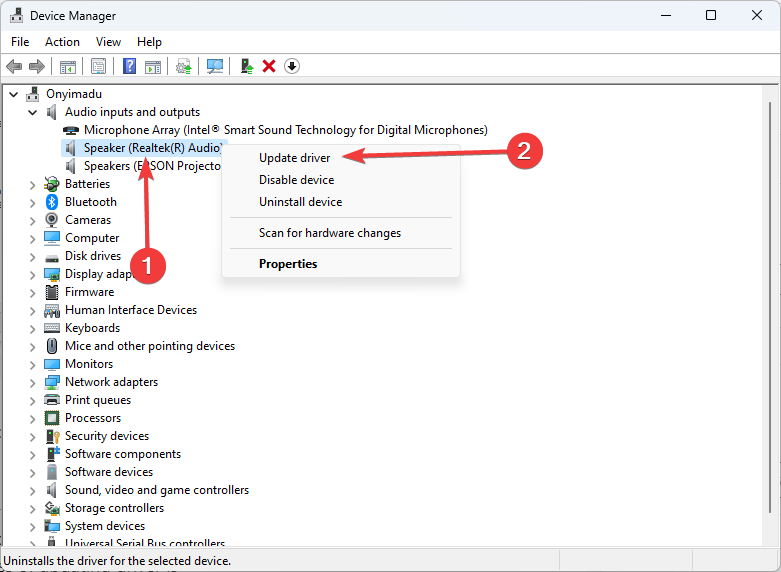
- Select Search automatically for drivers.

If you’re looking for a way to simplify the process, a third-party driver updater like Outbyte Driver Updater should do the trick.
All you need to do is run it, and it will instantly start scanning your PC for outdated, broken, or even missing drivers.
Once you’ve selected which drivers you want to fix, it will download and automatically install them for you.
Once that is done, you must finish it with a system restart to apply the changes.
See if this works. An outdated or corrupted driver is the most likely cause for your audio to malfunction, so explore all options to ensure your system is running the latest drivers.

Outbyte Driver Updater
Fix your drivers easily and locate the latest updates with the Outbyte Driver Updater software.2. Run the Sound troubleshooter
- Press Windows + R, type control panel, and hit Enter.

- Change the View by option to Large icons.

- Click on the Troubleshooting option.
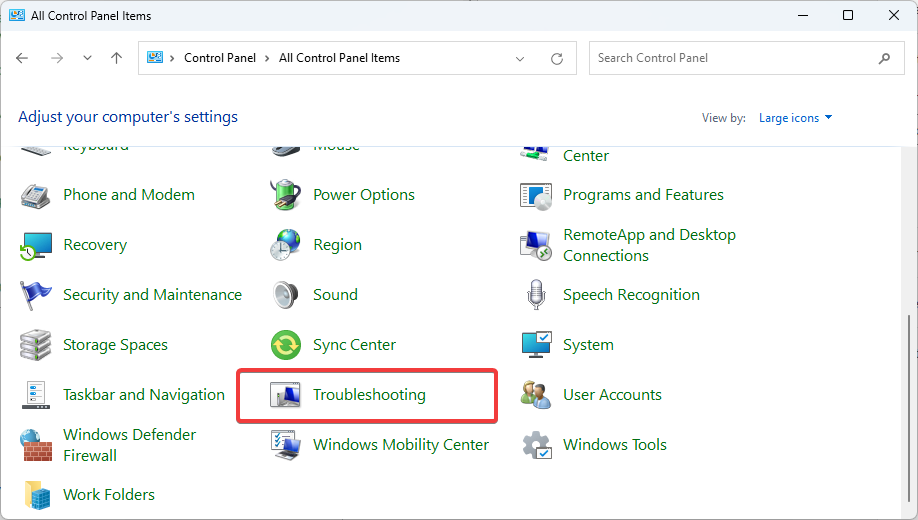
- Select View all on the left pane.

- Click the Playing audio troubleshooter.

- Now, click Next and follow the recommendations.

3. Change system memory value
- Press Windows + R, type msconfig, and hit Enter.

- In the System Configuration window, select Boot tab followed by Advanced options...
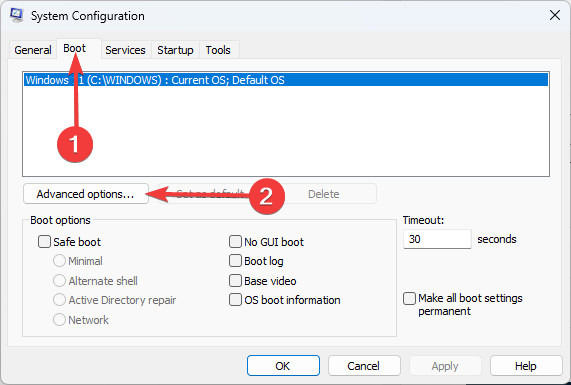
- Check Maximum memory and set the value at 3072.

- Click OK to close all open windows, including the System Configuration
- Restart your PC, and the audio should be back.
This is especially applicable to those notebook devices that have an installed memory of 4 GB.
However, if the issue isn’t resolved, you might also want to check if a Windows 10 update is available. Do a virus scan as well as with the latest version of your antivirus software.
Get in touch with the audio component manufacturer and see if they can provide an update to solve the issue.
Let us know in the comments below what worked for you.
Read our disclosure page to find out how can you help Windows Report sustain the editorial team. Read more


Improve this guide


User forum
7 messages