Outlook AutoFill Email Address not Working: Check & Fix ✅
Is Outlook not remembering email addresses? Make sure the Autocomplete option is checked
Key notes
- While it's a useful option, Outlook autofill email address not working cases are not uncommon.
- How do I rebuild my Outlook AutoComplete address? - That's the big question.
- If Outlook is not remembering email addresses, review its settings and perform a quick cache clean-up.

The Outlook autofill, otherwise Auto-Complete, displays email addresses when you start to enter them in the To field.
However, AutoComplete doesn’t always work for some users. If Outlook doesn’t display email addresses when you enter them in To, you might need to fix AutoComplete. First things first, though.
Why are all my Outlook autocomplete email addresses suddenly missing? Like so many other users, you might also be wondering what causes this abnormal and sudden behavior, to begin with.
Let’s find out together.
Why is my Outlook not auto-populating email addresses?
Improper autocomplete settings, conflicting extensions, or file corruption are just some of the reasons for which you might encounter this issue.
And speaking of issues, let’s quickly go through the most common problems reported by our readers:
- Outlook email address not auto populating
- Outlook not autocompleting email addresses
- Use autocomplete list Outlook greyed out
- Outlook autocomplete not working for some contacts
- Outlook 365 not auto populating email address
- Also, the versions are often impacted – Outlook 2013, 2010, 2003, 2016, 2007 autofill email address not working
How do I restore autofill email addresses in Outlook?
- Check the Auto-Complete setting in Outlook
- Clear the Auto-Complete List setting
- Turn off Outlook add-ins
- Open Outlook in Safe Mode
- Reset Auto-Complete
- Repair the PST File
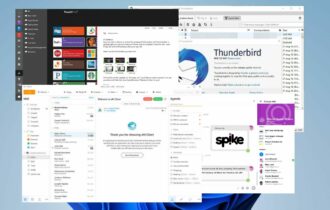
Before we dig into the solutions listed below, it might be worth considering a different email client.
There are lots of different email clients that offer efficient features in order to help you be more organized and stay on top of a busy day.
In case you wonder what email software you might use, we recommend carefully selecting the best email clients to boost your productivity.
1. Check the Auto-Complete List setting in Outlook
- Outlook includes an Auto-Complete setting that needs to be selected.
- To check the AutoComplete option, click the File tab.
- Select Options to open the Outlook Options window.
- Select Mail on the left of the window.
- Scroll down to the Send messages options, which include a Use AutoComplete List to suggest names when typing in the To, Cc, and Bcc lines option.
- Select the Use AutoComplete List to suggest names when typing in the To, Cc, and Bcc lines option if its checkbox isn’t selected.

2. Clear the Auto-Complete List setting
If you don’t need to select the Use AutoComplete List to suggest names when typing in the To, Cc, and Bcc lines option, note the Empty AutoComplete List button beside it.
Outlook includes a maximum of 1,000 entries in its AutoComplete list, which you can clear by pressing the Empty AutoComplete List button.
Press that button and click Yes to clear the AutoComplete list. Note that you’ll need to fully enter all the email addresses once before Outlook‘s autofill displays them again.
3. Turn Off Outlook Add-ins
- Click File > Options to open the Outlook Options window.
- Then select Add-ins on the Outlook Options window.
- Select COM Add-ins on the Manage drop-down menu.
- Click the Go button.

- Deselect the add-ins’ checkboxes to disable them.
- Press the OK button to close the window.
You might need to turn off some add-ins to fix Outlook autofill email addresses. The iTunes Outlook Change Notifier add-in is one that corrupts the AutoComplete list. You can turn off Outlook add-ins as follows.
4. Open Outlook in Safe Mode
- Press the Windows key + X hotkey.
- Select Run to open the window in the snapshot below.

- Input Outlook.exe /safe in the Open text box.
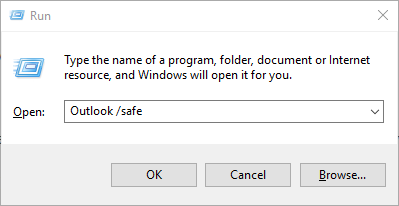
- Click the OK button to launch Outlook.
Alternatively, you can open Outlook in a Safe Mode that deactivates all the application’s add-ins.
Sometimes, Safe Mode won’t accept your password. We’ve prepared a dedicated guide just for such an occasion.
5. Reset Auto-Complete
- First, open File Explorer.
2. Then open this folder in File Explorer:
%LOCALAPPDATA%\Microsoft\Outlook
3. Right-click the RoamCache folder and select Rename.
4. Enter old_RoamCache as the folder’s title.
5. Outlook will set up a new RoamCache folder when you open the application.
How do I fix AutoComplete cache in Outlook? You can reset AutoComplete by clearing its cache. The RoamCache folder includes the AutoComplete cache.
You can reset that cache by editing the RoamCache folder with the help of File Explorer. If you have any File Explorer issues on Windows 10, check out this dedicated guide to solve them.
6. Repair the PST File
- First, open your Outlook folder in File Explorer.
- That folder path could be this one on 64-bit Windows:
Program Files(x86)/Microsoft/OfficerootOffice - Or this one on 32-bit platforms:
Program Files/Microsoft/OfficerootOffice - Then click the scanpst.exe to open the Outlook Inbox Repair Tool window.
- Press the Browse button to select your PST file.
- Enter Outlook.pst in the Windows search bar if you’re not sure what folder the PST file is in.

- Click the Start button on the Outlook Inbox Repair Tool window to fix the PST file.
Repairing the PST file might fix AutoComplete. Outlook includes a SCANPST utility (Outlook Inbox Repair Tool) that you can repair the PST file with.
Those are a few resolutions that might fix Outlook‘s AutoComplete so that the To field displays email addresses again.
The Outlook Support and Recovery Assistant might also come in handy for fixing AutoComplete. You can download the Support and Recovery Assistant from this webpage.
If you have any other questions, feel free to leave them in the comments section below.
Read our disclosure page to find out how can you help Windows Report sustain the editorial team. Read more


Improve this guide


User forum
0 messages