Please Enter Setup to Recover BIOS Setting: How to Fix it
A dead motherboard battery most likely triggers BIOS settings errors
Key notes
- Sometimes, when trying to restart your PC using the cold boot, you may come across an unexpected BIOS error that says, Please enter setup to recover BIOS settings.
- Many users who face this issue have been found to have an old motherboard with an outdated or dead CMOS battery.
- However, the BIOS error message may also show up due to incorrect BIOS settings, corrupted system files, or, outdated BIOS version.

When trying to do a cold boot, you may bump into the error message, Please enter setup to recover BIOS settings as your PC is starting up.
You may not encounter this issue when doing a normal restart, but only during a cold boot. Besides, it also wipes off all the saved BIOS changes. To know more about what is BIOS and how to use it, you can follow our detailed guide.
What causes the please enter setup recovery BIOS settings error?
Some of the primary reasons why you may see the BIOS settings error are as below:
- The CMOS battery is dead – When the motherboard model and the coin-cell battery are old.
- BIOS version is outdated – Sometimes, the BIOS needs to be updated to the latest version for proper functioning.
- System files – Chances are, that you see the error due to corrupted Windows files.
However, it’s not as frightening as it looks. Below are a few solutions that can help you fix the Please enter setup to recover BIOS settings error.
How do I fix the please enter setup recovery BIOS settings error?
Before you proceed with the main troubleshooting methods, you may want to apply the steps below:
- Restart your PC.
- Update the BIOS to the latest version.
- Enter the BIOS, hit Save all changes, and restart.
- Change the boot order in Windows 11.
- Ignore this error message completely if you don’t need any non-default settings.
But, if you still keep receiving the same error, Please enter setup to recover BIOS settings and press F1 to run the setup, you can follow the below workarounds.
1. Replace the CMOS battery and change the F1 settings
- Enter BIOS, and press F7 to enter the Advanced Mode.
- Here, go to the Boot tab and disable the Wait For ‘F1’ If Error option.

- Now, press and hold the power button until the computer shuts down completely. Remove any power sources from the laptop, and the battery to proceed.
- Before you dismantle your laptop, make sure to discharge any static electricity to avoid any damage.
- You can now remove the bottom panel of the laptop, or dismantle it to access the CMOS battery, which looks like a coin.

- It is typically located near your PCI slots but could also be found in other locations based on the motherboard manufacturer. Now, remove the battery.
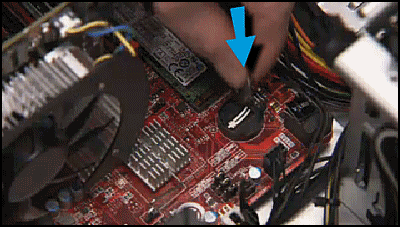
- Next, hold the power button on your laptop for about 10-15 seconds to discharge any remaining power. This will reset the CMOS memory and your BIOS.
- Now, place the CMOS battery back in its location, reassemble your laptop, plug the power source back, and boot up your laptop.
- Enter BIOS again, reset the time and date, and press F10 to save the settings and exit.

Now, shut down your PC, wait for a while and as you turn on your PC, you should not see the error anymore. You can also refer to our detailed guide on how to fix corrupt CMOS for more solutions.
2. Change BIOS settings
2.1 Enable CSM
- Enter BIOS on your PC based on the model, navigate to Security Options and turn off Secure Boot. Save the changes and restart your PC.

- Next, enter BIOS again, go to the Boot section, and disable Fastboot.

- Now, enable CSM (Compatibility Support Module), save the changes, and restart your PC.

You can now cold boot your PC and check if the issue is fixed or, if you still see the error, please enter setup to recover BIOS settings and press F1 to run setup.
This method can also help you with an issue such as when the PC won’t exit BIOS and we have some more solutions for the same.
2.2 Change SATA Mode to AHCI
- On your PC, enter BIOS by using the designated shortcut key (F10/F2/F12/F1/DEL) based on the PC model.
- Navigate to the Boot section, and enable the CSM option.
- Next, go to SATA mode and change it to AHCI.

Now, reboot your PC, and check if setting the SATA mode to AHCI helped fix the BIOS settings issue.
3. Ignore CPU Core Voltage
- Press the designated key based on your laptop manufacturer to enter BIOS and press F7 to switch to Advanced Mode.
- Here, go to the Monitor tab. Now, go to the CPU Core Voltage field and set it to Monitor.

- Save the changes and exit.
Now, restart your PC and you should not encounter the BIOS error message anymore, Please enter setup recovery BIOS settings.
How do I restore my BIOS?
- Restart your PC, wait for the computer’s first startup screen to appear, and repeatedly hit Del/F2/F8/F10/Esc/Tab key to enter setup.
- Once the BIOS loads and you reach the settings menu, select Reset to Default, Factory Default, or Setup Defaults.

- In the confirmation prompt, press Yes to save the changes, and your PC will automatically reboot.
Once the BIOS reset is complete, reboot your PC and you can now enter BIOS again to change any settings.
Alternatively, you can press the CTRL + ESC shortcut keys together to initiate BIOS recovery on your PC with an external keyboard as a primary input.
But if none of the above methods help, you can follow either of the two easy methods to flash the BIOS.
For any other queries on BIOS errors or if the computer won’t boot, do let us know in the comments box below.
Read our disclosure page to find out how can you help Windows Report sustain the editorial team. Read more


Improve this guide


User forum
0 messages