FIX: Please wait until current program finished uninstalling
7 min. read
Updated on
Read our disclosure page to find out how can you help Windows Report sustain the editorial team. Read more
Key notes
- This error is a never-completed uninstallation, which doesn’t allow you to uninstall any program.
- Restart your computer after you noticed the message about incomplete previous uninstallation.
- Uninstaller tools are useful when a program will not uninstall itself naturally, which happens more often than you think.
- Performing uninstallation with various assets present in Windows System will help you finish the task quickly and efficiently.
Uninstalling programs is relatively simple in Windows 10, but some potential errors are possible, and things might get complicated.
One of these errors is also a never completed uninstallation, which doesn’t allow you to uninstall any program, by telling you Please wait until the current program is finished uninstalling or being changed.
This could be a really serious issue, because you’ll eventually need to uninstall a program, and this error won’t allow you to. So, I prepared a couple of solutions, and I hope they’ll be helpful.
Not being able to uninstall your applications can be a big problem, and in this article, we’re going to address the following issues:
- Add remove programs stuck on please wait
- Several users reported that they are unable to remove applications from their PC.
- According to them, they are getting this message while using Add or remove programs app.
- Please wait until the current program is finished uninstalling AVG
- Third-party applications can often interfere with your PC, and many users reported this problem while trying to uninstall AVG antivirus.
- Please wait until the current program is finished uninstalling stuck
- In some cases, users might get stuck while trying to remove certain applications.
- This can be a big problem, but you should be able to fix it with one of our solutions.
How do I fix the Current program is finished uninstalling error?
- Restart your computer
- Use a third-party uninstaller
- Perform a System Restore
- Restart explorer.exe
- Remove/disable your antivirus
- Re-register Windows Installer
- Stop Windows Installer service
- Download Microsoft’s troubleshooter
- Try to remove the application in Safe Mode
1. Use a third-party software
There are some third-party uninstallers that are more powerful than Windows’ own uninstaller. Unfortunately, removing software from the add or remove programs panel, often leaves behind unwanted files or registry entries.
Third-party uninstallers are created specifically for this type of issue. They have integrated scanners that will find and remove any leftover files from your computer. Just select the app you want to uninstall and wait for the process to finish.
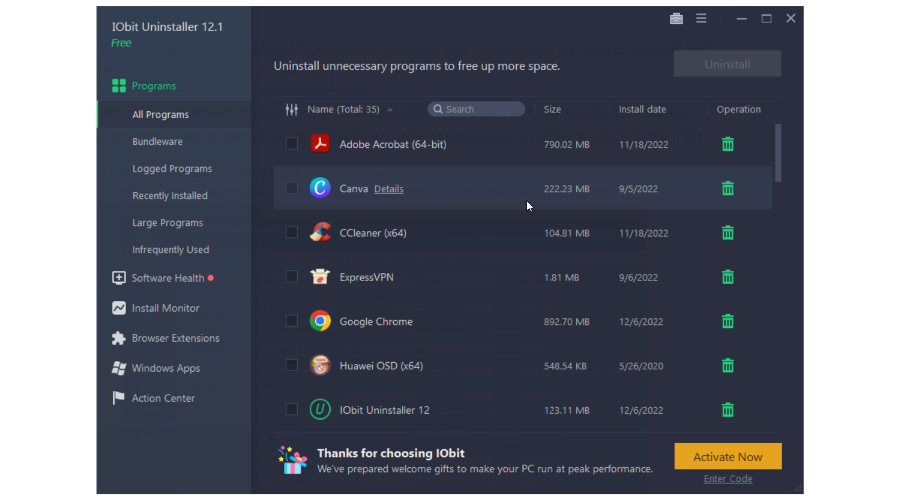
Additionally, uninstaller software such as IObit Uninstaller is equipped with forced uninstall features, which can be used to remove stubborn software that won’t be removed from the Windows settings list.
- Click the Programs icon on the left side of the IObit Uninstaller.
- Select the program you want to remove and then click on the trash icon.
- Enjoy more free space.
IObit Uninstaller displays a list of your installed apps immediately and allows you to eliminate any program from the All programs list. This is useful because it will remove any apps and their leftovers from your PC.
2. Restart your PC
If you didn’t restart your computer after you noticed the message about the incomplete previous uninstallation, you definitely should.
Sometimes Windows is unable to complete the uninstallation of the program normally, and as you probably know, you can’t uninstall two programs at the same time.
So if the uninstallation of one isn’t completed, you can’t run another process.
Restarting your computer will kill all processes, including the corrupt uninstallation, so you can try to uninstall the desired program once again when your computer boots.
But if you’re facing this issue even after you’ve restarted your computer, try one of the solutions below.
3. Perform a System Restore
If restarting and trying another uninstaller didn’t get the job done, you can try restoring your Windows 10 to the state before the problem existed.
To perform a System Restore in Windows 10, do the following:
- Go to Control Panel > Recovery.
- Go to Open System Restore.
- Select the proper restore point, and follow further on-screen instructions.
- Wait for the process to finish.
- Try to uninstall the desired program to see if the problem has been resolved.
4. Restart explorer.exe
If you’re getting Please Wait Until Current Program is Finished Uninstalling or Being Changed error message, the problem might be the Windows Explorer process.
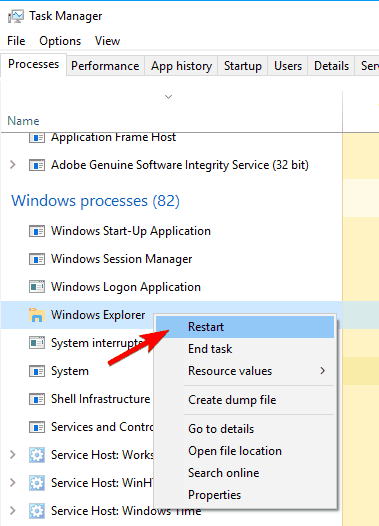
According to users, you might be able to fix the problem simply by restarting explorer.exe. To do that, follow these steps:
- Press Ctrl + Shift + Esc to open Task Manager.
- When Task Manager opens, right-click Windows Explorer and choose Restart from the menu.
After doing that, the error message should disappear. Keep in mind that this is just a workaround, so you might have to repeat this solution if the problem reappears.
5. Remove / disable your antivirus
According to users, Please Wait Until Current Program Is Finished Uninstalling or Being Changed error message can appear sometimes due to your antivirus software.
Certain antivirus apps can interfere with your operating system and cause this error to appear.
To fix the issue, it’s advised to disable your antivirus software and check if that solves the problem.
If disabling the antivirus doesn’t solve the issue, you might have to uninstall it.
The best way to remove all files associated with your antivirus is to download the dedicated removal software for your antivirus.
After using this tool the application should be completely removed.
Now you just have to install the latest version of your antivirus software or switch to a completely new antivirus solution.
Users reported issues with AVG, but keep in mind that other antivirus tools can cause this problem to appear.
6. Re-register Windows Installer
According to users, this issue can appear due to problems with the Windows Installer service.
However, you can fix this problem simply by re-registering the Windows Installer service. This is rather simple, and you can do it by following these steps:
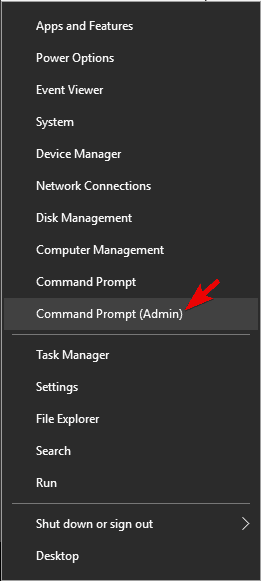
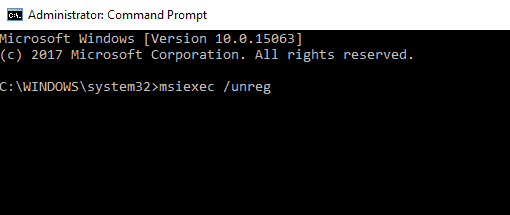
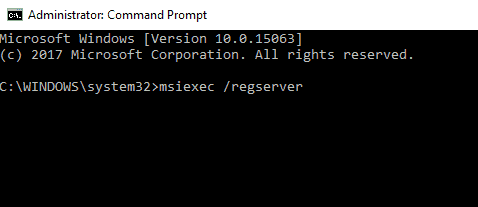
- Open Command Prompt as administrator. To do that, just press Windows Key + X to open Win + X menu and choose Command Prompt (Admin) from the list. You can also use PowerShell (Admin) if you don’t have Command Prompt available.
- When Command Prompt starts, enter the following commands:
After running these commands, check if the problem is resolved.
7. Stop Windows Installer service
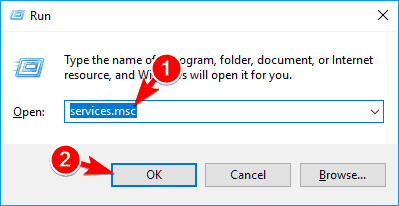
- Press Windows Key + R and enter services.msc. Now press Enter or click OK.
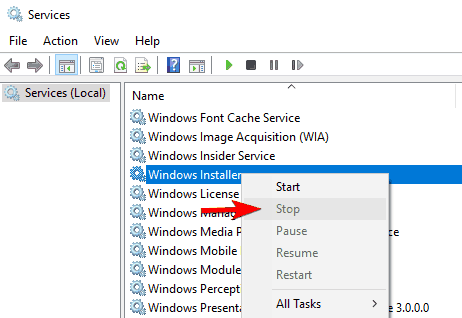
- List of available services will now appear. Locate Windows Installer service, right-click it, and choose Stop from the menu. If Stop option isn’t available, it means that Windows Installer service isn’t currently running on your PC.
If you’re getting Please Wait Until Current Program is Finished Uninstalling or Being Changed error message, you might be able to fix the problem simply by disabling the Windows Installer service.
This service starts when you try to remove a certain application, and it can prevent you from uninstalling other apps.
Some users are recommending restarting Windows Explorer after disabling the Windows Installer service, so you might want to do that.
8. Download Microsoft’s troubleshooter
Sometimes Please Wait Until Current Program is Finished Uninstalling or Being Changed error message due to corrupted registry or other third-party apps.
However, you can easily fix the problem by downloading Microsoft’s Troubleshooter.
After downloading the application, run it and it will automatically fix any installation issues that you have. Now check if the error appears again.
9. Try to remove the application in Safe Mode
Several users reported that they fixed the Please Wait Until Current Program is Finished Uninstalling or Being Changed error message simply by removing their application from Safe Mode.
To access Safe Mode, do the following:
- Open the Settings app by pressing Windows Key + I and navigate to Update & security section.
- In the left pane, select Recovery, and in the right pane click on Restart now button.
- Your PC will now restart and you’ll be presented with three options. Select Troubleshoot > Advanced options > Startup Settings. Now click on the Restart button.
- You’ll see a list of options. Select any version of Safe Mode by pressing the appropriate key on your keyboard.
After Safe Mode starts, try to uninstall the problematic application.
That’s about it, I hope these solutions helped you to uninstall your program normally. If you have any comments or questions, just reach out to the comment section below.






User forum
0 messages