How to Fix Realtek Error Code 0001 - 5 Tested Ways
This error usually indicates driver installation issues
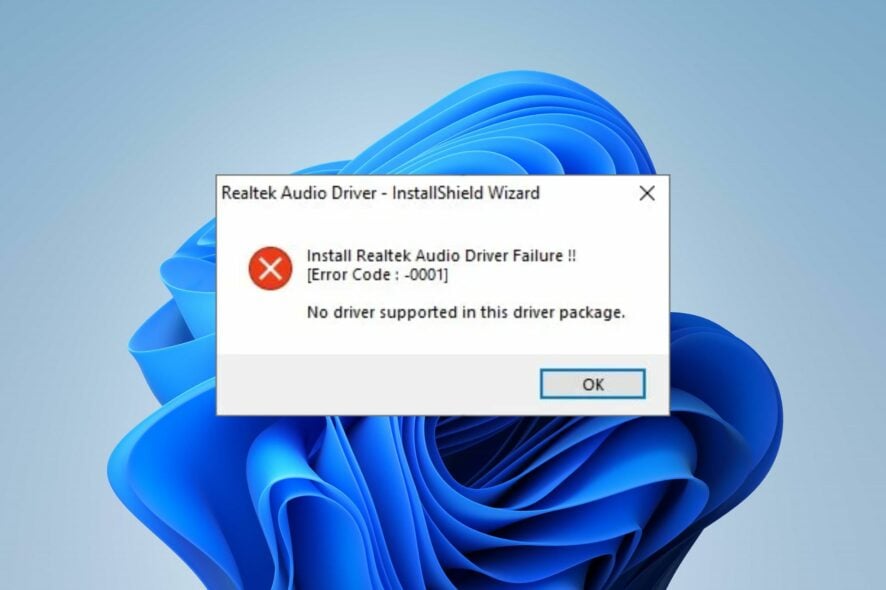
If you’re seeing the Realtek Audio Driver Failure !! [Error Code: -0001], it means your system is unable to support the driver you’re trying to install. It can prevent you from getting your Realtek audio drivers working on Windows 10 or 11.
Don’t worry, this guide will show you 5 ways to fix Realtek Error Code 0001. Whether you need to manually install the driver, address outdated drivers, or troubleshoot issues with your Realtek Audio Manager, we’ve got solutions that will help you get your sound back on track.
Plus, if you’re dealing with existing driver conflicts, we’ll cover how to safely overwrite and update them.
How do I fix Install Realtek Audio Driver Failure Error Code 0001?
1. Update Windows
- Click on the Start button and select Settings from the options.
- Click on Windows Update, then select Check for updates (Windows will automatically search and download updates if any are available for your PC).
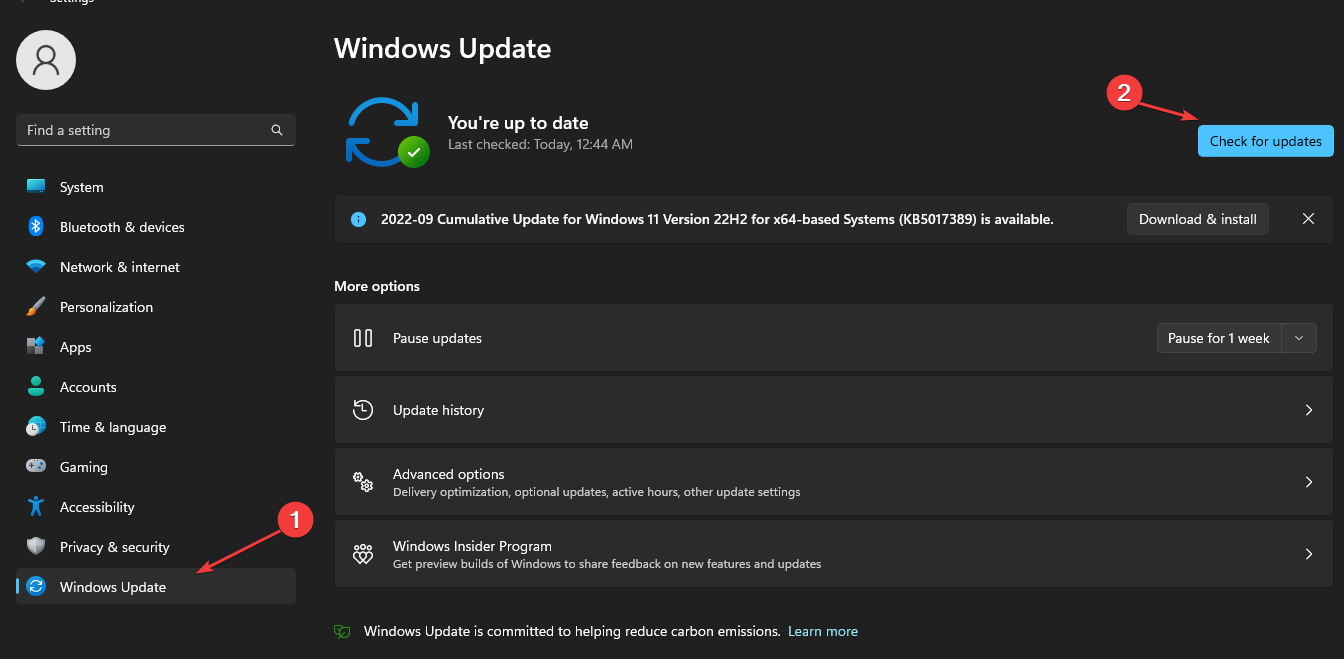
Updating your operating system will fix bugs that may cause the error code 0001. However, we recommend you read about what to do if the Windows update is not working on your device.
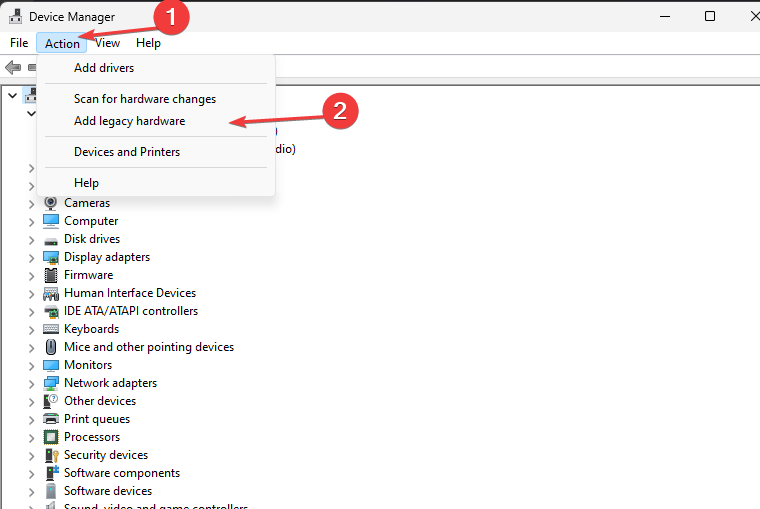
2. Add legacy hardware
- Right-click the Start button, then select the Device Manager.
- Expand the Audio inputs and Outputs to check if the Realtek audio device is missing (if the audio device is unavailable, continue with the steps below).
- Click on Action at the top bar, select the Add legacy hardware option and click OK.
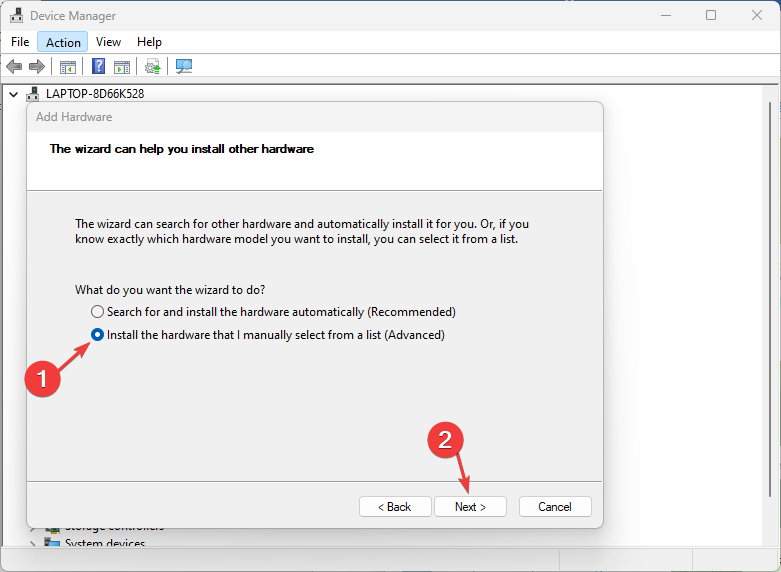
- On the Add Hardware window, select the button to Install the hardware I manually selected from a list (Advanced), then click Next.
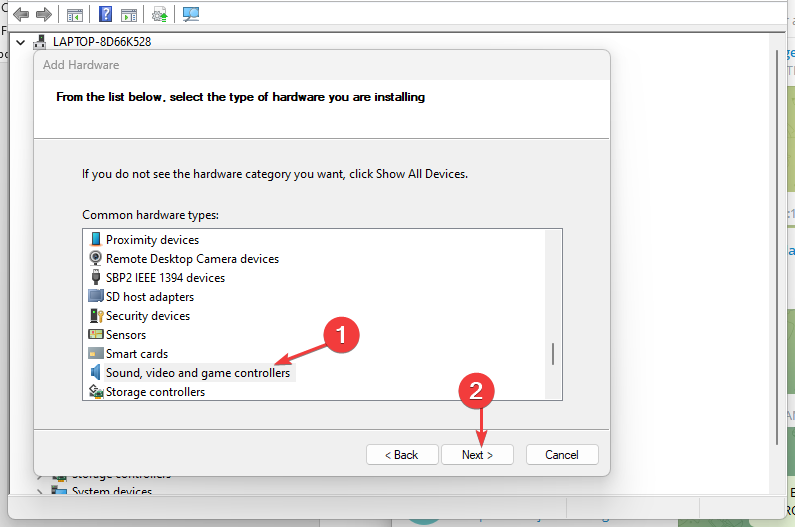
- Click the Sound, video, and game controllers options and click Next.
- Select Realtek from the Manufacturer tab on the left and select the latest version from the Model tab on the right.
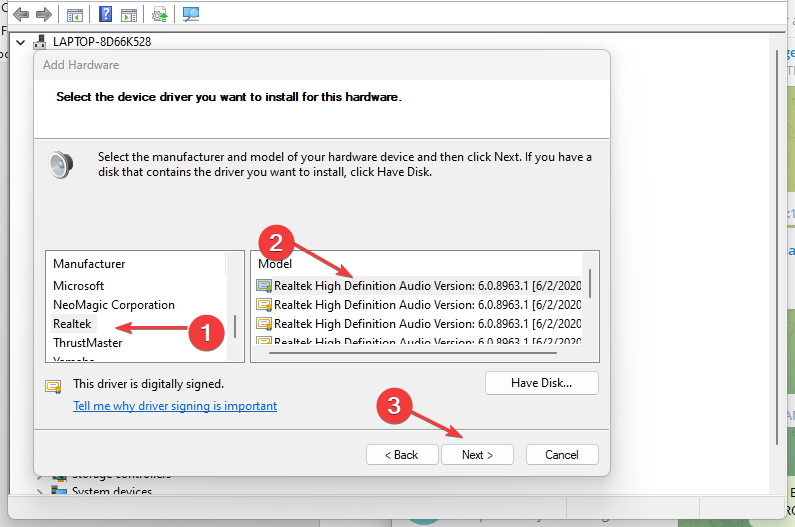
- Click Next to continue the process. (Follow the on-screen instructions to complete the hardware installation)
You can check our guide on how to fix the Realtek HD Audio Manager missing on your device.
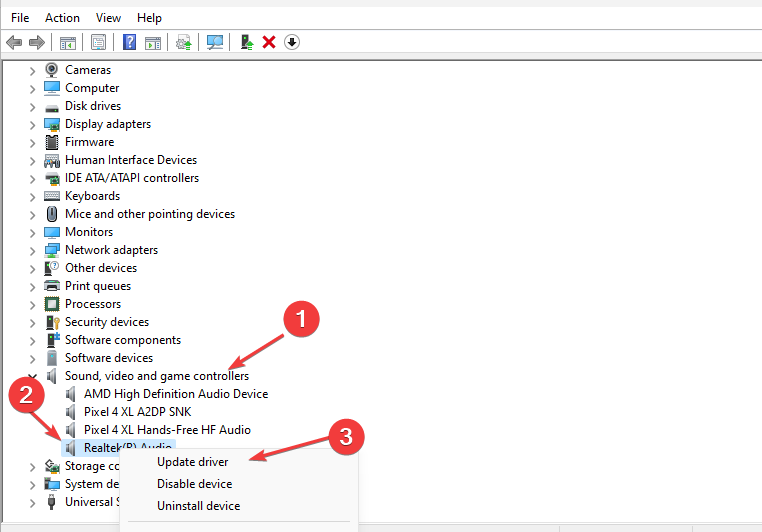
3. Uninstall and reinstall the Realtek audio device
- Right-click the Start button, then select the Device Manager.
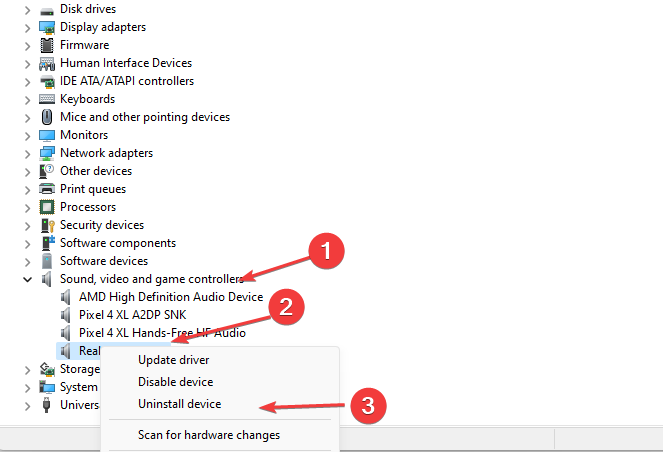
- Navigate to Sound, video, and game controllers in the Device Manager, then expand it.
- Right-click on Realtek Audio and select Uninstall device from the drop-down.
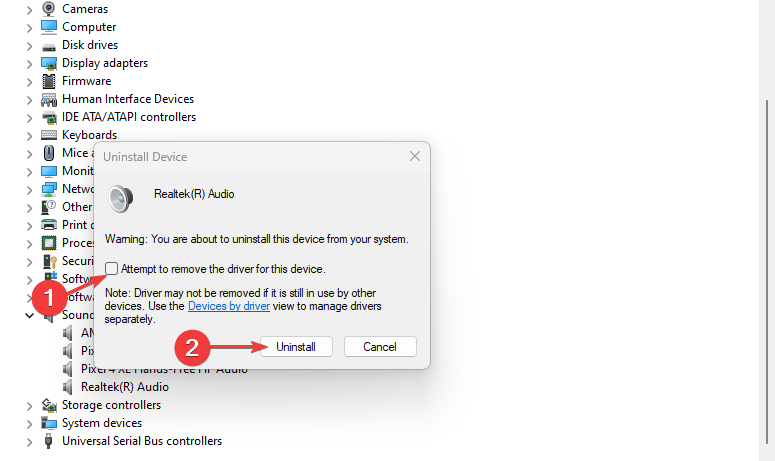
- Check the Delete the driver software box for this device option and click Uninstall.
- Reinstall the driver software.
Restart your computer after the installation is complete, then try to install the driver again to check if the error persists.
4. Update the audio driver
- Right-click the Start button and select the Device Manager.
- Expand the Sound, Video and Audio controller, select the Realtek audio, and right-click on it.
- Select Update driver from the options.
- Then select Search automatically for drivers.
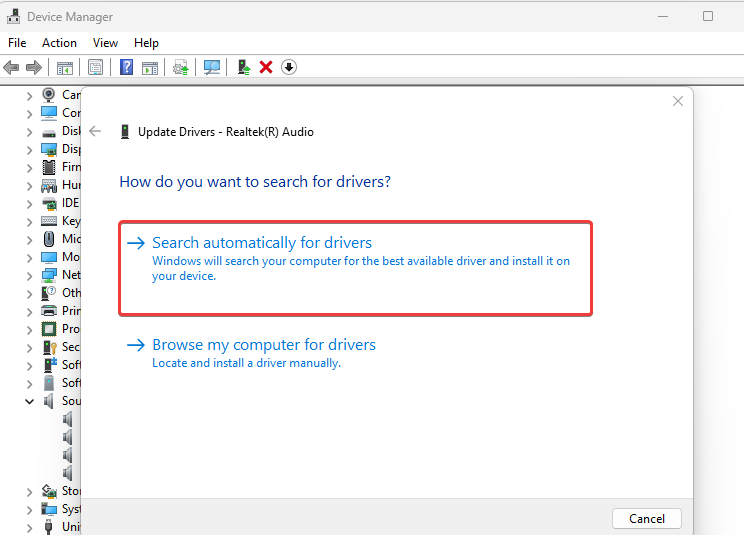
If there are any updates, the installation wizard will install them automatically. Restart your computer after the installation is complete, and Realtek Audio Driver can install Windows 11.
Users complain about having some sound issues on their computers after audio driver updates. However, we have a detailed guide on the no sound after the Realtek driver update on your PC.
Alternatively, we recommend you use PC HelpSoft Driver Updater to automatically download all the latest drivers on your device with a single click. This saves the manual effort of downloading individual drivers one at a time.
⇒ Get PC HelpSoft Driver Updater
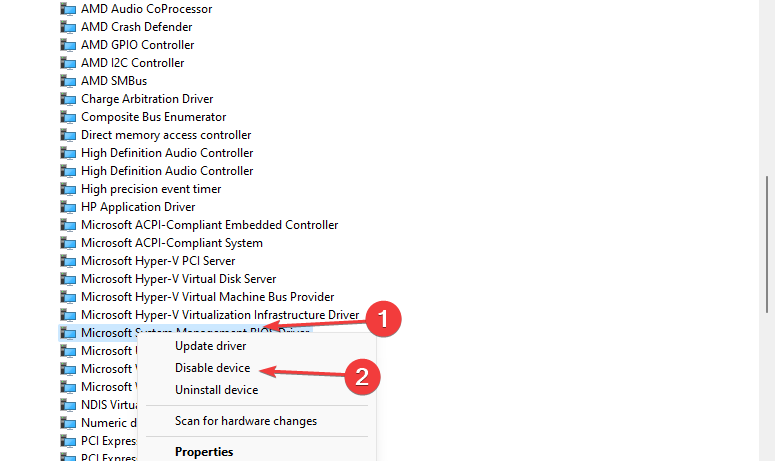
5. Disable conflicting drivers on your system
- Right-click the Start button and select the Device Manager.
- Expand the System Devices option in the Device Manager.
- Right-click on the Microsoft UAA Bus Driver for High Definition Audio driver, then select Disable from the drop-down.
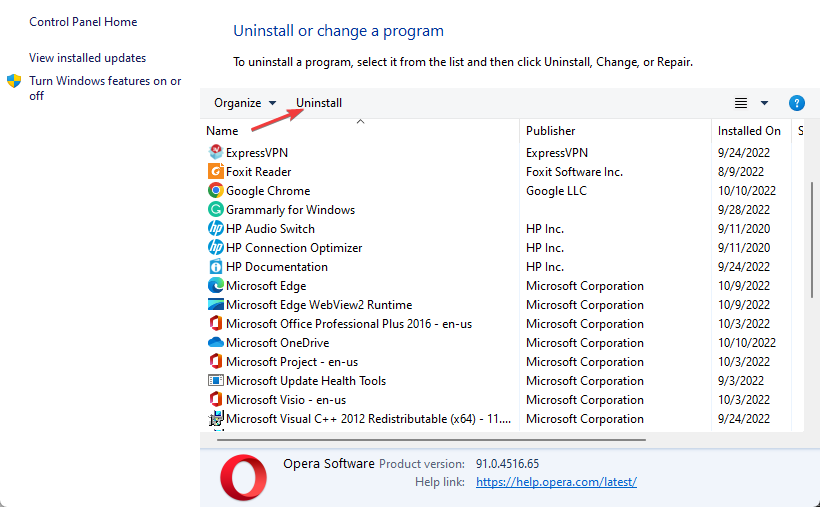
- Click on Start, type Control Panel in the search box, and press Enter.
- Select the Control Panel from the search result and go to the Uninstall a Program tab.
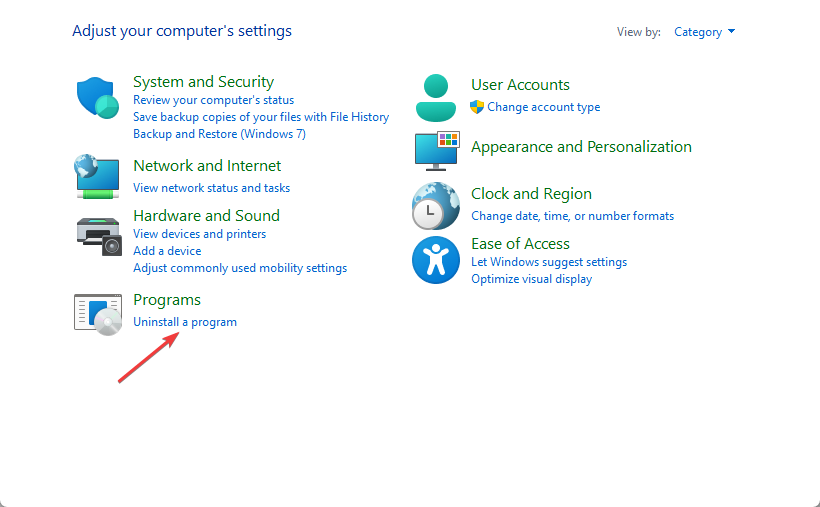
- Select Programs & Features, then find the Realtek HD audio driver entry and right-click on it.
- Click Uninstall from the drop-down.
- Go back to the Device Manager and uninstall the Microsoft UAA Bus Driver for High Definition Audio driver.

We recommend you reboot your computer to allow the changes to sync smoothly. Then, try installing the Realtek audio driver and check if the error code 0001 persists.
We hope you have been able to fix the install Realtek Audio Driver failure 0001 on your Windows 11 or Windows 10 PC.
You may be interested in downloading Realtek HD Audio Manager for Windows 11 to enjoy a better experience.
If you’re still facing issues, it’s worth checking out our guide on how to resolve the Realtek Audio Console doesn’t support for this machine error, which can often cause similar driver-related problems.
Additionally, if your Realtek HD Audio Manager isn’t opening properly, take a look at our detailed fix for Realtek HD Audio Manager won’t open.
Kindly leave your comments and suggestions in the comments section below. We’d like a response from you.
Read our disclosure page to find out how can you help Windows Report sustain the editorial team. Read more


Improve this guide


User forum
0 messages