How to Record a Zoom Meeting on a Chromebook
The cloud recording option is the most convinient for most users
3 min. read
Updated on
Read our disclosure page to find out how can you help Windows Report sustain the editorial team. Read more
Key notes
- Recording Zoom meetings can be highly beneficial for various reasons, such as archiving important discussions or sharing the meeting with absent participants.
- Before proceeding with the meeting recording, it's essential to ensure that your Zoom account settings allow for cloud Chromebook recording.

The ability to record a Zoom meeting on your Chromebook may be quite helpful, whether you’re presenting a webinar, participating in a virtual classroom, or attending an important online meeting.
This comprehensive guide takes you through the steps, explaining every detail to help you record meetings.
What do I need to record a Zoom meeting on Chromebook?
- A Chromebook with the Zoom app installed – The Zoom app is free from the Google Play Store and should be downloaded on your browser.
- A strong internet connection – A robust internet connection is necessary for the smooth recording of Zoom meetings. Zoom meetings may not be able to be recorded if your internet connection is sluggish or unstable.
- Enough storage space – You must ensure your Chromebook has enough storage capacity to accommodate the recording of your Zoom meetings because these files can be huge. The duration of the meeting and the audio and video quality should be considered.
How do I record a Zoom meeting on Chromebook?
1. Cloud record from Chromebook
- Log into your Zoom account on the browser.
- On the left pane, click Settings, then on the right, toggle on Cloud recording.
- Finally, start your Zoom meeting and hit the Record button.
- Once you are done recording, you can log into Zoom on your browser to view the recording.
2. Record from a basic Zoom account
 NOTE
NOTE
- Launch a Zoom meeting on the Chromebook Zoom app.
- Press Ctrl + Shift + Show Windows (the button with a rectangle and two lines) buttons on your keyboard.
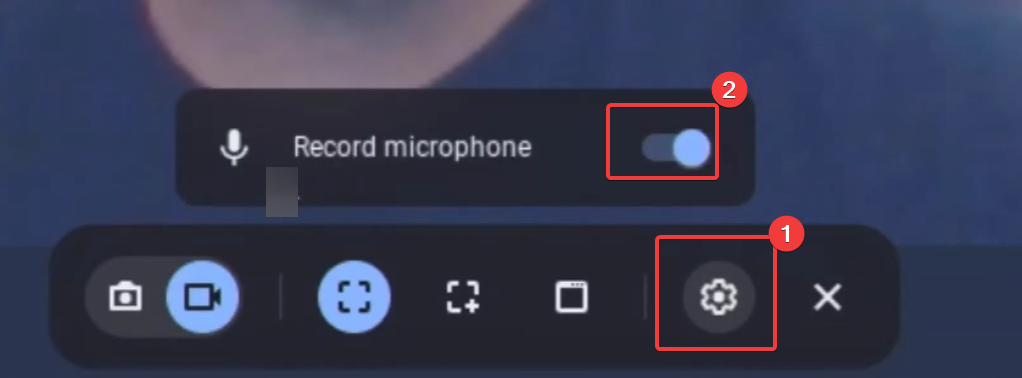
- On the toolbar at the bottom, click on the Screen record button.
- Click the full-screen button.
- Click the Settings icon and toggle on the microphone switch.
- Finally, click anywhere on your screen, and it will record anything after 3 seconds. This is a way to record a Zoom meeting using the native Chromebook record function.
The first option is great if you have a paid Zoom account. Free accounts do not give you access to record to the cloud. The first option will also guarantee that your recordings are saved in high quality.
The second option is, however, an easy free workaround to record Zoom meetings on Chromebook. It may also be used to record anything you do on your device.
If you’re also interested in finding some screen recorder apps that can perfectly capture Windows tabs on Google Chrome, then don’t hesitate to check out our Screencastify and Chrome screen recorder tutorial.
That is all we share in this guide. Do you have other ways of recording on a Chromebook? We would love to read them in the comments section.


User forum
0 messages