How to Remove Watermark in Windows 10, 7
8 min. read
Updated on
Read our disclosure page to find out how can you help Windows Report sustain the editorial team. Read more

Having a watermark on the lower right corner of your Windows 8.1 and Windows 10 every time you start your computer can get really annoying and it messes your desktop picture.
Luckily for us, there are some methods that you can do in order to completely remove your Windows 8.1 watermark and it will not take you more than a couple of minutes to do it.
Also, you will need to be aware that you cannot use the same method to remove the Microsoft Confidential watermark in Windows 8.1 and Windows 10.
This tutorial is specifically made to remove only the Windows 8.1 Preview and Windows 10 watermark.
Read the following lines below for a detailed and very quick explanation on how to remove Windows 8.1 and Windows 10 watermark.
How can I remove Windows 8.1 and Windows 10 watermark?
Windows 10 watermark can be somewhat annoying, and in this article we’ll cover the following topics:
- Windows 10 remove watermark registry – There are several ways to remove Windows 10 watermark, and the simplest one might be by modifying your registry.
- Remove watermark Windows 10 Test Mode – Many users tend to use Windows 10 Test mode, but this mode comes with the Test Mode watermark in the bottom. However, you can easily remove the watermark by using one of our solutions.
- Remove watermark windows Education, Technical preview – If you’re using Education version or a Technical preview of Windows 10, you should be able to remove the watermark by using one of our solutions.
1. Replace shell32.dll.mui and basebrd.dll.mui files
Before we start, we have to mention that this process can cause stability issues if you’re not careful.
Therefore, it’s a great idea to create a backup before trying out this solution. Since this solution requires you to replace system files, keep in mind that you’re using it at your own risk.
- You will need to download the little zip file from the link below in order to start the removing process. Download zip file here.
- Once you download the file, open it and extract its contents to your PC.
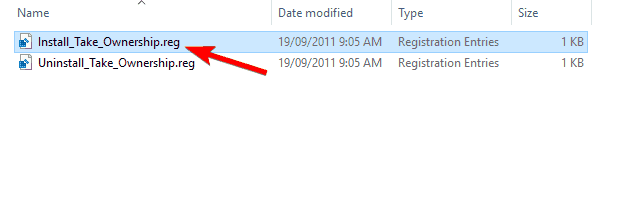
- Open the extracted directory and navigate to Take Ownership directory. Locate Install_Take_Ownership.reg file and double click it.
- Registry Editor window will pop up and you will need to left click on Yes to proceed with the operation.
Once you run this .reg file, you should be able to take ownership of any directory or file with just two clicks. In the following steps, we’ll modify some system files.
These steps can be potentially dangerous and cause stability issues, so keep in mind that you’re following these steps at your own risk. You can take ownership of the system files by doing the following:
- Navigate to C:WindowsSystem32en-US directory.
- Now in the en-US folder look for shell32.dll.mui. After you find it right click on it and select Take Ownership. Before you take ownership, it’s a good idea to make a copy of this file and save it to your Desktop in case anything goes wrong.
- After doing that, navigate to C:WindowsBrandingBaseBrden-US directory.
- Locate basebrd.dll.mui, right click it and select Take Ownership from the menu. Before you take ownership, be sure to copy the file to your Desktop and use it as a backup in case anything goes wrong.
- Now go back to the folder you extracted in Step 2 above. Navigate to Edited files folder and copy basebrd.dll.mui to C:WindowsBrandingBaseBrden-US and shell32.dll.mui to C:WindowsSystem32en-US directory.
After replacing these files, you just need to run a single command from Command Prompt. To do that, follow these steps:
- Open Command Prompt as administrator. You can do that by pressing Windows Key + X and choosing Command Prompt (Admin) from the menu. If Command Prompt isn’t available, you can use PowerShell (Admin) instead.
- When Command Prompt opens, enter mcbuilder and press the Enter key on your keyboard to run the command.
- After the mcbuilder finishes, you can close the Command Prompt window and reboot the Windows 8.1 or the Windows 10 device.
Once your PC restarts, the watermark in should be gone. Now, you need to remove take ownership feature. To do that, follow these steps:
- Navigate to Take Ownership directory and double click on Uninstall_Take_Ownership.reg.
- Left click on the Yes button when the Registry Editor window pops up.
Keep in mind that this solution can be potentially dangerous, and we’re not responsible for any stability issues and file loss that can occur after using this solution.
2018 Update: Unfortunately, the link from the beginning of this solution is no longer available. The tool cannot be downloaded, and in this case, we have searched for another tool to help you removing watermarks.
After several hours of research, we have concluded that the best alternative is Universal Watermark Disabler. Download the tool from its website and try to disable the watermark by using it.
2. Use Registry Editor
According to users, you can remove the Insider’s watermark simply by making a couple of changes in your registry. To do that, follow these steps:
- Press Windows Key + R and enter regedit. Press Enter or click OK.
- When Registry Editor opens, in the left pane navigate to ComputerHKEY_CURRENT_USERControl PanelDesktop. In the right pane double click on PaintDesktopVersion.
- Set the Value data to 0 and click on OK to save changes.
After doing that, restart your PC and the watermark should be gone.
3. Change your Ease of Access settings
According to users, you can remove your build number watermark in Windows 10 simply by changing Ease of Access settings.
This is a simple workaround that will remove background images as well as your watermark. To do that, follow these steps:
- Press Windows Key + S and enter control panel. Select Control Panel from the list of results.
- Select Ease of Access Center from the list.
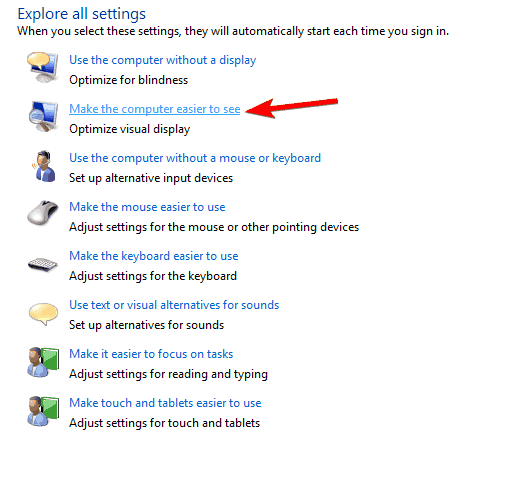
- Click on Make the computer easier to see.
- Check Remove background images (where available) and click on Apply and OK to save changes.
After doing that, your background should disappear, but the watermark will be gone as well. This is a crude workaround, but it works according to users, so feel free to try it out.
4. Use Command Prompt
If you’re using Windows 10 in Test Mode, you should see the watermark in the bottom right corner. However, there’s a way to remove test watermark in Windows 10 by using Command Prompt.
This process is rather simple and you can do it by following these steps:
- Open Command Prompt or PowerShell as administrator.
- When Command Prompt starts, enter the following commands:
- bcdedit.exe -set loadoptions ENABLE_INTEGRITY_CHECKS
- bcdedit.exe -set TESTSIGNING OFF
- Close Command Prompt and restart your PC.
Now the watermark should disappear when you enter Test Mode. Keep in mind that this solution works only for Test Mode and it won’t work in normal mode.
Use Command Prompt like a real technician with this complete guide!
5. Change your background image
According to users, you can remove Evaluation copy watermark simply by making a few changes to your background image. To do that, you need to do the following:
- Press Windows Key + R and enter %appdata%. Press Enter or click OK.
- Navigate to RoamingMicrosoftWindowsThemes directory.
- Create a copy of TranscodedWallpaper in Themes directory.
- Go to the View tab and check File name extensions.
- Open CachedFiles directory, right click the available image and choose Rename from the menu. Be sure to copy the entire name of the image. In our example it’s CachedImage_1920_1080_POS1.jpg but it will be different on your PC.
- Go back to Themes directory. Rename TranscodedWallpaper – Copy to CachedImage_1920_1080_POS1.jpg. Keep in mind that you need to use the file name that you got in Step 5. Don’t use the same file name as we used since it might not work for you.
- Copy CachedImage_1920_1080_POS1.jpg to CachedFiles directory. You should see Replace or Skip File dialog. Choose Replace the file in the destination.
Windows won’t let you change the background image? Solve the issue quickly with our guide!
After doing that, your Evaluation copy watermark should disappear completely.
As you can see, removing the Evaluation watermark is rather simple and you can do it easily with one of our solutions.
If your watermark says that you need to activate Windows, be sure to purchase Windows 10 license and activate it.
If you already have a genuine license, you might have to contact Microsoft to see how to activate your copy of Windows.
So you can follow the steps above to remove your Windows 8.1 or Windows 10 watermark and have your desktop clean as a whistle in no time.
Also, if something in the article above is unclear or it hasn’t worked for you please write us below in the comments section and we will help you as soon as possible.
READ ALSO:
- Fix: Cursor Freezes, Jumps or Disappears in Windows 8, 10
- Fix: Windows 8.1, Windows 10 Deactivated Itself After Update
- Windows 10 activation errors: Why they occur and how to fix them
- How to fix Windows 10 Pro activation error 0xc004f014
- Microsoft making it easier to reactivate Windows 10 after major hardware change


User forum
7 messages