How to Enable or Disable Storage Sense on Windows 11
Hit the storage jackpot with Storage Sense

Windows users can enable Storage Sense to automatically free up storage when the system runs low on disk space by removing these files. In this guide we’re going to show you how to use this feature, so let’s get started.
Table of contents
How do I enable or disable Storage Sense in Windows 11?
Use the Settings app
- Click the Windows button and select Settings.

- Click on the System option on the right and select Storage.

- Now toggle the Storage Sense button to On.

- The default settings will allow the feature to clean up unnecessary files when your PC runs low on disk space. To configure the Storage Sense option, click on it and select the Run Storage Sense menu.
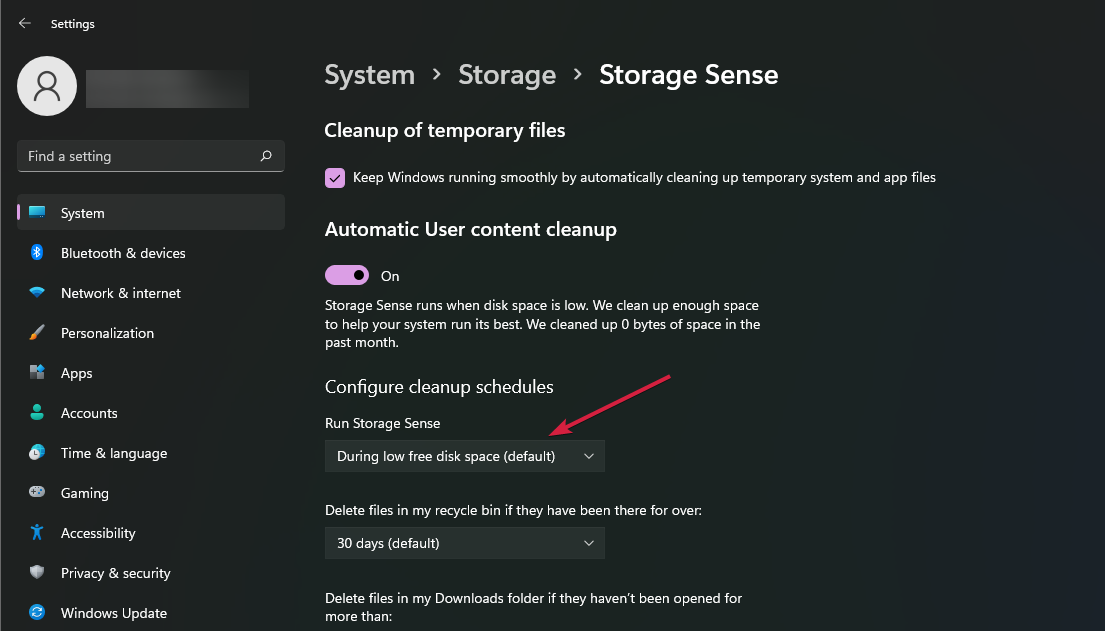
- Select the frequency for cleaning from the drop-down menu and choose from the three settings: daily, weekly, or monthly.

To disable Storage Sense, simply toggle off the feature in step 3.
If you want to prevent the deleted data from being recovered, wipe free space on the disk.
What are the pros and cons of Storage Sense on Windows 11?
Pros
- It helps you clean up your hard drive and make it more efficient by deleting temporary files and old data.
- You can set up a cleanup schedule to automatically free drive space when there is no activity on it.
- It also allows you to uninstall programs that you do not need anymore or clean up other unnecessary files left behind.
- It helps protect your privacy online by deleting temporary internet files.
Cons
- Storage Sense is restricted to internal storage only, so it won’t help in freeing up external drives.
- It can delete crucial system files without asking for permission.
- It does not delete files in the Recycle bin if they are not from the default system drive.
How can I troubleshoot possible issues with enabling/disabling Storage Sense in Windows 11?
- Storage Sense not working – This can happen if you’ve paused or not installed the latest Windows updates. Ensure to keep your system up-to-date to keep other functions working efficiently.
- PC runs very slowly after enabling Storage Sense – This can happen if you don’t have enough memory. You can run Disk Cleanup to free up space from other drives.
- Storage Sense isn’t deleting files – If your PC has been infected with malware that corrupts your settings, tools like Storage Sense that rely on these settings for proper operation can fail. You can run a virus scan and retry.
- Free space stuck – When running two concurrent cleanup utilities, there may be a conflict where free space is stuck. You can disable Storage Sense to get rid of this error.
You can analyze disk usage in more detail by checking our guide on how to use WizTree to quickly find large files and recover storage space.
Storage Sense is an automatic cleanup feature that deletes temporary files, old downloads, and Recycle Bin items to free up disk space.
Go to Settings > System > Storage, turn on Storage Sense, then click Configure cleanup schedules to customize when it runs.
No, Storage Sense only removes temporary system data and items from the Recycle Bin or Downloads folder if you choose those options.
Yes, you can trigger it anytime by going to Settings > System > Storage > Storage Sense and clicking Run Storage Sense now.
And that brings us to the end of this article. It’s easy to enable Storage Sense on Windows to free up space on your computer or device. Of course, this information could also be used by someone who wants to disable the feature altogether for whatever reason.
Regardless, the process is simple. You can also tailor the storage settings to help clean up your hard drive any way you want, based on your personal preferences and needs.
Should it fail to meet your expectations, you can find other ways to free up space on your Windows device like downloading WinDirStat.
Storage Sense is a great feature if you want to clean the C drive without formatting on Windows 11, so don’t miss it.
To keep your PC running smoothly, check out Storage Sense in Windows 10, which helps automatically clear temporary files and manage disk space efficiently while keeping your personal files safe.
Do you prefer the Storage Sense feature on or off? Let us know in the comments section below.
Read our disclosure page to find out how can you help Windows Report sustain the editorial team. Read more


Improve this guide


User forum
0 messages