FIX: The pipe is being closed
6 min. read
Updated on
Read our disclosure page to find out how can you help Windows Report sustain the editorial team. Read more
Key notes
- Windows registries seem to be the main cause of this error, so check out our many articles on the matter.
- If an error prevents you from installing new applications, then it is certainly severe, and needs to be dealt with accordingly.
- Windows 10 errors are common, and that is why our library holds articles covering most of them.
- System Errors can have a wide range of effects on your Windows system, so don’t take them lightly.
ERROR_NO_DATA is a system error and it usually comes followed by The pipe is being closed error message. This error can affect various applications, but today we’re going to show you how to fix it on Windows 10.
How do I fix The pipe is being closed error?
1. Change your registry
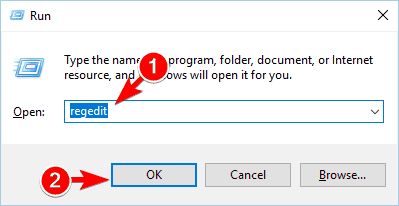
Note: To fix this issue, you need to open Registry Editor and make few changes.
Optional: Since modifying the registry can be potentially dangerous, we strongly suggest you export your registry before making any changes. By doing so, you can restore your registry to the previous state in case any problems occur.
- Exporting registry is easy, and to do that you need to click on File > Export.
- Set Export range to All and enter the desired file name.
- Navigate to the following key in the left pane:
- HKEY_LOCAL_MACHINESOFTWAREMicrosoftCryptographyOIDEncodingType 0CryptDllFindOIDInfo2.16.840.1.101.3.4.2.1!1 .
- Look for CNGAlgid entry in the right pane and set it to SHA256.
- If this value isn’t available, you’ll need to create it and set it manually.
- After making changes to the registry, restart your PC and check if the problem still persists.
Several users reported that they had issues while installing Visual Studio on their PC due to The pipe is closed error message. According to users, this problem is caused by Entrust Entelligence Security Provider for Windows.
This app makes changes to your registry and it can prevent you from installing Visual Studio. It’s worth mentioning that you might have to create the same value in the following key as well:
HKEY_LOCAL_MACHINESOFTWAREWOW6432NodeMicrosoftCryptographyOIDEncodingType 0CryptDllFindOIDInfo2.16.840.1.101.3.4.2.1!1
By doing so, these changes will be applied to the 32-bit registry branch as well.
Can’t access the Registry Editor? Check out this guide for some troubleshooting solutions.
2. Tweak the Registry automatically with the REGEDIT file
If you’re not comfortable modifying the registry on your own, you can fix the problem simply by running a single file. Download Fix_it.reg and run it, and it will automatically make the necessary changes in your registry.
Once again, we advise you to create a backup of your registry just in case anything goes wrong.
In addition, some users recommend to temporarily uninstall Entrust Entelligence Security Provider for Windows in order to fix this problem. After uninstalling this application, restart your PC and try to install Visual Studio again.
3. Disable your antivirus software
Antivirus software is important because it can protect your PC from online threats, but sometimes third-party antivirus tools can interfere with your apps.
As a result, you might encounter The pipe is being closed error message while installing apps. To fix the problem, be sure to disable all third-party antivirus tools and check if that solves the problem.
If you don’t use third-party antivirus software, disable Windows Defender temporarily and check if that helps. After disabling your antivirus, try to run the setup file again. If the installation is successful, be sure to turn your antivirus back on again.
4. Run application with administrative privileges
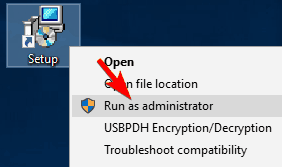
If running the application as an administrator fixes the problem, you’ll have to repeat this process every time you want to start that application.
To make this process more straightforward, you can set the application to always run with administrative rights.
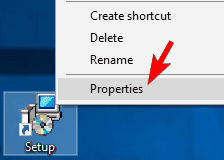
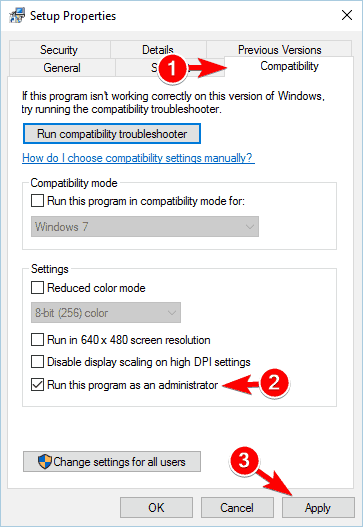
- Right-click the problematic file and choose Properties from the menu.
- Go to the Compatibility tab and check Run this program as an administrator option.
- Click Apply and OK to save changes.
After doing that, the application will always run with administrator privileges and the problem should be fixed.
5. Update the problematic application
This issue can sometimes appear if the problematic application is out of date. Outdated applications can have few bugs and glitches that can cause this error to appear.
To fix the problem, we suggest updating the problematic application to the latest version and check if that solves it. Several users reported this problem with Google Chrome, but after updating it to the latest version the issue was resolved.
If updating Chrome to the latest version doesn’t fix the problem, you might want to try installing the Beta version instead.
We have to mention that this error can affect almost any application, so to avoid it in the future try to update your installed applications as often as you can.
6. Change eConnect config file
This solution applies only to eConnect users, so if you’re not using this tool you can skip this solution entirely.
To fix the problem with eConnect, you just have to navigate to C:Program FilesMicrosoft DynamicseConnect 11.0Service and open its configuration file with Notepad or any other text editor.
After you open the config file, add receiveTimeout=”infinite” to it and restart the service.
Solution 7 – Reinstall your network card drivers
If you have problems accessing the Internet due to this error, you might want to try reinstalling your network card. To do that on Windows 10, follow these steps:
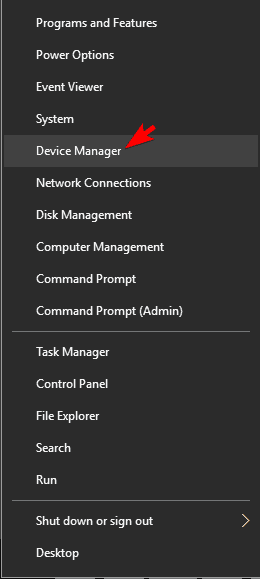
- Press Windows Key + X and choose Device Manager.
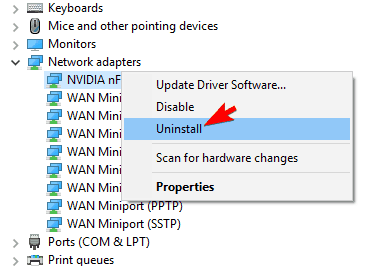
- Once Device Manager opens, locate your network card driver, right-click it and choose Uninstall from the menu.
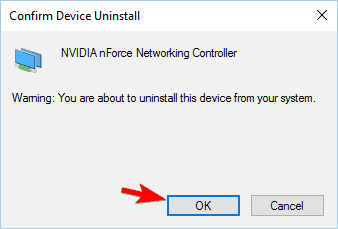
- A confirmation message will appear.
- Click on OK to remove the driver.
- After removing the driver, click on Scan for hardware changes icon.
- Windows 10 will now install the missing drivers automatically.
After you install the drivers, check if the issue still persists.
8. Perform a System Restore
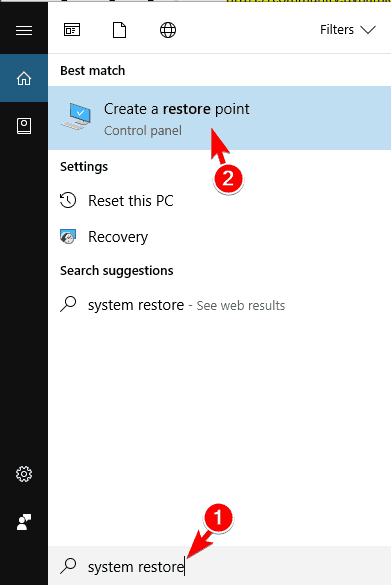
- Press Windows Key + S and enter system restore.
- Choose to Create a restore point from the menu.
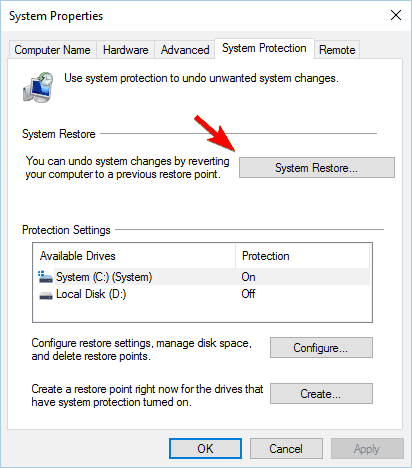
- System Properties window will appear. Click on System Restore button.
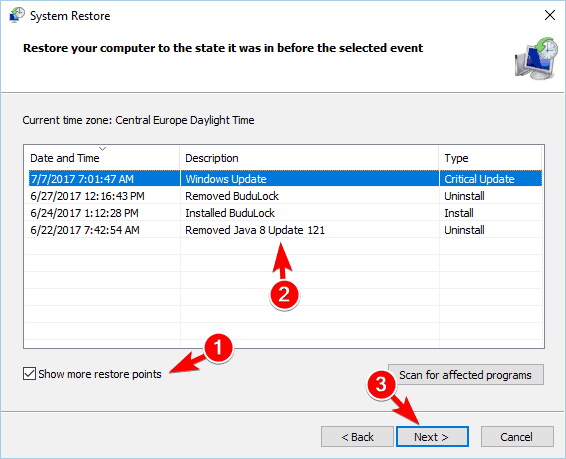
- When System Restore starts, click on Next.
- Check Show more restore points option, select the desired restore point and click on Next.
- Follow the instructions on the screen to complete the process.
If none of the previous solutions fixed your problem, you might want to try performing a System Restore. This feature allows you to fix any problem on your PC by restoring it to an earlier state.
After restoring your PC, check if the problem still persists.
ERROR NO DATA and The pipe is being closed error message can prevent you from installing certain applications, but you should be able to fix this problem by using one of our solutions.
Before you leave, visit our Error_Pipe_Busy guide which covers a similar issue.
Speaking of which, let us know which of them worked best for you by leaving your feedback in the comments section below.






User forum
0 messages