Fix The Sims 4 stuttering issues on Windows 10/11
7 min. read
Updated on
Read our disclosure page to find out how can you help Windows Report sustain the editorial team. Read more
Key notes
- Many users reported Sims 4 stuttering, and this mostly happens when panning the camera.
- This can be a classic driver problem so try to update them by using a dedicated tool.
- Disabling the online features could also bring an end to this issue so try it out.
- You can try to check the game files' integrity from the options in the Origin client.
The Sims 4 is one of the most popular games in recent years. Nonetheless, the game is, like its predecessor, plagued with lots of bugs and glitches.
Seemingly, the optimization of the game is on the short side with The Sims 4. One of the commonly reported problems concerns stuttering while in the game, especially when panning the camera.
We noted the viable solutions and compiled the list below to help you fix this problem and enjoy the game.
How can I fix the stuttering in The Sims 4?
- Meet the requirements
- Check the drivers
- Disable online features
- Check the game’s integrity
- Switch to the windowed mode or 32-bit version
- Enforce the dedicated graphics and disable Vsync
- Remove mods
- Reinstall the game and Origin
1. Meet the requirements
Let’s start with the obvious one. If you have a new PC or laptop, there’s a high probability you have a configuration which can run The Sims 4.
But we need to cover that ground in order to move to more delicate steps. In addition, there’s a possibility that you have an older configuration.
Nonetheless, here are the minimum system requirements for The Sims 4:
- CPU: Intel Core 2 Duo E4300 or AMD Athlon 64 X2 4000+ (2.0 GHz Dual-Core required if using integrated graphics)
- RAM: 4 GB
- GPU: NVIDIA GeForce 6600 or ATI Radeon X1300 or Intel GMA X4500
- DIRECTX: DirectX 9.0, 10 and 11 compatible
- HDD: 16 GB
- Internet connection for product activation
2. Check the drivers
Drivers or in particular GPU driver are essential. And the most complex thing to deal with on Windows 10.
Namely, you may as well have the top-tier GPU, but without the fitting drivers, gaming becomes a glitchy ride. Windows 10 will provide the generic copy of display drivers, but they won’t suffice most of the time.
Not for gaming or legacy cards, at least. What you’ll need to do is to download the proper driver from the official site, provided by the OEM.
Follow one of these links and find yourself a suitable up-to-date driver:
In addition, make sure to install the driver cleanly by deleting the previous display driver from the device. After you’ve dealt with this step, try out the game. If the issue is persistent, continue through the list.
Update the drivers automatically
Of course, you can visit the manufacturer and get the correct drivers but it’s not that simple and it can take some time that you probably don’t have.
The easiest way is to use a dedicated updating tool that will scan your sistem in a couple of seconds, find all the right drivers for your system, not only the GPU’s and update them automatically.
- Download and install the Outbyte Driver Updater app.
- Launch the software and wait for the app to detect all incompatible drivers.
- Now, it will show you a list of all faulty drivers to select the ones to Update or Ignore.
- Click on Update & Apply Selected to download and install the newest versions.
- Restart your PC to ensure the applied changes.

OutByte
Keep your GPU in a flawless state without worrying about possible driver issues.3. Disable online features
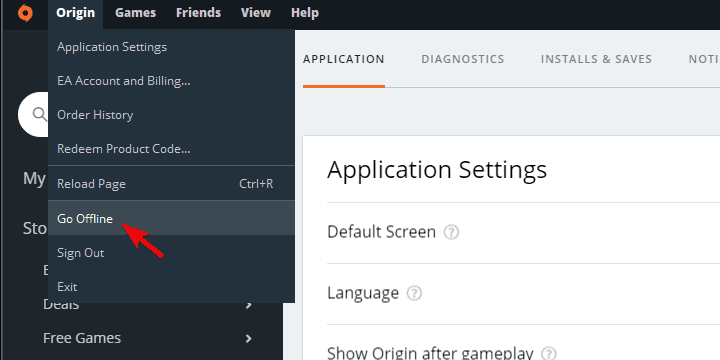
- Open Origin.
- Click on Origin and start the game Offline mode.
- In addition, you can click Origin and open Application Settings.
- Under the Diagnostics tab, disable Share hardware info.
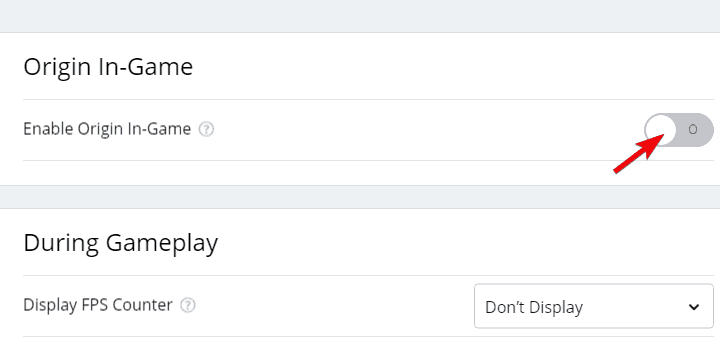
- Under the More, go to Origin In-Game, and toggle off the Enable Origin In-Game.
Even though The Sims franchise was always about the single-player experience, The Sims 4 was partly produced for the multiplayer.
Since this concept fell apart, the online features of the game are now more of a burden than an advantage. Except, if you’re part of the modding community and running the custom multiplayer mod.
Long story short, disable online features before you start playing the game. This resolved the problem for some users. Just open the game, access the Game settings, and disable Online content.
In addition, disable online features in Origin, too. Follow the steps above to get to the desired result.
4. Check the game’s integrity
- Open the Origin client.
- Open My Game Library.
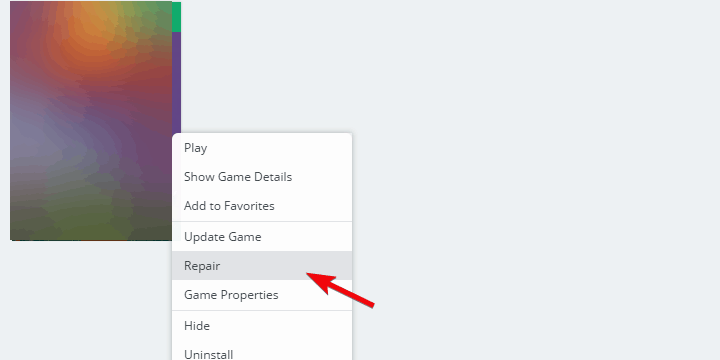
- Right-click on The Sims 4 and choose Repair from the contextual menu.
- Wait until the tool verifies the integrity of the game files and close Origin.
- Restart your PC and run the game.
Since The Sims 4 is a pretty customization-open game, there’s a chance that something went wrong with the installation files.
The issue here is that you can’t be sure whether that’s the case. However, instead of reinstallation as the first step, you can utilize the tool in the Origin desktop client.
This tool verifies the integrity of the game files. If something is wrong with any of those, it downloads and replaces the damaged files.
5. Switch to the windowed mode or 32-bit version
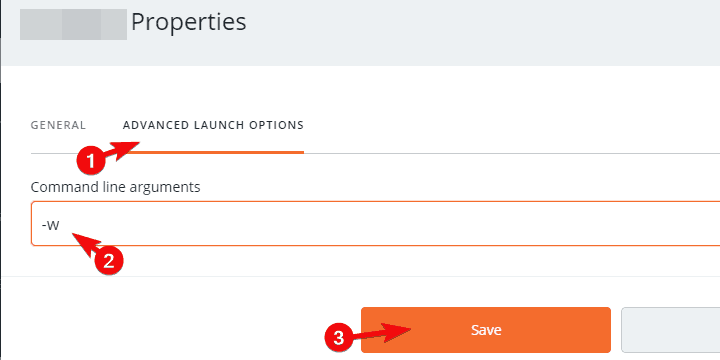
- Open Origin and My Game Library.
- Right-click on The Sims 4 and open Game Properties.
- Choose the Advanced Launch Options tab.
- Select The Sims 4 32 Bit from the drop-down menu.
- Add -w to the command-line and confirm changes.
- Start the game and look for improvements.
There are dozens of threads online about this problem. Where some users succeeded in resolving the stuttering, others failed.
One of the most common solutions includes tweaking advanced launch options. Some users reduced the stuttering by running the game in windowed mode.
Others were more successful with running the game in the 32-bit version. Both can be applied through the Origin desktop client.
Perform the steps above to run The Sims 4 in windowed mode and get rid of the stuttering of the image.
6. Enforce the dedicated graphics and disable Vsync
If you, by any chance, have a dual-GPU configuration, we suggest enforcing The Sims 4 on the dedicated graphics.
Even though the dedicated GPU should, by default, take over from the integrated graphics when the game starts, this transition causes glitches.
Obviously, the loading of the game is disrupted, and stuttering is a possibility.
You can enforce the dedicated Nvidia or ATI graphic in two ways. The first option is applicable through the GPU’s control panel. There you should also globally disable Vsync.
The second is right-clicking on the game’s shortcut and selecting the high-performance graphics from the contextual menu. Just select Run with graphics processor and choose the dedicated card out of the two.
7. Remove mods
- Close the game and the Origins client and restart your PC.
- Navigate to the following folder:
C:\Users\Your Username\Documents\Electronic Arts\Sims4 - Cut the Mods folder and paste it on the desktop.
- Start the game and check whether the white screen occurs.
Mods are a vital part of The Sims 4 experience. However, some of them might cause issues with the game’s performance.
They also tend to get corrupt but unfortunately, they can’t be repaired with the Origin’s built-in tool.
And if you have lots of them installed, chances are you’ll have a hard time determining which individual mod is behind the reoccurring stutters.
Therefore, we suggest removing temporarily all mods to determine whether they’re inflicting stutters in the first place.
If that’s indeed the case, you can use the community-built Mode Conflict Detector to determine the culprit and use the steps above to disable the mods temporarily.
8. Reinstall the game and Origin
Finally, try reinstalling both the game and the Origin client and hope for the best. We can confirm, based on the vast presence of this subject online, that this is a big issue.
The game has its share of bugs, just like The Sims 3 was. However, since the majority still can play the game without stuttering, the small part of the problem might be on your side.
Make sure you follow the troubleshooting instructions we provided and, if the game is still suffering from constant stutters, contact the developer on the official forum.
If you have problems starting the game, you can also read our step-by-step guide on how to fix The Sims 4 if it doesn’t launch.
With that said, we can conclude this article and you found here the Sims 4 stuttering fix that you were looking for.
If you have any alternative solutions or questions regarding the stuttering in The Sims 4, do tell in the comments section below.




User forum
0 messages