
Unable to Extend Volume in Hyper-V? 6 Fixes That Work


 6 min. read
  Published on

Unable to extend volume in Hyper-V? This usually happens when the virtual disk has not been expanded, Windows cannot see the new space, or another partition blocks the unallocated space.
Try the fixes below in order. Back up important VM data before changing virtual disks or partitions.
How do I fix unable to extend volume in Hyper-V?
1. Expand the virtual hard disk in Hyper-V
If Windows shows no unallocated space, increase the virtual disk size first.
- Open Hyper-V Manager.
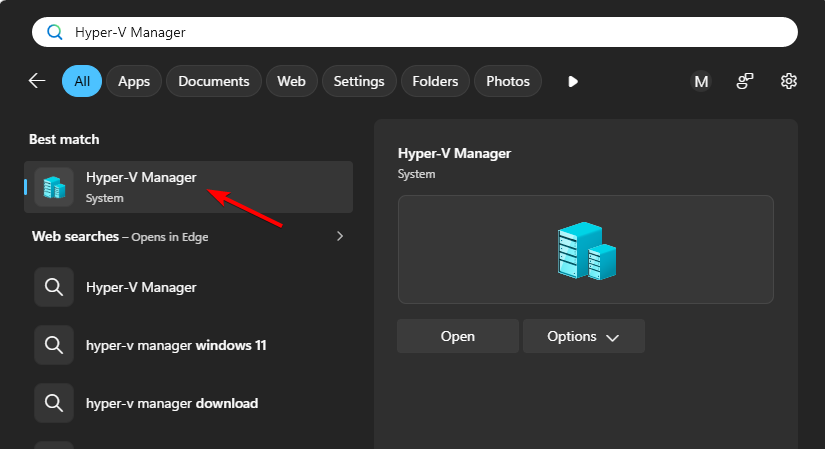
- Right-click the affected virtual machine and select Settings.
- Select the virtual hard disk under SCSI Controller or IDE Controller.
- Click Edit.
- Select Expand and click Next.
- Enter the new disk size.
- Click Next, then Finish.
- Start the virtual machine again if you shut it down.
If you do not know which controller the disk uses, shut down the VM before resizing it. Microsoft notes that Hyper-V can resize disks on a SCSI chain while the VM runs, while IDE-attached disks require the VM to remain offline.
After expanding the virtual disk, you still need to extend the Windows partition inside the VM.
2. Rescan the disk and extend the volume
Windows may not immediately detect the additional Hyper-V disk capacity.
- Sign in to the virtual machine.
- Press Windows + R.
- Type diskmgmt.msc and press Enter.
- Click Action.
- Select Rescan Disks.
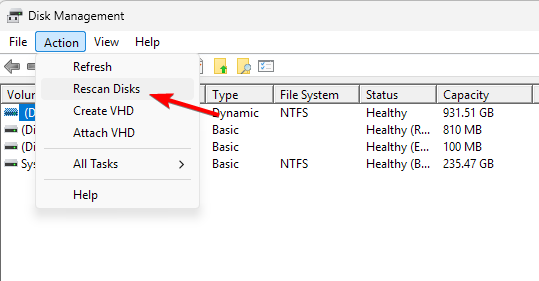
- Find the disk you expanded.
- Confirm that Unallocated space appears after the target partition.
- Right-click the partition you want to enlarge.
- Select Extend Volume.

- Follow the wizard and click Finish.
Windows Disk Management can extend a basic volume only when suitable unallocated space exists immediately after the partition.
If Extend Volume remains grayed out, check the partition layout next.
3. Make sure the unallocated space is next to the volume
- Open Disk Management.
- Locate the volume you want to extend.
- Check what appears immediately to its right.
- Look for a Recovery or another partition between the volume and the unallocated space.
- Back up important data before changing the partition layout.
- Move the blocking partition with a partition management tool, or remove and recreate it when appropriate.
- Place the unallocated space directly after the target partition.
- Right-click the target volume and select Extend Volume.
Microsoft confirms that Disk Management requires contiguous unallocated space directly to the right of the volume.
Do not delete EFI, system, or recovery partitions unless you know exactly how the VM boots and recovers.
4. Remove Hyper-V checkpoints before expanding the disk
Existing checkpoints can prevent Hyper-V from editing or expanding a virtual disk.
- Open Hyper-V Manager.
- Select the affected virtual machine.
- Check the Checkpoints section.
- Right-click an unneeded checkpoint.
- Select Delete.
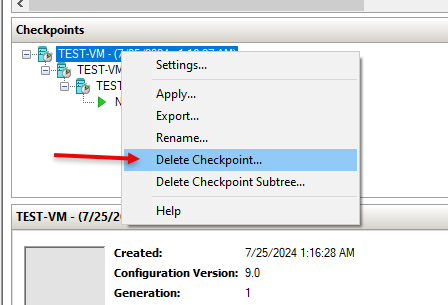
- Delete additional checkpoints if necessary.
- Wait for Hyper-V to finish merging the checkpoint files.
- Shut down the VM.
- Try expanding the virtual disk again.
Hyper-V stores checkpoint changes in AVHDX differencing disks. Deleting a checkpoint through Hyper-V Manager merges those changes back into the disk chain.
Do not manually delete .avhdx files from File Explorer. Doing so can break the virtual disk chain and prevent the VM from starting.
5. Check whether the disk uses MBR or GPT
An MBR disk can also prevent you from using additional capacity when the virtual disk grows beyond 2 TB.
- Open Disk Management inside the VM.
- Right-click the disk label, such as Disk 0.
- Select Properties.
- Open the Volumes tab.
- Check Partition style.

- Confirm whether it shows Master Boot Record (MBR) or GUID Partition Table (GPT).
If the virtual disk exceeds 2 TB, use GPT to access capacity beyond the MBR limit. Microsoft lists GPT as a requirement when extending disks larger than 2 TB.
For a data disk, back up the files before converting or recreating the disk. For a Windows system disk, use a supported conversion method rather than deleting partitions manually.
6. Extend the Hyper-V disk with PowerShell
You can also resize the VHDX from PowerShell on the Hyper-V host.
- Run PowerShell as administrator.
- Enter
Resize-VHD -Path "D:\VMs\Server01\Virtual Hard Disks\Disk01.vhdx" -SizeBytes 200GB - Replace the path with your VHDX location and set the size you want.
- Sign in to the virtual machine after resizing the VHDX.
- Run the following to get the max size:
$size = Get-PartitionSupportedSize -DriveLetter C - Run the following to extend C: to the available maximum:
Resize-Partition -DriveLetter C -Size $size.SizeMax
Microsoft’s Resize-VHD command changes the maximum size of VHD and VHDX files. The partition commands then extend the Windows volume to use the available space.
Why is Extend Volume grayed out in a Hyper-V VM?
The Extend Volume option usually appears grayed out when Windows cannot find usable unallocated space directly after the selected partition.
Other common causes include:
- The VHDX has not been expanded in Hyper-V.
- Windows has not rescanned the virtual disk.
- A Recovery partition sits between the volume and free space.
- Hyper-V checkpoints block virtual disk editing.
- The disk still uses MBR and has reached its size limit.
- The partition uses an unsupported file system.
Windows supports extending NTFS and ReFS volumes through its standard disk management tools.
When you are unable to extend a volume in Hyper-V, first confirm that the VHD or VHDX has enough capacity. If you’re still setting up virtualization, see how to install Hyper-V or enable Hyper-V on Home.
After resizing the disk, rescan it inside the VM and make sure the unallocated space sits directly after the partition. If you run into other virtualization problems, you can also troubleshoot high CPU usage or learn how to create virtual switches.
FAQs
Can I extend a Hyper-V disk without shutting down the VM?
Yes, in some configurations. Hyper-V supports online resizing when the virtual disk connects through a supported SCSI chain. Shut down the VM if the disk uses IDE or if Hyper-V refuses the resize operation.
Why did my Hyper-V disk get bigger but C: did not?
Expanding the VHDX increases the virtual disk capacity, but it does not automatically enlarge the Windows partition. Open Disk Management inside the VM, rescan the disk, and extend C: into the new unallocated space.
Why can’t I extend C: even though I have unallocated space?
The unallocated space must sit immediately to the right of C:. A Recovery or another partition between C: and the free space prevents Disk Management from extending the volume.
Can Hyper-V checkpoints prevent disk expansion?
Yes. Active or unmerged checkpoint files can make the disk expansion option unavailable. Delete or merge the checkpoints through Hyper-V before trying again.

Read our disclosure page to find out how can you help Windows Report sustain the editorial team. Read more



Improve this guide

User forum
0 messages