How to create Hyper-V virtual switch [Step-by-step guide]
Previously we have shown you how to add network adapter to Windows 10 Hyper-V virtual machine. In this post, we look at how to create Hyper-V Virtual Switch in Windows virtual machines.
Knowing how to create and manage Hyper-V virtual switches is a critical aspect of managing and maintaining your Hyper-V virtual machines. In this article, we will show you all the methods to configure and deploy Hyper-V virtual switches.
Follow the steps in this article to create Hyper-V virtual switches on Windows computers. There are two ways to do this, and we have listed both of them.
Steps to create Hyper-V virtual switch
1. Create virtual switch using Hyper-V Manager
- Creating virtual switches using the Hyper-V virtual manager is easy. Here is how to configure it.
- Open Hyper-V Manager on your Windows computer.
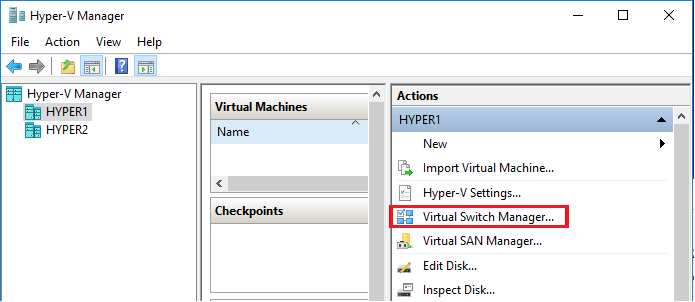
- From the right pane click on “Virtual Switch Manager” under Actions. It will open the Virtual Switch Manager wizard.
- In the wizard, choose the “New virtual network switch” option.
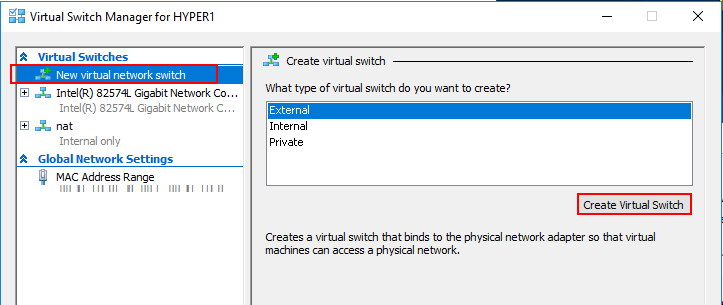
- Next, select the type of virtual switch you want to create. There are three types of the virtual switch which I have explained below.
Private Virtual Switch – This switch only allows communications between the connected VMs that are connected to the private virtual switch.
Internal Virtual Switch – This switch only allows communication between virtual adapter connected to connected Virtual Machines and the operating system.
External Virtual Switch – This switch allows communication outside the host. This is due to the switch being connected to a physical network adapter installed in the Hyper-V. - Select you prefered type of virtual switch and click on Create Virtual Switch button.
- Name your new virtual switch.
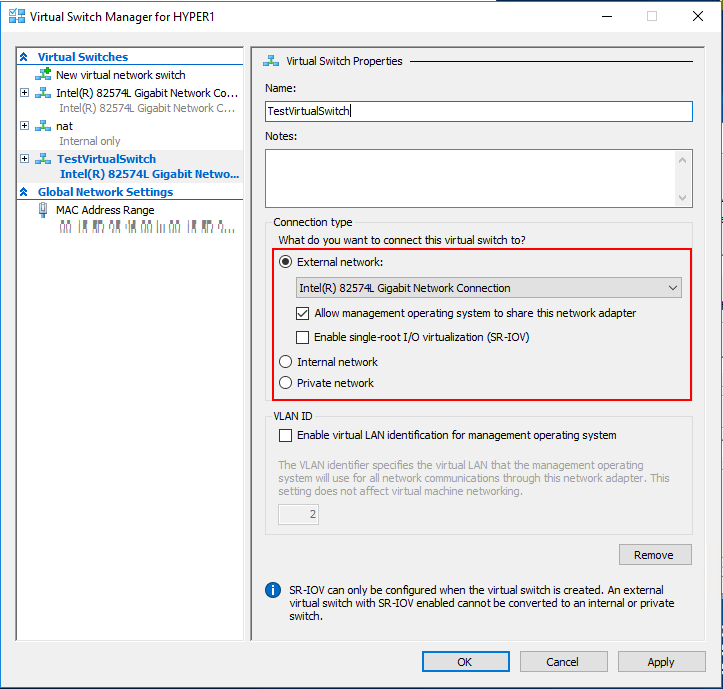
- For Connection Type, select “External Network” and select the network connection from the drop-down menu.
- Check “Allow management operating system to share this network adapter” box. These options depend on the virtual switch type selected by the user.
- There is an option to enable “VLAN ID” for LAN identification. Leave it unchecked, if you don’t know what it does.
- Once done, click on Apply and OK to complete new virtual switch configuration.
Before setting up virtual switches, make sure Hyper-V is installed and running properly. You can follow this complete step by step tutorial on how to install Hyper-V on Windows Home.
How to fix the Hyper-V Error applying hard drive changes
2. Create Hyper-V virtual switch using PowerShell

- One advantage of using PowerShell to create a virtual switch is the automation it offers in the Hyper-V environment. It also expedites the process by creating virtuals switch with a few commands.
- Right-click on “Start” and select Windows PowerShell (admin).
- In the PowerShell window, enter the following command and hit enter:
- This command will show network adapters. Take note of the names.
Get-NetAdarpte - External Switch – The following command creates a new External switch. Make sure to replace switch name and network adapter name accordingly.
New-VMSwitch -name < switch name > -NetAdapterName < network adapter name > -AllowManagementOS $true - Internal Switch – The following command creates a new Internal Switch. Make sure to replace the switch name and network adapter name accordingly.
New-VMSwitch -name < switch name > -SwitchType Internal - Private Switch – The following command create a new Private Switch. Make sure to change the switch name and network adapter name accordingly.
New-VMSwitch -name < switch name > -SwitchType Private - Execute any one of the above commands to create Hyper-V virtual switch.
Conclusion
These are the two ways to create Hyper-V virtual switch in Windows virtual environment. Do let us know your thoughts in the comments below.
RELATED STORIES YOU MAY LIKE:
Read our disclosure page to find out how can you help Windows Report sustain the editorial team. Read more


Improve this guide


User forum
0 messages