How to Add a Secondary/Multiple IP Address in Windows 11
You can't use multiple IPs in a DHCP configuration

Yes, you can add a secondary IP address in Windows 11 and it’s very useful when you are hosting various SSL websites. Having multiple IP addresses also helps when you have to send bulk emails in a short duration, or to avoid being blacklisted under the spamming filter.
How can I add secondary & multiple IP addresses in Windows 11?
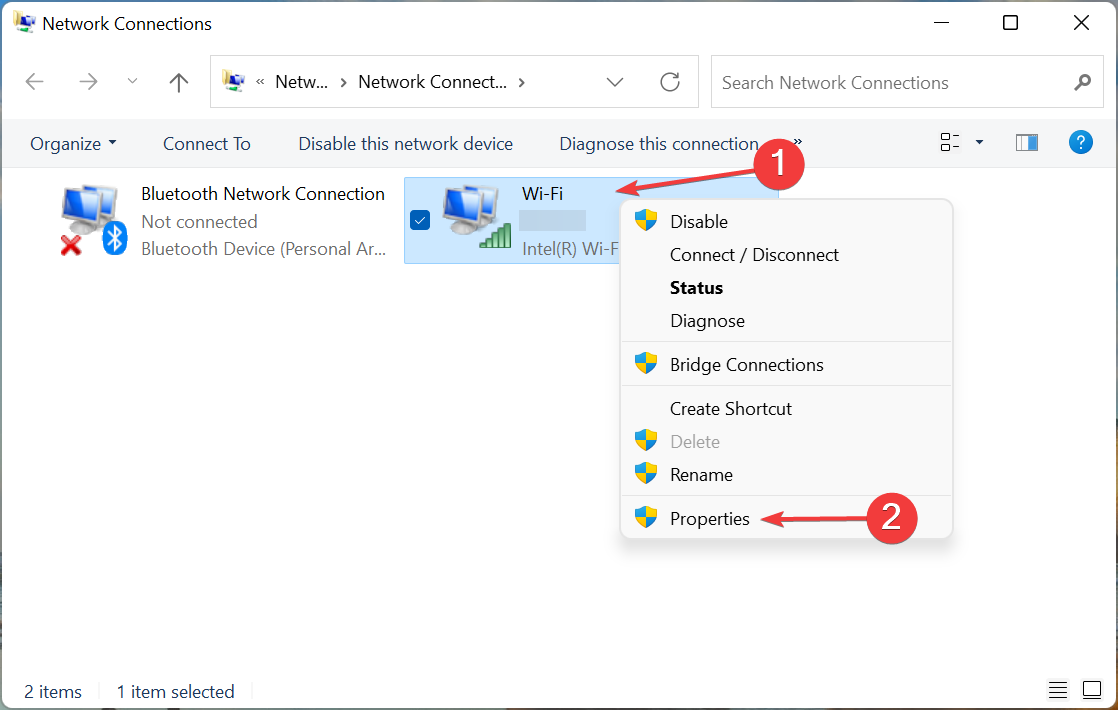
1. Via Network Connections
- Press Windows + R to launch the Run command, enter ncpa.cpl in the text field, and either click OK or hit Enter to launch the Network Connections window.

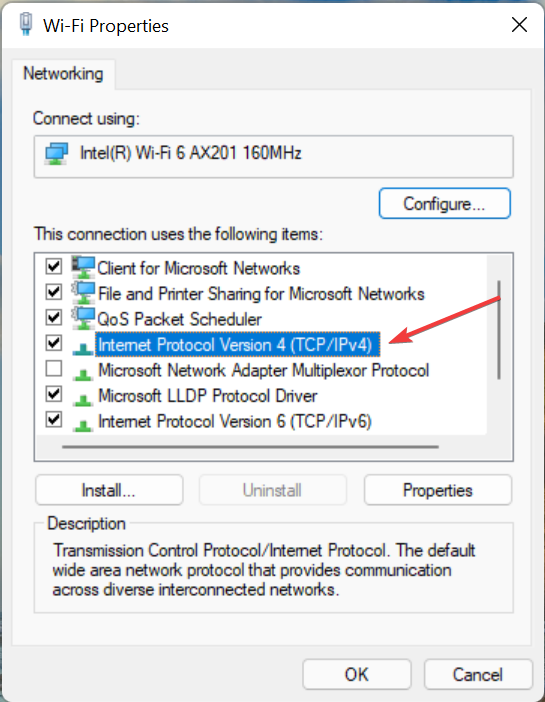
- Now, right-click on the relevant network adapter, and select Properties from the context menu.

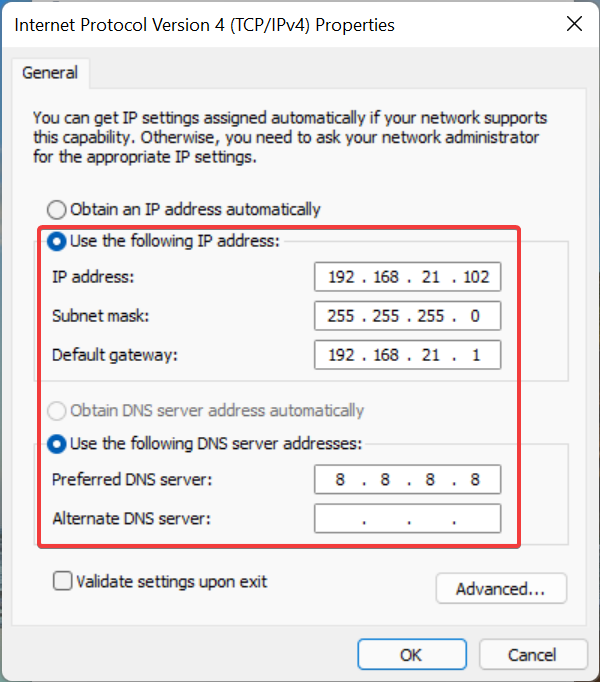
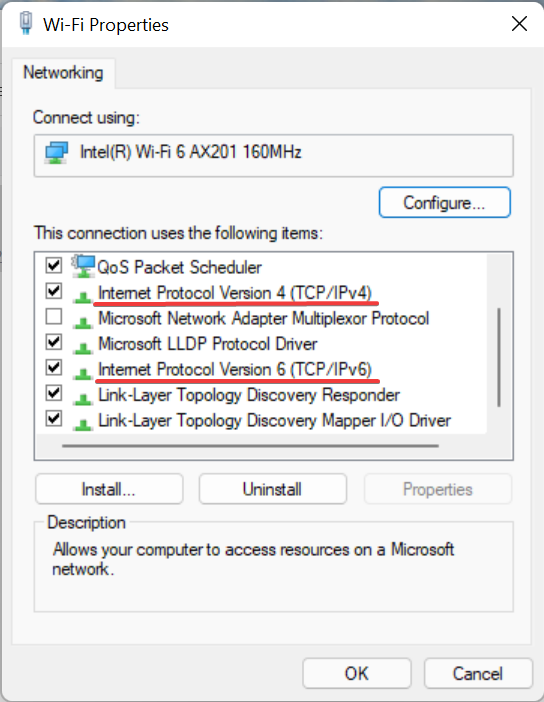
- Either double-click on the Internet Protocol Version 4 (TCP/IPv4) entry here or select it and click on Properties.

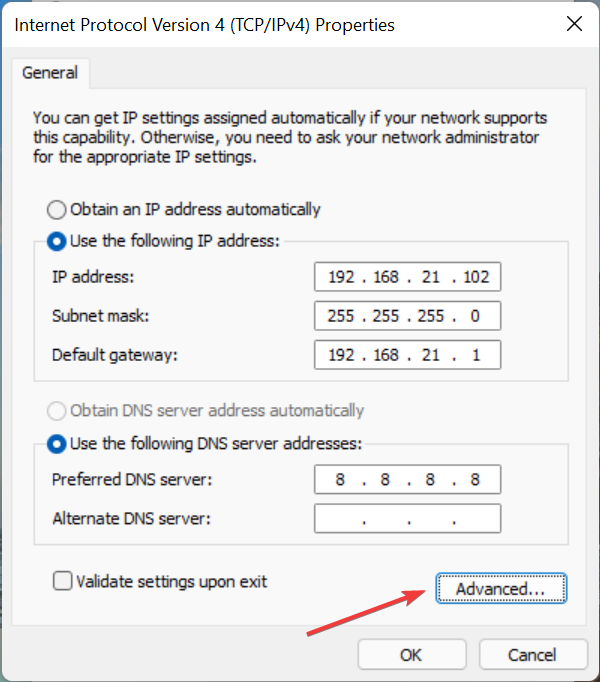
- Now, select the Use the following IP address and Use the following DNS server addresses options and enter the desired addresses in the fields under both.

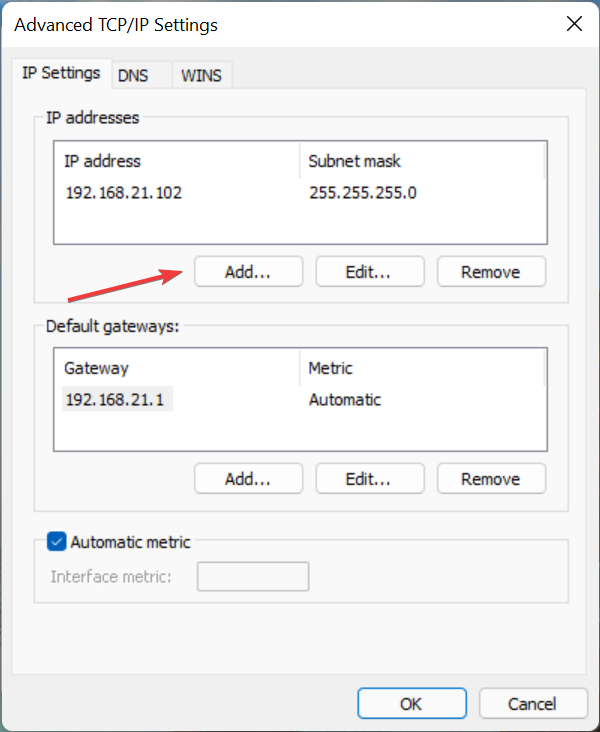
- Once done, click on the Advanced button.

- Next, click on the Add button.

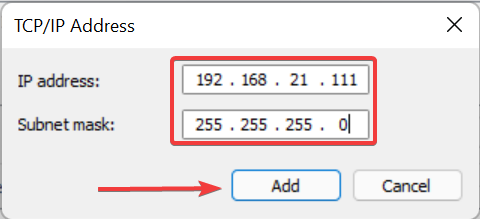
- You can now enter the IP address and Subnet in the relevant fields here and then click on Add.

- Once done, click on OK at the bottom of every window to save the changes.
- Similarly, you can add multiple IP address by clicking on the Add button and entering the other IP’s.


2. Via Command Prompt
- Press Windows + S to launch the Search menu, enter Windows Terminal in the text field at the top, right-click on the relevant search result, and select Run as administrator from the context menu.

- Click Yes on the UAC (User Account Control) prompt that pops up.

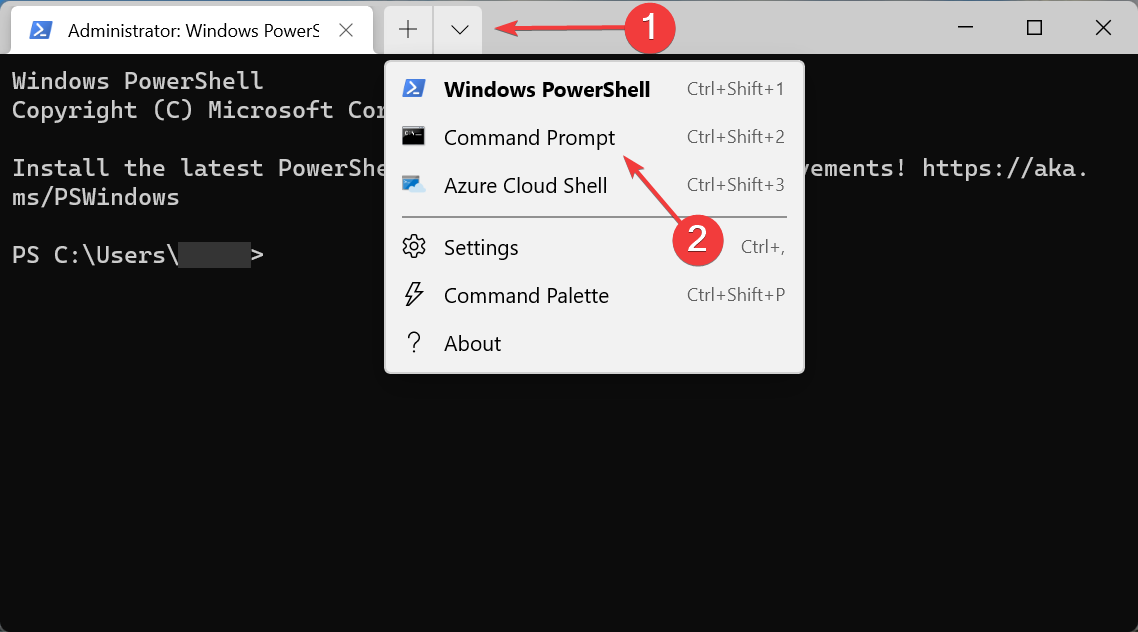
- Next, click on the downward-facing arrow at the top, and select Command Prompt from the list of options. Alternatively, you can hit Ctrl + Shift + 2 to launch Command Prompt in a new tab.

- Next, execute the following command while replacing the NIC (Network Interface Card) name, IP address, and subnet:
netsh int ipv4 add address "NIC name" 192.168.21.102 255.255.255.0

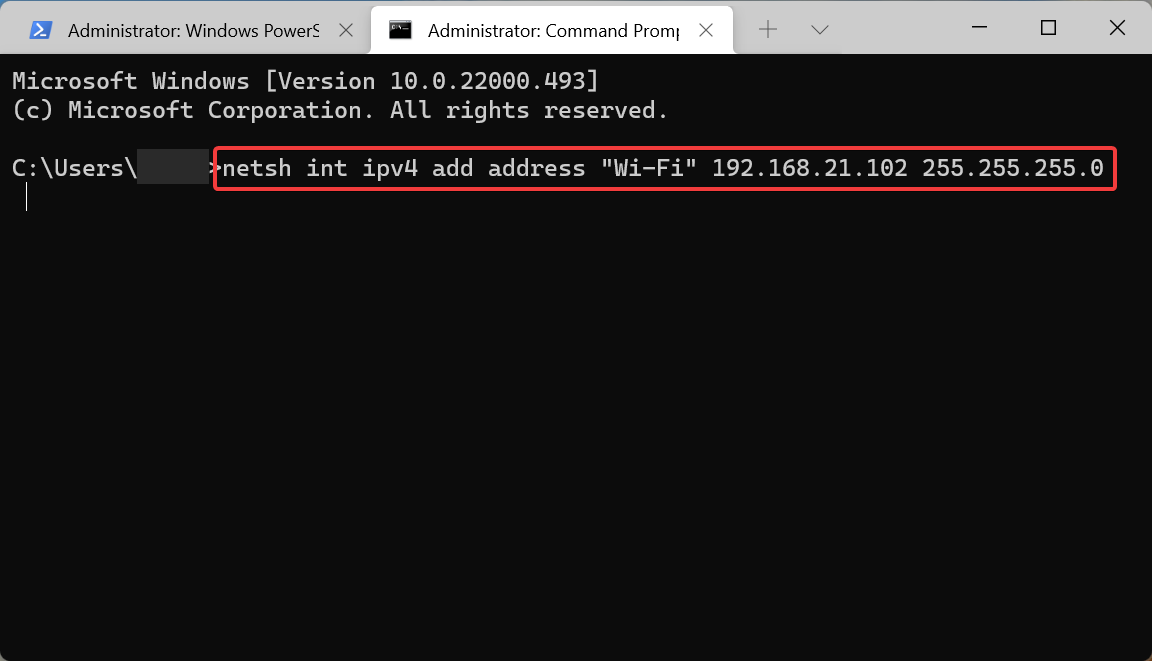
That’s it! The secondary IP address will now be added, and you can verify the same in the network properties or use the ipconfig /all command.
There are several users who prefer executing commands, rather the going with the conventional GUI (Graphic User Interface) method, and this method will help them do that.
Also, check the next section to find out how to add multiple IP addresses in Windows 11.
3. Add multiple IP addresses using Command Prompt
- Launch an elevated Windows Terminal, and then open the Command Prompt tab in it.
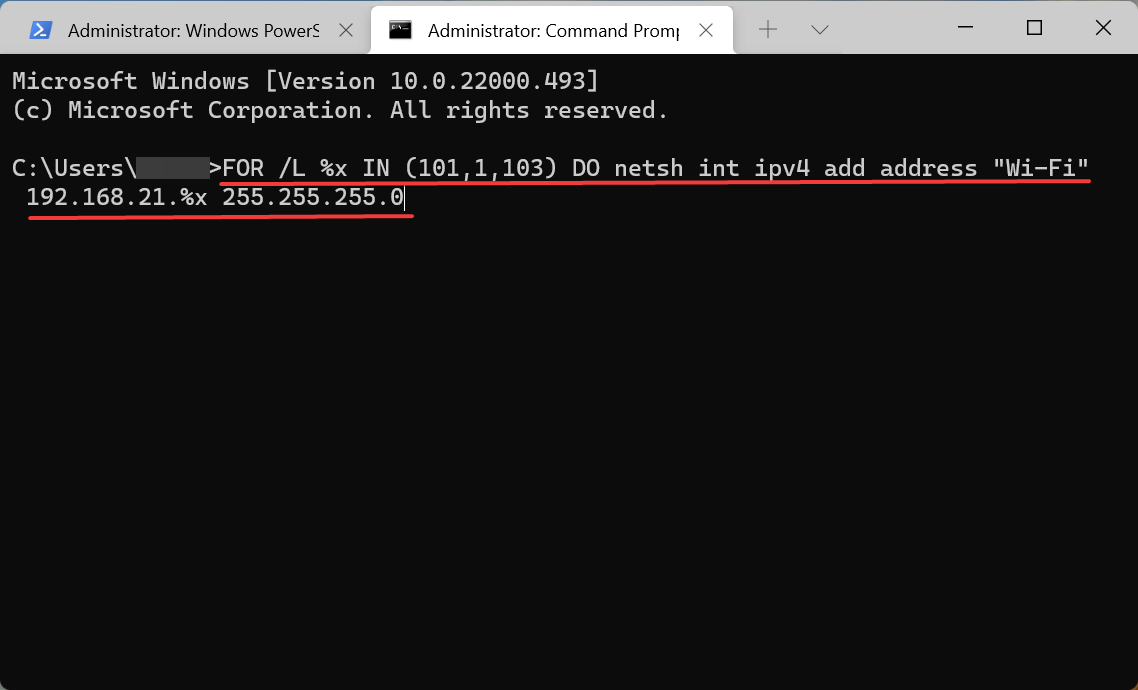
- You will now have to execute the the following command to automatically add multiple IP addresses while replacing the relevant entries here, as you did earlier:
FOR /L %variable IN (Start,Increase/Decrease,Stop) DO netsh interface ipv4 add address "NIC name" IP address (with variable) Subnet - If you want to add the IP addresses 192.168.21.101 to 192.168.21.103 to the required network adapter, here is what the command would look like:
FOR /L %x IN (101,1,103) DO netsh interface ipv4 add address "NIC name" 192.168.21.%x 255.255.255.0
- The command may take a few seconds to execute, depending on the number of IP addresses to be added, so wait patiently.

- Once done, you can check the new IP addresses using the following command:
ipconfig /all
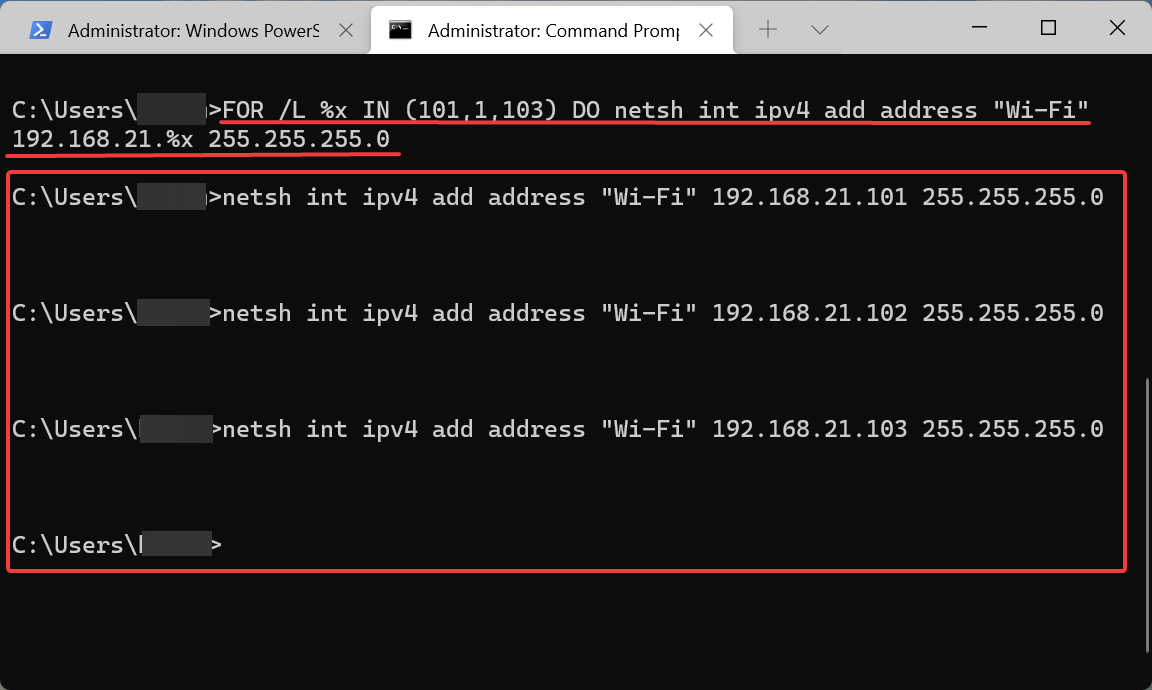
This method is somewhat tricky and requires the use of For loop, often used in computing languages. But it will save considerable time when adding multiple IP addresses at once in Windows 11.
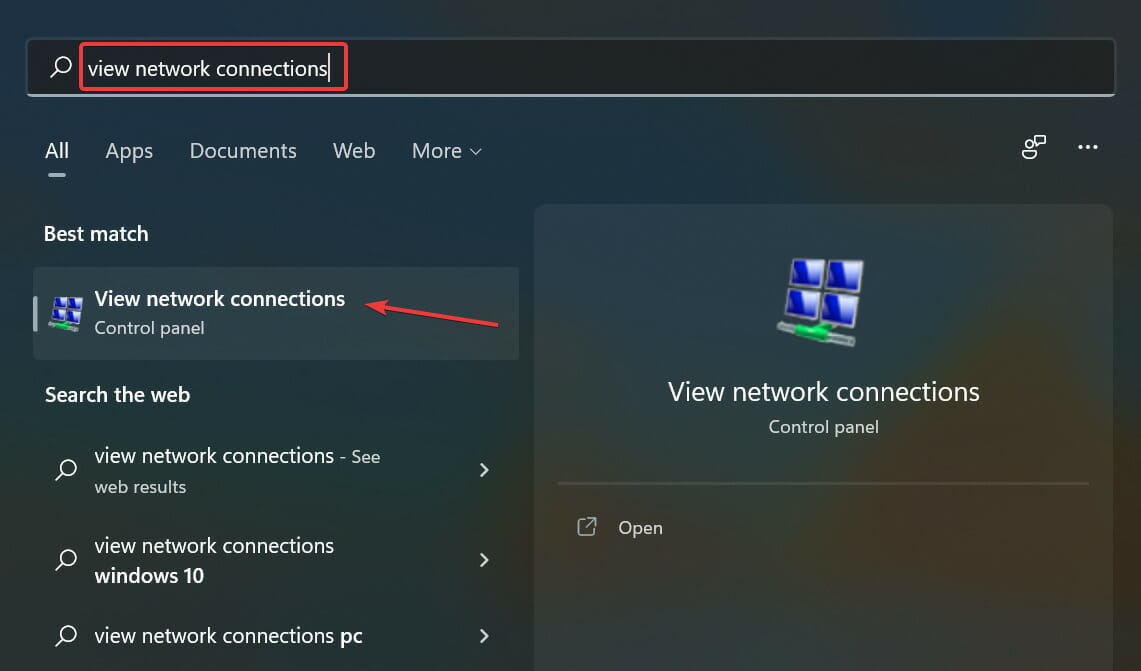
How do I remove a secondary IP address in Windows 11?
- Press Windows + S to launch the Search menu, enter View network connections in the text field, and click on the relevant search result that appears.

- Right-click on the relevant network adapter, and select Properties from the context menu.

- Double-click on the Internet Protocol Version (TCP/IPv4) entry to launch its Properties.

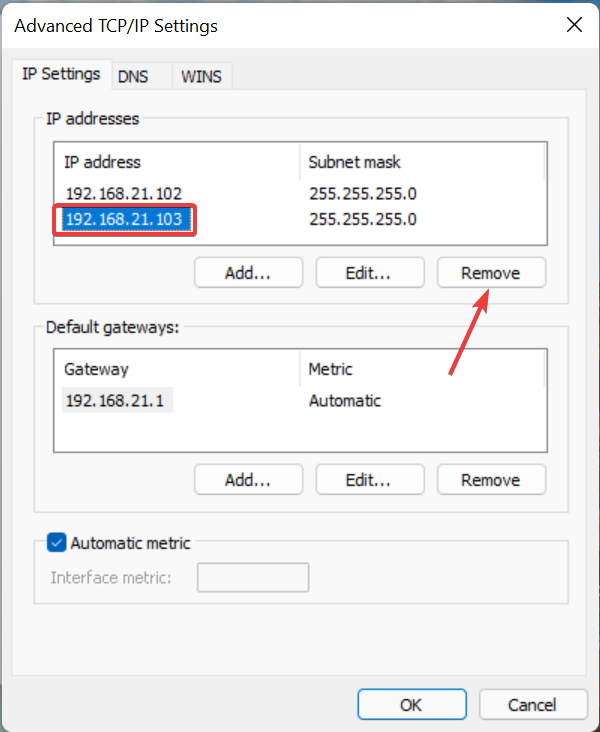
- Now, click on the Advanced button near the bottom.

- Finally, select the IP address not required anymore, and click on the Remove button

- Once done, click on OK at the bottom for every window to save the changes.

The process to remove a secondary IP address is as simple as adding it. But do make sure not to remove a critical address or even enter any random one, since it could lead to problems connecting to the Internet.
What are the various versions/types of IP address?
If you navigate to the network properties, you will find both IPv4 and IPv6, which are different versions of an IP address, with the latter being more advanced.
The need for IPv6 arises due to an increase in the number of devices connected to the Internet. Since IPv4 could only cater to 4.29 billion addresses, there’s IPv6 now that can support 1028 times more devices.
Then comes the concept of static and dynamic IP addresses. As the name suggests, the former remains the same throughout while the latter keeps changing periodically. A normal user will likely have a dynamic IP address since the static ones cost more.
To fully understand the concept, check our guide on IP addresses. Though it’s for Windows 10, the ideas and steps listed there also work the same on Windows 11.
How can I hide or mask my IP address on a LAN (Local Area Network)?
There are a couple of arguments in favor of hiding or masking your IP address, but they certainly don’t apply to a large number of users. Many argue that it maintains anonymity and safety, two of the most critical things on the Internet.
Apart from that, certain websites or data are not accessible to the people of a particular country due to geographical restrictions, but by masking the IP address, you can easily access that, since that’s the only way to identify your location on the web.
So, if you are keen on hiding your IP address, check out this guide to learn all the ways you can do it. Though it’s for Windows 10, we have verified that it works just as effectively on the latest iteration.
As you can see, it’s easy to add secondary or multiple IP addresses in Windows 11, and all that you have to do is to check network connection details, and adjust your network settings to do so.
Along with that, you now also know how to remove or hide your IP address. Use this information to make your presence on the web safer and avoid being located or scammed. Also, find out how to connect to a DHCP server in Windows 11.
Tell us your experience of adding a secondary IP address and the need for it, in the comments section below.
Read our disclosure page to find out how can you help Windows Report sustain the editorial team. Read more


Improve this guide

User forum
0 messages