Windows 11 on Raspberry Pi gets new life thanks to Botspot's BVM
3 min. read
Published on
Read our disclosure page to find out how can you help Windows Report sustain the editorial team. Read more
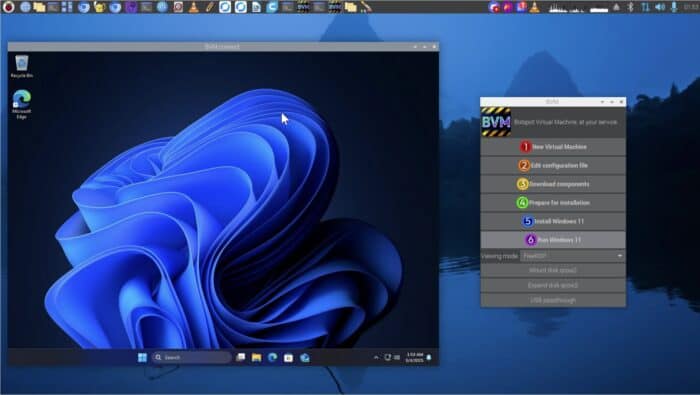
Installing Windows on a Raspberry Pi 4 and Raspberry Pi 5 can be reasonably easy (or not), depending on many factors, but a new update makes it possible for users to run Microsoft’s Windows 11 in a virtual machine with surprisingly seamless results. The tool Botspot Virtual Machine (BVM) is the work of a pseudonymous student and single-board computer hobbyist known as “Botspot,” who released the free script for this functionality.
A week ago, I released a free script for running Windows 11 on Pi OS. It works on all 4th and 5th generation Pi models, Compute Modules, and other SBCs, unlike WoR which only partially worked on Pi 4 and some 5’s, never on Wi-Fi, and now is abandoned. Over the past 7 days, the community has responded with much enthusiasm, but the majority of people still have no clue this exists. Let’s change that!
BVM fully works out-of-the-box, with broad support
The script runs on any Raspberry Pi 4 and 5 variant, including Compute Modules and other single-board computers. Unlike earlier projects such as Windows on Raspberry (WoR), which supported only limited hardware and no longer exists, Botspot’s solution offers broader support with enhanced performance.
By leveraging the native ARM64 architecture, the virtualized Windows 11 runs smoothly on the Raspberry Pi hardware. This approach allows Windows to utilize ARM64 CPU instructions directly, resulting in a user experience that doesn’t feel emulated. The virtual machine fully connects to the Raspberry Pi’s Wi-Fi and Ethernet ports, audio output, and USB passthrough, enabling Windows to interact directly with specific physical hardware, says Botspot:
Of particular note is audio, internet, and USB passthrough, which gives Windows direct access to specific physical hardware of your choosing. That’s how one person connected a Software Defined Radio to a Windows-only SDR tool, on a Pi 5 installed in a portable enclosure. I think many new embedded projects like this are now possible.
Furthermore, Microsoft’s Prism translation layer allows the virtual machine to run traditional x86 programs without requiring recompilation for ARM. However, it’s important to note that the virtual machine lacks hardware acceleration for graphics, making it less ideal for gaming and other graphically intensive applications.
Installing the VM is simple and mostly automated
The installation process is user-friendly, mostly automated via the terminal, with an optional graphical user interface for added convenience. Users can install the virtual machine on a Raspberry Pi 5 with just 2GB of RAM, though a 4GB model is recommended for optimal performance. For the best experience, using an NVMe SSD or a USB 3 drive is advised over traditional microSD cards.
If you need more info or help, check out Botspot’s Raspberry Pi forum post. Additionally, here’s the repository on GitHub with full instructions and tips for getting started.
This update opens new possibilities for Raspberry Pi users, allowing them to run Windows 11 applications and access previously limited features to conventional PC hardware. While it may not be suitable for all use cases, particularly those requiring high-end graphics performance, it provides a practical solution for running Windows-based applications on low-cost, low-power hardware.




User forum
0 messages