Step-by-Step: Wipe and Reformat a Hard Drive in Windows 7
Wiping your hard drive in Windows 7 helps protect your personal data before selling or repurposing your PC. This guide explains the safest methods to erase all data permanently.
Table of contents
How to Wipe a Hard Drive in Windows 7?
1. Back Up Important Files
Before erasing the drive, save any files you want to keep.
- Connect an external hard drive or USB flash drive.
- Open Start > Control Panel > Backup and Restore.
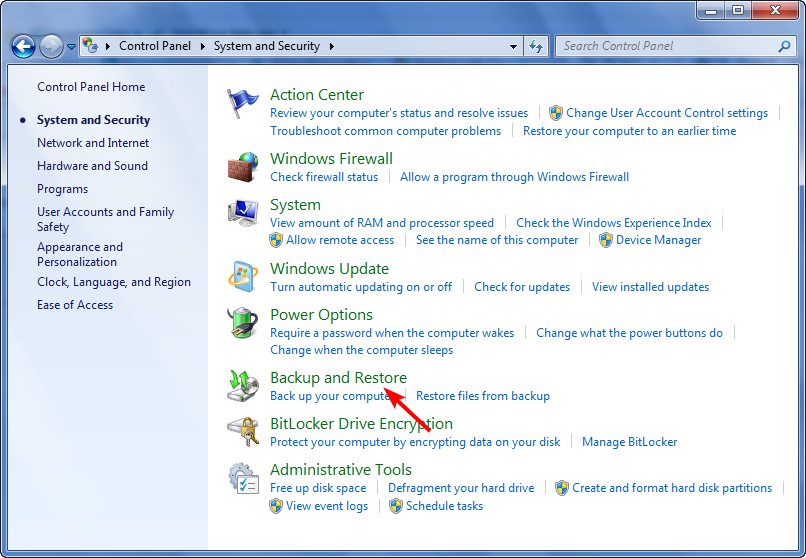
- Click Set up backup and choose the external location.

- Follow the on-screen steps to back up documents, photos, and programs.
Once complete, disconnect the external device safely.
If you do not have access to your admin account, see this guide on how to log in as Administrator in Windows 7.
2. Use the Built-In Format Tool
You can wipe secondary drives directly from Windows Explorer.
- Press Windows + E to open Computer.
- Right-click the drive you want to wipe and select Format.
- Choose the file system (NTFS is default).
- Uncheck Quick Format for a deeper erase.
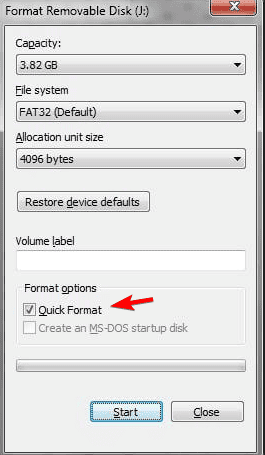
- Click Start to begin the process.
This method does not work for the system drive currently in use.
3. Wipe the System Drive with Installation Media
If you need to erase the main Windows drive (C:), use your Windows 7 installation disc or USB.
- Insert the Windows 7 installation DVD or bootable USB.
- Restart your PC and press F12, F2, or Esc to open the boot menu.
- Select the installation media and press Enter.
- On the Install Windows screen, choose Custom (advanced).

- Select your main partition and click Drive options (advanced).
- Click Format, then confirm the warning to erase the partition.
This removes all files and prepares the drive for a clean installation.
If you are not sure how to reach the boot options, follow this guide on how to boot into Safe Mode in Windows 7.
When your PC fails to reach the boot menu or does not start correctly, check the Windows 7 not booting guide for detailed troubleshooting before wiping the drive.
4. Securely Erase Using Command Prompt
You can also use DiskPart for a complete wipe.
- Boot from your Windows 7 DVD or USB.
- On the setup screen, press Shift + F10 to open Command Prompt.
- Type the following commands, pressing Enter after each:
diskpart
list disk
select disk 0
clean all
exit
Close the Command Prompt and restart your PC.
The clean all command overwrites every sector, making recovery impossible.
5. Use a Third-Party Disk Wiping Tool (Optional)
For added security or multiple drives, consider specialized software such as:
- DBAN (Darik’s Boot and Nuke)
- CCleaner Drive Wiper
- EaseUS Partition Master
Download the ISO file, create a bootable USB, and follow the on-screen steps to erase your drives.
FAQs
No. Formatting removes file references, but data can still be recovered. A full wipe overwrites all data sectors.
Yes. Boot from a recovery or utility tool like DBAN to erase all partitions without reinstalling the OS.
Depending on size and method, a secure wipe can take from 30 minutes to several hours.
Not usually. If you use a secure erase method like clean all or DBAN, data recovery is nearly impossible without advanced forensic tools.
Conclusion
To completely wipe your Windows 7 hard drive, use DiskPart or the Custom install option from installation media. Always back up files first, as this process permanently removes all data.
If you plan to reinstall the system after wiping, read this step-by-step guide on how to factory reset Windows 7.
Read our disclosure page to find out how can you help Windows Report sustain the editorial team. Read more


Improve this guide


User forum
0 messages