4 easy ways to create email notifications for Event viewer
Key notes
- Windows built-in event notification viewer is not straightforward and is very difficult to navigate through.
- A simple workaround is to have the events emailed to stay up to date. Setting up the email solution is fairly simple.
- You can also have the event emailed to multiple computers. Read more to find out!

When you aren’t using your computer, you may want to know what’s happening on your PC or who’s accessing it. What program is being opened and when, or any activity that happens on your Windows computer, you will want to know about it.
Keeping a log of the events is possible, but unfortunately, it can be a pain to check the log because it is not user-friendly and it can be difficult to sift through the events because they are not straightforward.
But that doesn’t mean there isn’t a workaround!
You can configure the system to send out emails whenever an activity takes place using Windows event viewer email notification, this way you can stay up-to-date.
How can I get email alerts in the Windows Event Viewer?
1. Create a Powershell script
- Click on the Start button, search for Powershell, and open it with Administrator privileges.

- Run the following script by pressing Enter:
$EventId = 16,20,23,150,219,220
$A = Get-WinEvent -MaxEvents 1 -FilterHashTable @{Logname = "System" ; ID = $EventId}
$Message = $A.Message
$EventID = $A.Id
$MachineName = $A.MachineName
$Source = $A.ProviderName
$EmailFrom = "[email protected]"
$EmailTo = "[email protected]"
$Subject ="Alert From $MachineQ"
$Body = "EventID: $EventIDnSource: $SourcenMachineQ: $MachineQ `nMessage: $Message"
$SMTPServer = "smtp.gmail.com"
$SMTPClient = New-Object Net.Mail.SmtpClient($SmtpServer, 587)
$SMTPClient.EnableSsl = $true
$SMTPClient.Credentials = New-Object System.Net.NetworkCredential("[email protected]", "PPDOMAIN@67W0rdD");
$SMTPClient.Send($EmailFrom, $EmailTo, $Subject, $Body)
 NOTE
NOTE
By setting this up, you will receive an email notification even if you update the Application log file.
Install a third-party SMTP service provider and configure the settings properly as instructed by the provider. Also, confirm if you’ve given the correct destination email; otherwise, you won’t receive any email.
Once done, save the script on your computer, for example, C:\ScriptsPowerShell\eventnotification-send-email.ps1
Now follow the below steps to enable email notification for all the events.
2. Setting up notifications of events using Task Scheduler
 Tip
Tip
- Tap on the Start button and search for Task Scheduler.

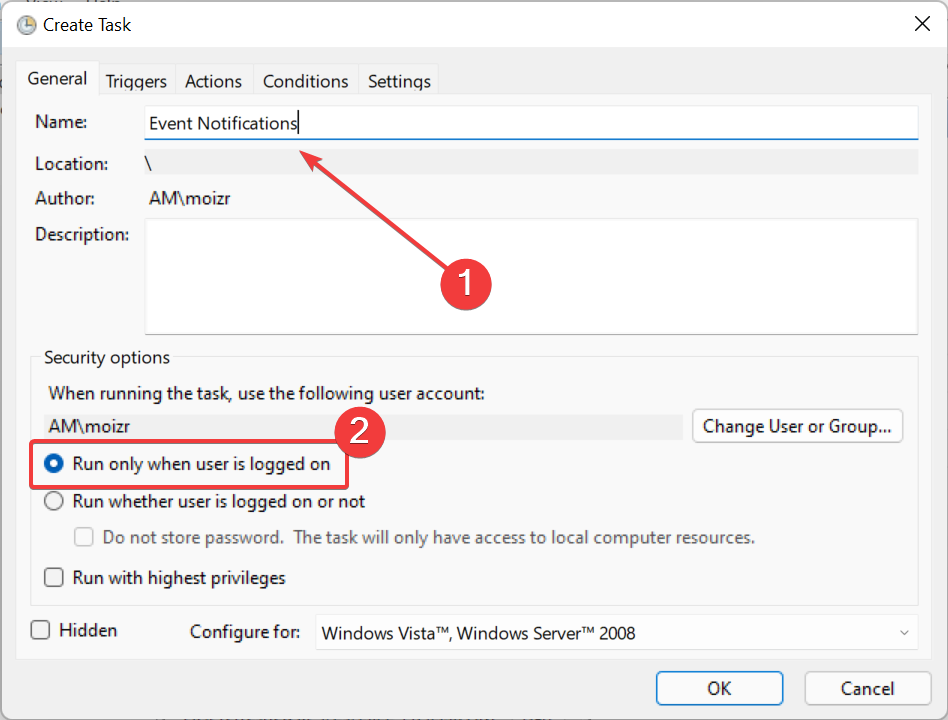
- Select Action, then choose Create Task.

- Name the task. In this case, we’ll name it Event Notifications.
- Change the setting from Run only when the user is logged in to Run whether the user is logged in or not and click on Ok.
- Now in the same window, click on Triggers, and click on New.

- In the new window that opens, select On an event under Begin the task drop-down menu.

- Now, type in the event ID or the source.
- Open the Log Menu and choose an event, such as event 4627 for logon and 4734 for logoff.
- And if you want the notifications only when you turn on your system, change the setting to Logon from On an event.
- Now, select Actions and then click on New to open a new window.

- Now enter the following command inside the Add arguments (optional) section:
C:\ScriptsPowerShell\eventnotification-send-email.ps1 - Click on Ok and set the password on the next screen.
NOTE
3. Create a Scheduled Task
- Open Event Viewer.

- Choose the event or the log file that you want to attach to the script you created.
- Right-click on the event or the log file and click on Attach a task to this log.

- Now, give a name to the task in the Action panel.
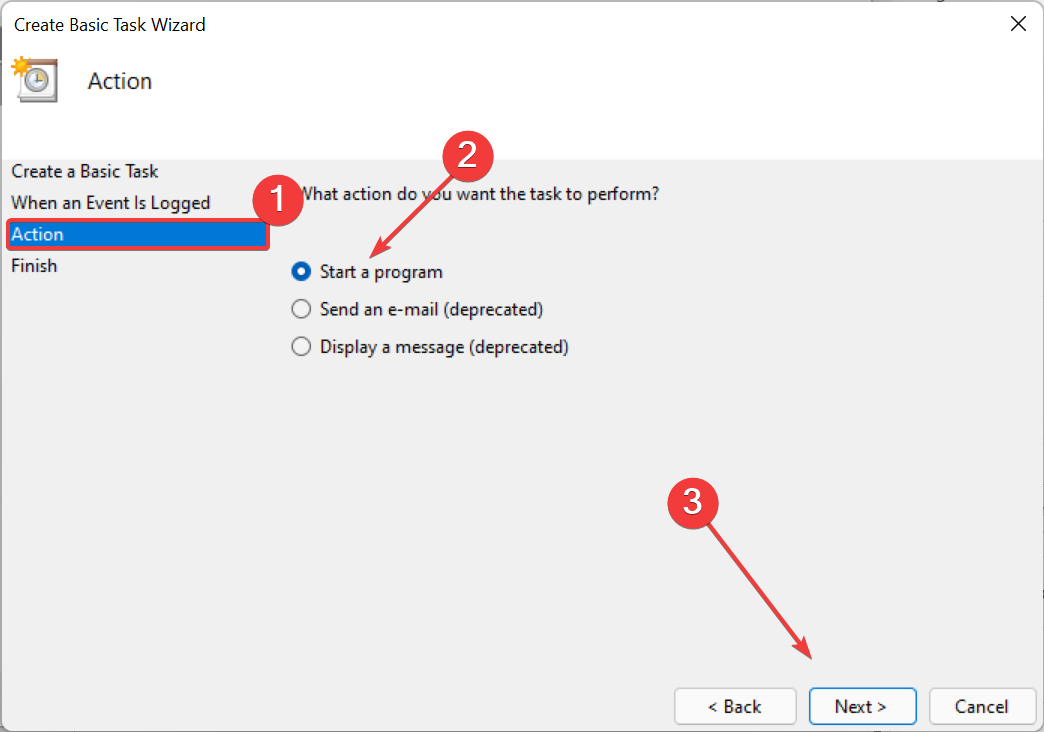
- Click on Start a Program and then click on Next.
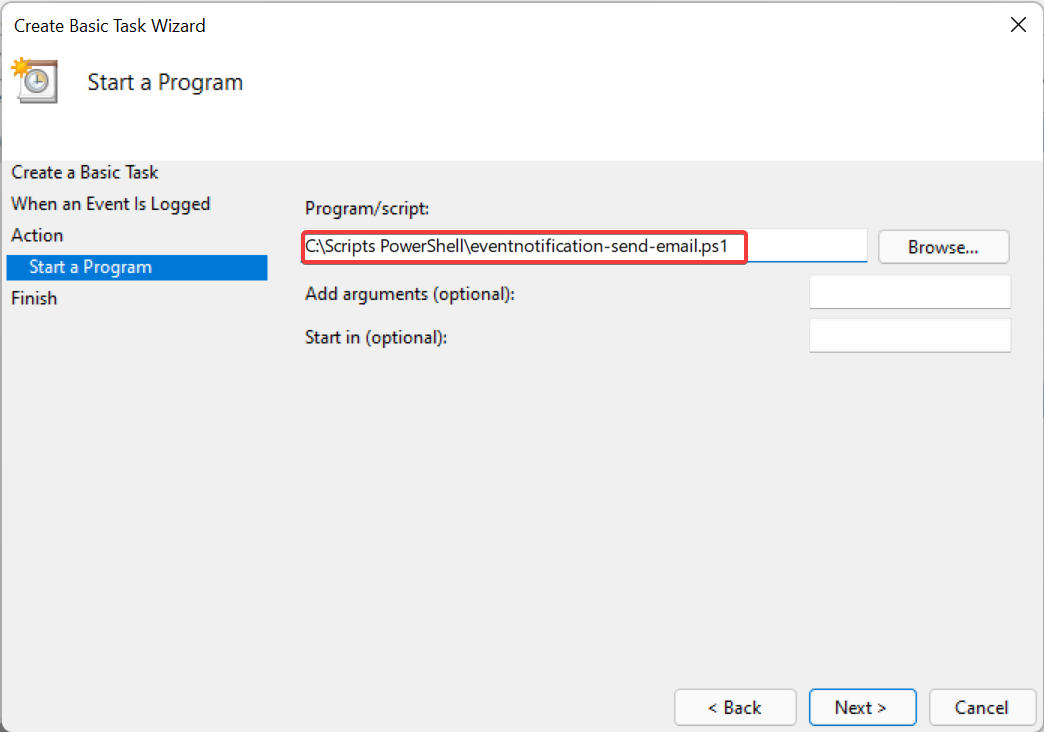
- On the next screen, type powershell.exe in the program/script box.
- In the Add arguments (optional) copy and paste the script that was created in C:\Scripts PowerShell\eventnotification-send-email.ps1
- You can also use quotes around the script if needed. For example:
C:\Scripts PowerShell\eventnotification-send-email.ps1 - Now allow some time for the application error log entry to confirm that everything is working properly.
4. Automate the deployment
- To view the notifications on multiple systems. Click on the Start button and type Task Scheduler.
- Export the task to an XML file.

- Or, even better to automate the import, use a Powershell script after creating the XML file, such as:
PS C:\> Register-ScheduledTask -Xml (get-content '\\myfileshare\tasks\DataKeeperAlerts.xml' | out-string) -TaskName "DataKeeperAlerts" -User datakeeper\dave -Password PPDOMAIN@67W0rdD –Force
If you are an administrator or if you simply want to keep track of all the events that are happening on your system, you could keep track of them using Windows Event Viewer, but the program is not straightforward.
Hence, you can have all the events emailed to you and keep yourself updated. Feel free to share your experience with us by using the comment section found below this guide.
Read our disclosure page to find out how can you help Windows Report sustain the editorial team. Read more


Improve this guide


User forum
1 messages