10 Most Common Windows Hello Errors & How to Fix Them
These quick solutions are all recommended by our team of experts
Key notes
- Biometric sign-in using face, fingerprints, or iris is gaining traction these days, which is unique to each individual and considered safer than using passwords.
- Windows Hello is one such popular feature by Microsoft that allows enhanced security of your system data, however, it is prone to different types of errors.
- You may bump into an error immediately after a Windows update, while creating a PIN, due to outdated biometric drivers or corrupted system files.

While the Windows Hello feature offers you a fun safer way to log in to your Windows PC using fingerprint scan or facial recognition, unfortunately, it’s prone to errors.
Windows Hello errors can be related to PIN creation, TPM not working, the recent update, and more.
However, owing to the fact that passwords are more susceptible to security breaches, biometric authentication like the Hello feature makes it a better alternative.
But, if it’s your Windows fingerprint that isn’t working, we have a few workarounds to help you.
What causes Windows Hello to stop working?
There could be a host of reasons why your Windows Hello stops working and one of the major reasons include a Windows update.
Some of the most common Windows Hello errors include:
- Windows Hello is not configured – This error shows up when there is some kind of misconfiguration.
- Something went wrong. Try again later – You may encounter this error when there’s something goes wrong with your PIN, face, or fingerprint.
- Windows Hello stops working after an update – This is when you installed a Windows update and the Hello feature stops working.
- Stuck on Windows Hello Set Up Account Screen – In this situation, Windows Hello is stuck on the blue screen during face setup.
- Windows 11 Hello Face not working – In this case, you’ll get an error message when you try to sign in through Windows Hello
- This option is currently unavailable – This is when the Windows Hello Biometrics and facial recognition stops working due to a Windows update or Group Policy settings.
- Windows Hello not working on Windows 11 – In this case, the fingerprint sensor stops working due to disabled PIN login, an outdated biometrics driver, or missing/malfunctioning biometrics device.
- Unable to create Windows Hello PIN – This is when Windows doesn’t recognize the PIN due to insufficient permissions for the NGC folder or due to corrupted system files.
- Couldn’t turn on the camera – It’s a problem related to the Windows Hello Face and the culprit is outdated webcam drivers.
- Windows Hello isn’t available on this device – You may see this error on a device that does not have a fingerprint scanner or after a recent update.
However, these errors are common and can be easily fixed with some quick workarounds as listed below.
How do I fix Windows Hello problems?
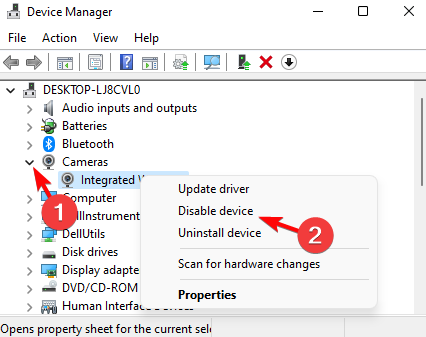
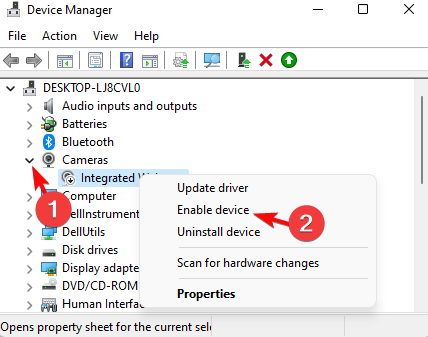
1. Use the Device Manager
1.1 Disable/Enable webcam
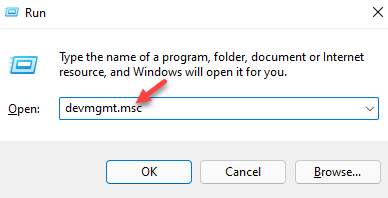
- Press the Win + R keys simultaneously to launch the Run console.
- Type devmgmt.msc in the search bar and hit Enter to open the Device Manager window.

- Expand the Cameras section, right-click on the webcam and click on Disable device.
- Now, right-click on the webcam again and select Enable device.
Now, close Device Manager, restart your PC, and check if you encounter any errors while signing into Windows Hello.
1.2 Reinstall the webcam
- Open the Run console by pressing the Win + R shortcut keys.
- In the search field, type devmgmt.msc and hit Enter.
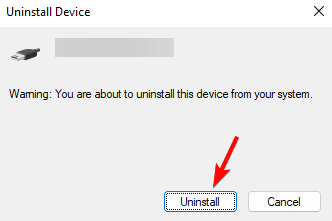
- Click to expand the Cameras section, right-click on the device and select Uninstall device.

- Click Uninstall again in the prompt to confirm.
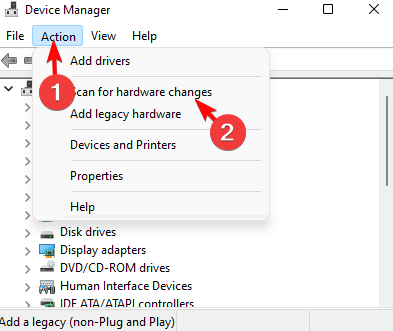
- Now, click on the Action tab and select Scan for hardware changes to reinstall the webcam.
Once done, restart your PC and you should not see any error messages while signing into Windows Hello.
1.3 Rollback the webcam driver
- Press the Win + I shortcut key combination and the Run console will open.
- Next, type devmgmt.msc in the search box and hit Enter.
- In the Device Manager window, expand the Cameras section, right-click on the device, and select Properties.
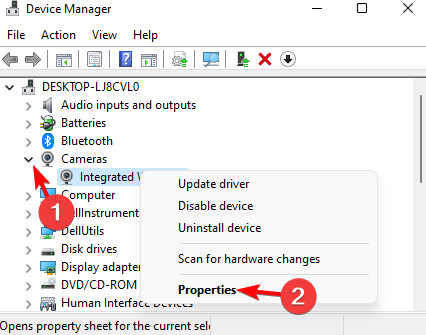
- Now, go to the Driver tab and click on Roll Back Driver.

Once done, exit Device Manager, reboot your machine, and check for any error as you sign in to Windows Hello.
1.4 Uninstall the Biometric driver
- Open the Run console by pressing the Win + R shortcut keys together.
- In the search box, type devmgmt.msc and hit Enter.
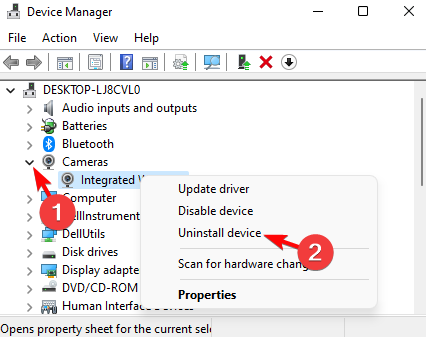
- In the Device Manager window, expand the Biometric devices section, right-click on the device, and select Uninstall device.
- Confirm the uninstallation in the next prompt.
Once done, restart your PC to check if Windows Hello isn’t available on this device error is resolved.
An easier and faster solution is using a specialized program, like Outbyte Driver Updater, that can execute these steps automatically. It scans your device for old drivers and then locates the latest version from its systematically reviewed database.
2. Set up TPM on your device
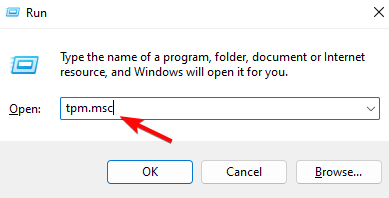
- Pressing the Win + R hotkey will open the Run console.
- Here, type tpm.msc and hit Enter.
- Click on the Action tab at the top and select Prepare the TPM.
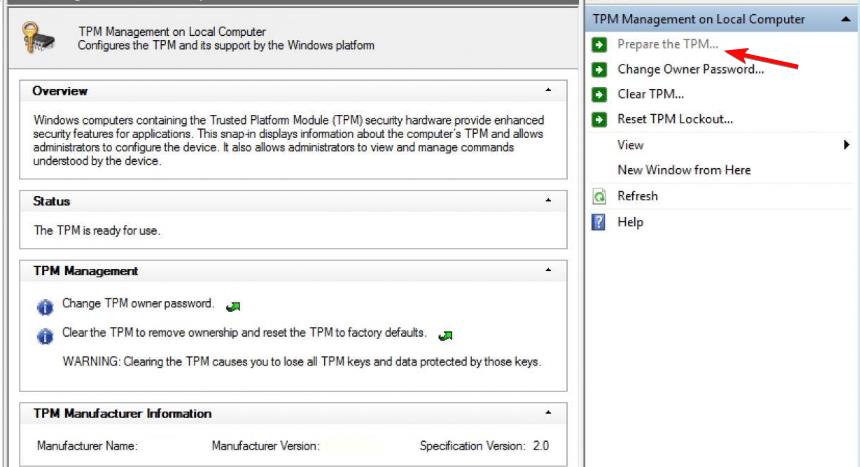
Now restart your PC and you should not face any Windows Hello errors as you sign in.
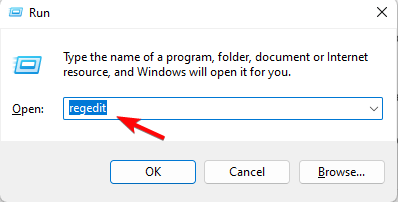
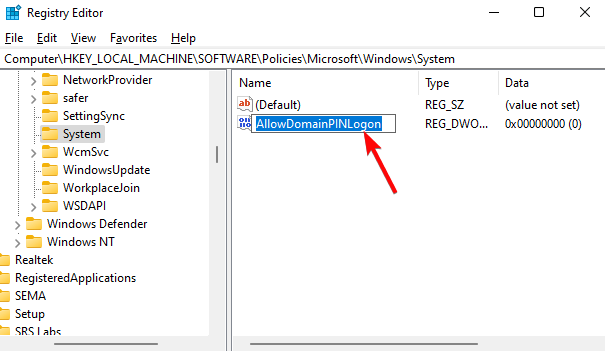
3. Authorize the PIN Login using the Registry Editor
- Press the Win + R keys together on your keyboard.
- In the Run console search bar that opens, type Regedit and hit Enter.
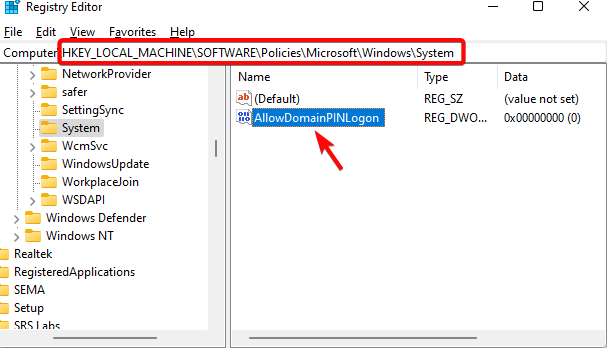
- Navigate to the following path in the Registry Editor:
HKEY_LOCAL_MACHINE\SOFTWARE\Policies\Microsoft\Windows\System - Now, look for the AllowDomainPINLogon entry on the right and double-click on it.
- If you don’t find the key, right-click at an empty space on the right, select New, and then click on DWORD (32-bit value).
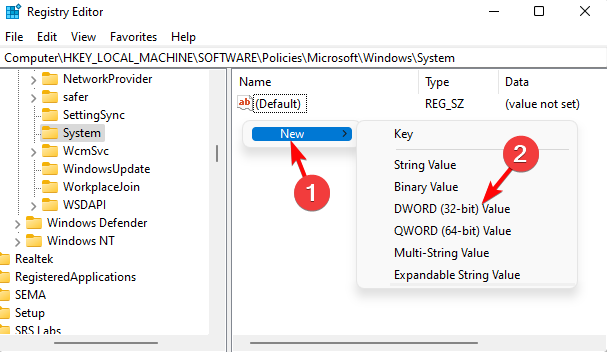
- Rename the key as AllowDomainPINLogon and double-click on it to open the Edit DWORD (32-bit value) dialog.
- Here, go to Value data and change the value to 1. Press OK.
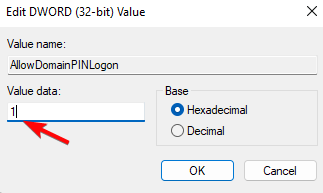
Close the Registry Editor, restart your PC, and you should be able to create a PIN again in Windows Hello without any errors.
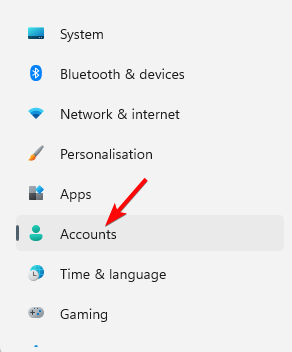
4. Verify your Microsoft account
- Open Windows Settings by pressing the Win + I keys together.
- Click on Accounts on the left.
- Now, on the right, click on Your info.
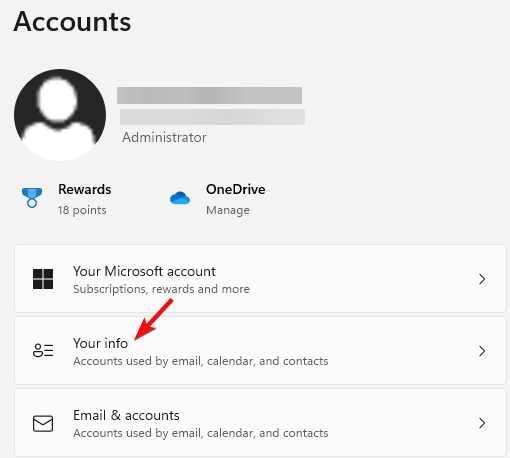
- Next, under the Account settings section on the right, check if it asks you to verify the account. Click on Verify.
Once done, reboot your PC and check if Windows Hello is working normally now.
5. Review the Group Policy Editor settings
- Press the Win + R shortcut keys to launch the Run console.
- In the search bar, type gpedit.msc and hit Enter.
- Now, make sure that the below GPO settings are in place:
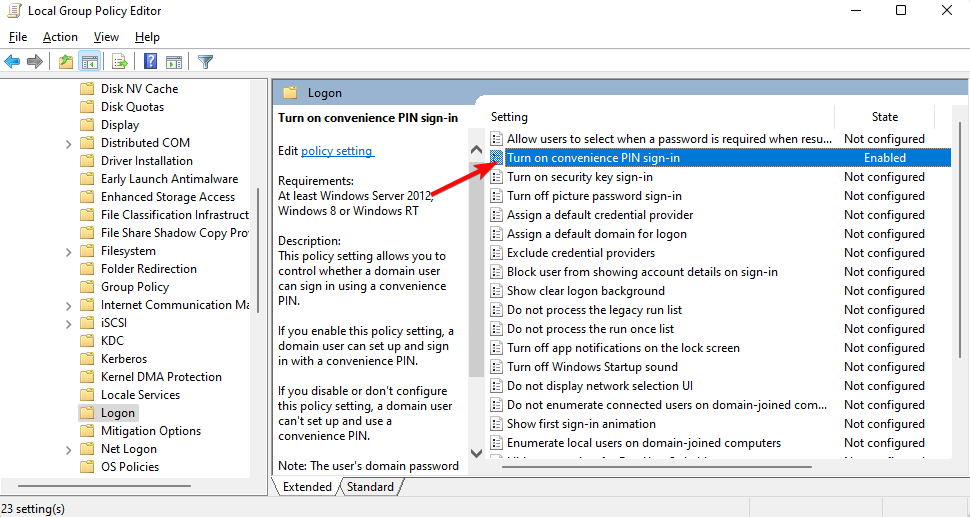
- Navigate to Computer>Administrative Templates>System>Logon>Turn on convenience PIN sign-in = Enabled
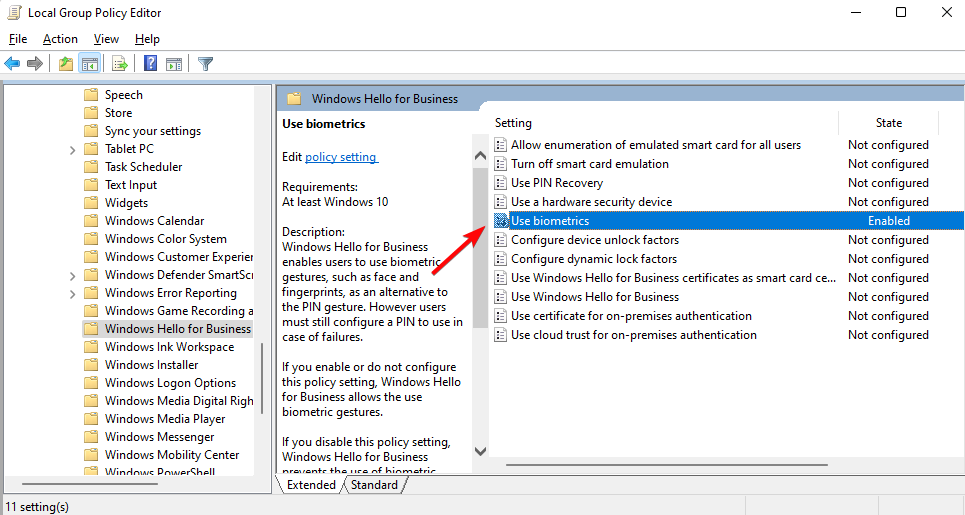
- Go to Computer>Administrative Templates>Windows Components>Windows Hello for Business>Use Biometrics = Enabled
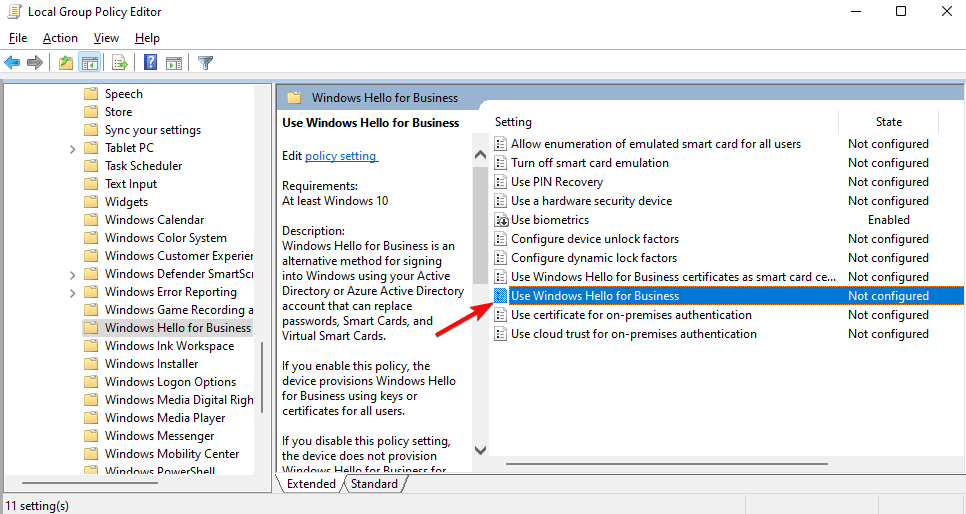
- Select Computer>Administrative Templates>Windows Components>Windows Hello for Business>Use Windows Hello for Business = Not configured
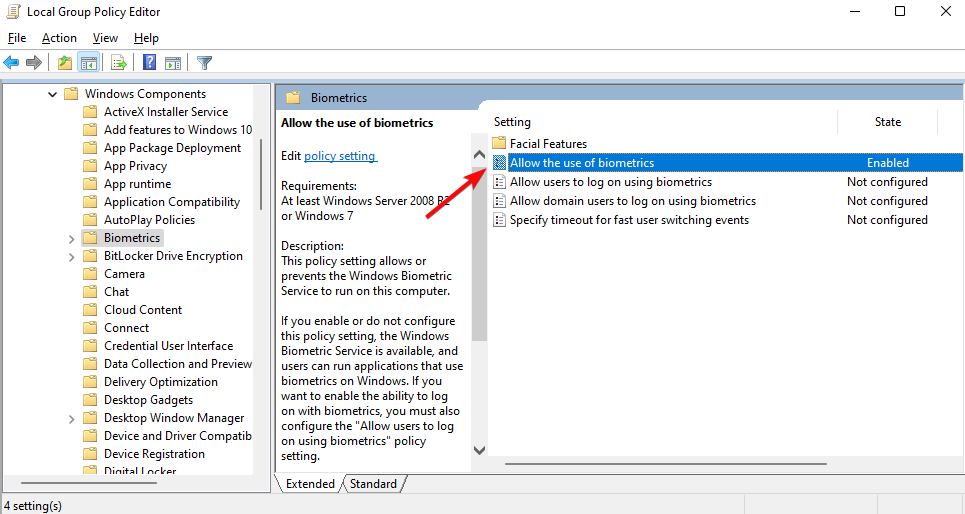
- Click on Computer>Administrative Templates>Windows Components>Biometrics>Allow the use of biometrics = Enabled
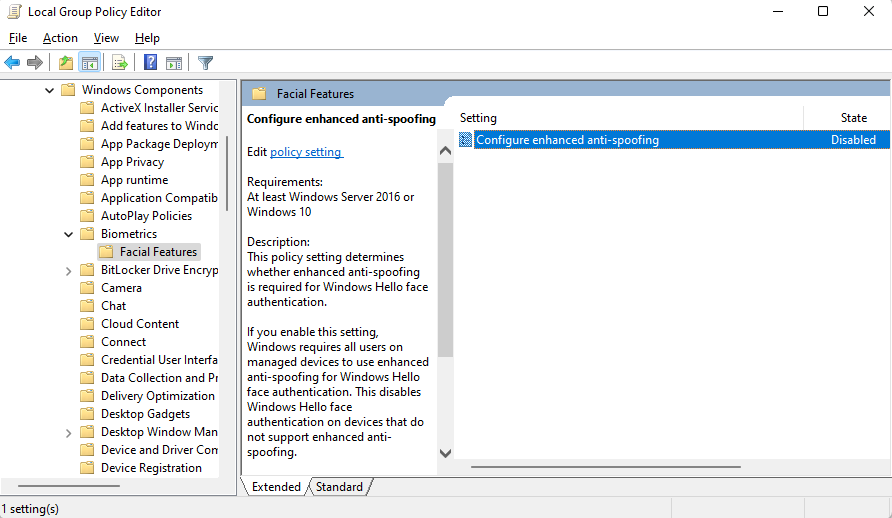
- Go to Computer>Administrative Templates>Windows Components>Biometrics>Facial Features>Configure enhanced anti-spoofing option = Disabled
- Navigate to Computer>Administrative Templates>System>Logon>Turn on convenience PIN sign-in = Enabled
This method can help you to fix all kinds of Windows Hello errors like when it’s not working on Windows 11, this option is currently available, or even if you are facing a PIN error.
6. Remove the NGC folder
- Press the Win + E keys simultaneously to open File Explorer and navigate to the below path:
C:\Windows\ServiceProfiles\LocalService\AppData\Local\Microsoft - Now, right-click on the NGC folder and select Properties.
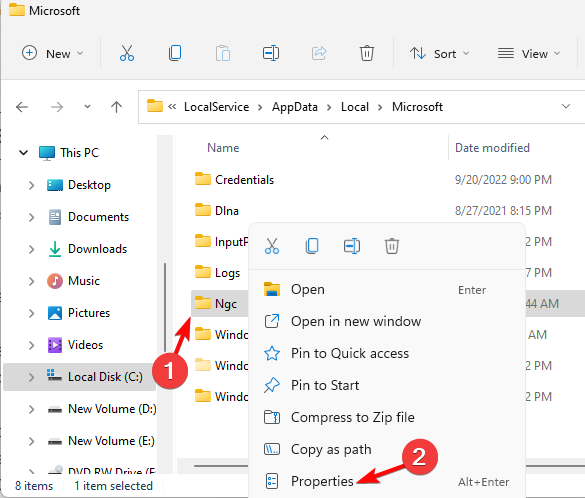
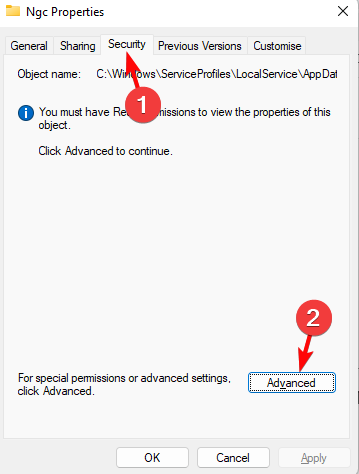
- Next, select the Security tab and click on Advanced.
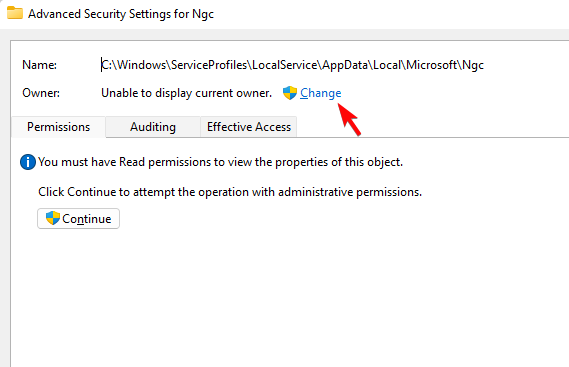
- On the Advanced Security Settings page, go to Owner and click on Change.
- Next, under Enter the object name to select, type Administrator, click on Check Names, and press OK.
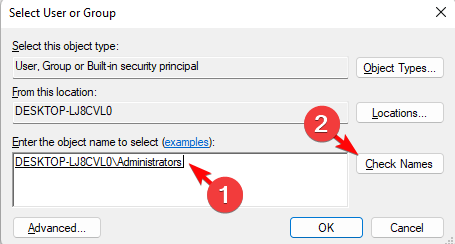
- Back on the Advanced Security Settings page, select Replace owner on sub containers and objects. Press Apply and OK.
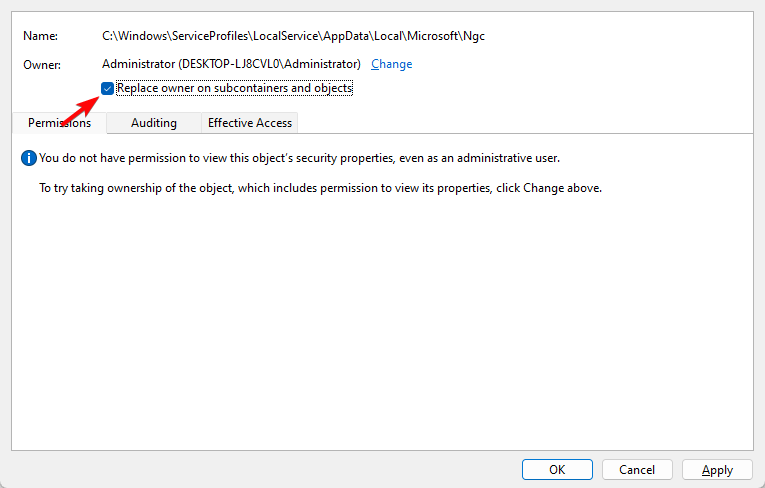
- Now you can double-click on the NGC folder and it should open.
- Select all files and folders inside the NGC folder and hit Delete.
Once the files and folders are deleted from the NGC folder, go back to step 1 to add a new PIN.
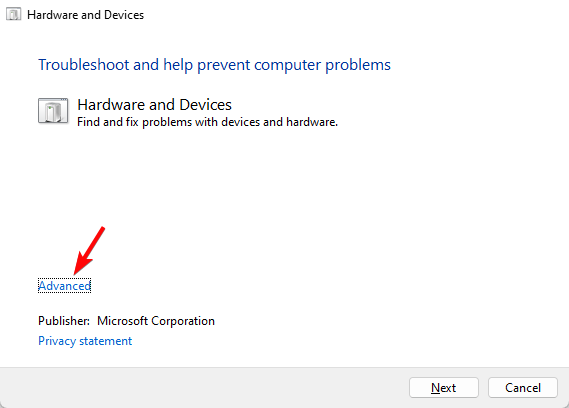
7. Use the Hardware and Devices Troubleshooter
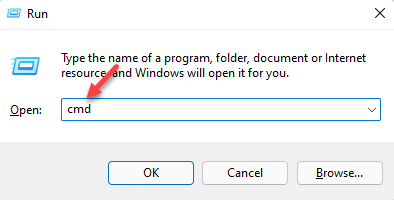
- Press the Win + R keys at the same time to open the Run console.
- Type cmd in the search field and press the Ctrl + Shift + Enter keys together to launch Command Prompt with admin rights.
- Now, in the elevated Command Prompt, run the below command:
msdt.exe -id DeviceDiagnostic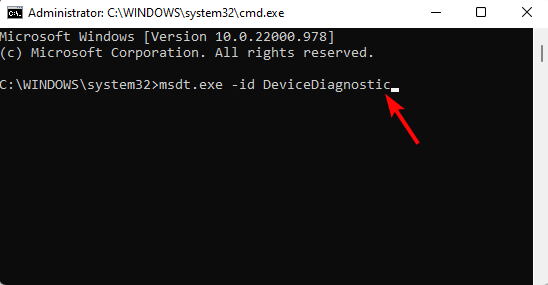
- As the Hardware and Devices troubleshooter opens, click on Advanced.
- Select Apply repairs automatically and press Next.
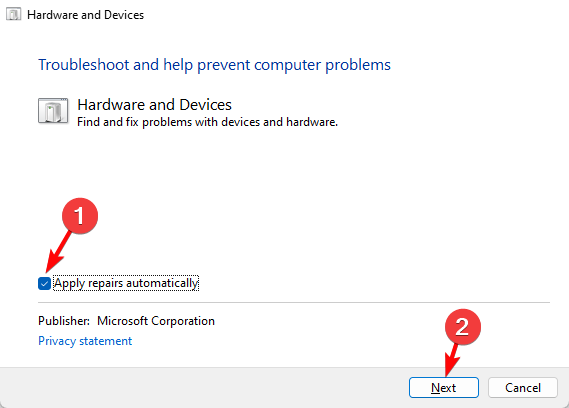
- Now, wait till Windows detects any errors, and applies the fix accordingly.
Once done, restart your PC and check if the Camera is not compatible with the Windows Hello Face error is fixed.
8. Run DISM/SFC scan
- Launch the Run console by pressing the Win + R shortcut keys at the same time.
- Now, type cmd in the search bar and press the Ctrl + Shift + Enter hotkey to launch the elevated Command Prompt.
- In the Command Prompt (Admin) window, run the below command and hit Enter:
Dism.exe /Online /Cleanup-Image /Restorehealth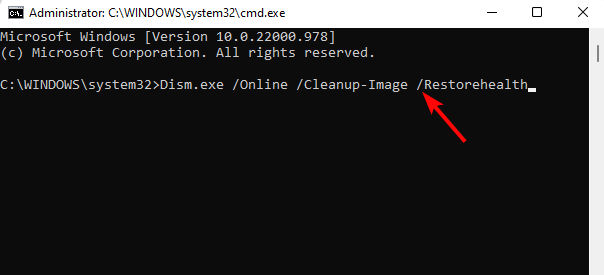
- The scan takes a while so wait patiently till it’s over. Once it’s over and you see the success message, run the below command and hit Enter:
sfc /scannow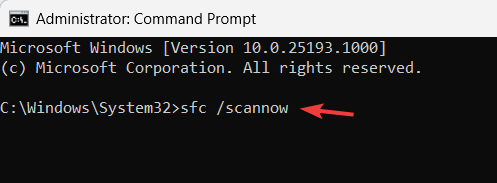
- Wait till the process is over, and once completed, you should see the success message.
Now, restart your PC and check if you can sign in to Windows Hello without any errors.
Another option you can always choose is a specialized tool to ease this process. This way, your PC will be scanned, or even repaired if it is the case, in a more secure way.
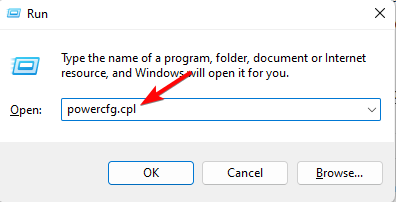
9. Turn off Fast Startup
- Press the Win + R keys together to open the Run console.
- Here, type powercfg.cpl and hit Enter to open the Power Options window.
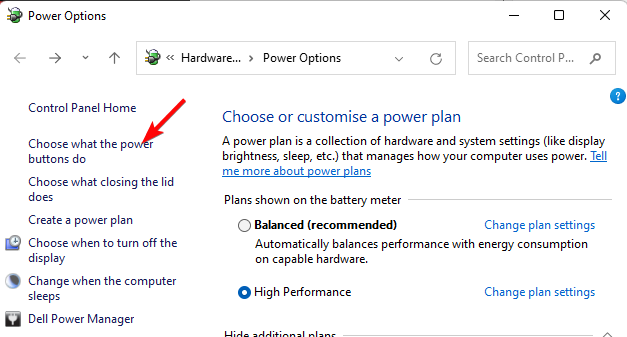
- Now, on the left, click on Choose what the power buttons do.
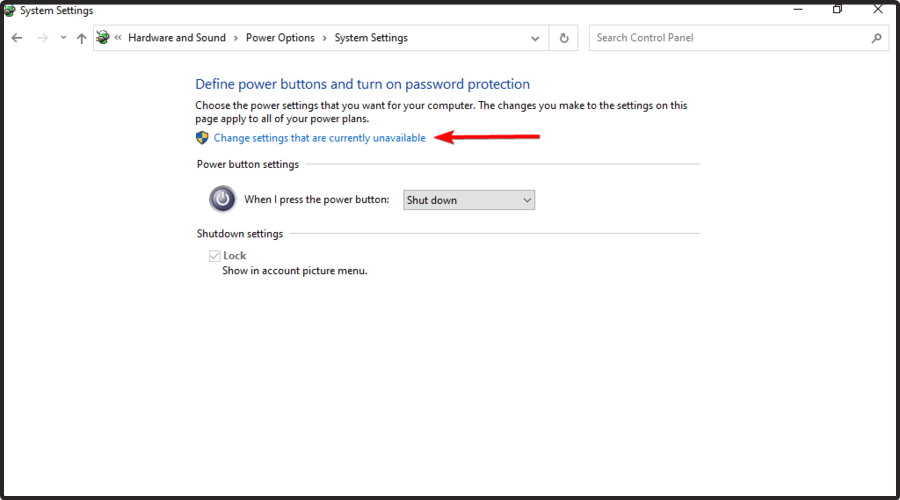
- On the next screen, click on Change settings that are currently available.
- Now, scroll down and under Shut-down settings, deselect Turn on fast-startup. Click on Save changes.
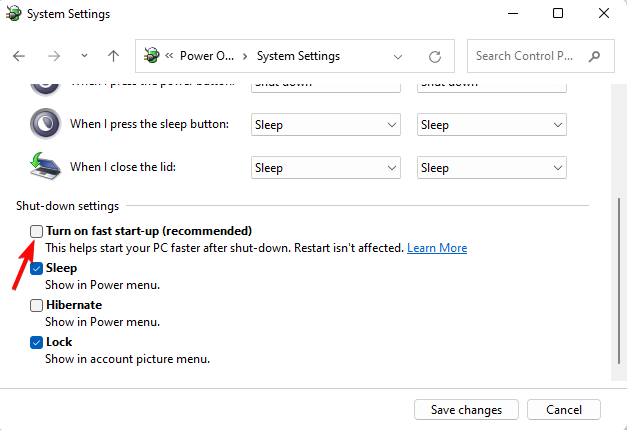
Once done, reboot your machine and try signing in to Windows Hello and see if you come across any errors.
How can I set up Windows Hello on my new Windows 11 device?
Windows 11 supports Windows Hello as an alternative to password login and hence, a more personal and secure way to access your device.
You can sign in using your facial recognition, fingerprint, or PIN. While to activate fingerprint or facial recognition sign-in, you need to set up a PIN, you can also sign in just using your PIN.
Here’s how to set up Windows Hello if you also have a new Windows 11 device and create a PIN:
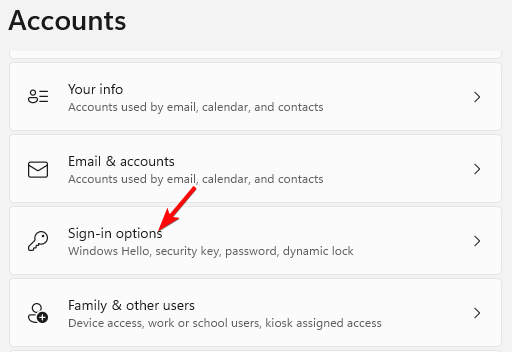
- Press the Win + I shortcut key combination to Windows Settings.
- On the left side of the Settings app, click on Accounts.
- Next, on the right, select Sign-in options.
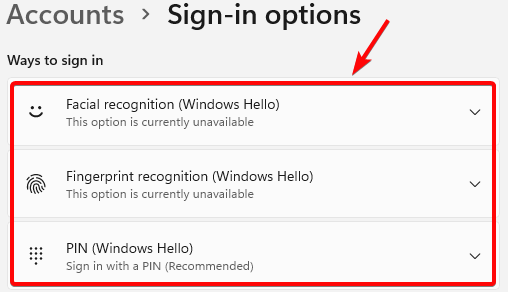
- Now, on the next screen, select the Windows Hello sign-in you want to set up:
- Select Facial recognition (Windows Hello) to set up facial recognition sign-in.
- Or, select Fingerprint recognition (Windows Hello) to set up sign-in with a fingerprint reader.
- Alternatively, you can select PIN (Windows Hello) to set up sign-in with a PIN.
At the same time, make sure that you are using the correct PIN. If not, then next time make a note of it to avoid any issues in the future.
You may also uninstall the recent update, install any pending Windows update, remove your Work/School account, or update the BIOS to see if this helps fix the Windows Hello errors.
For any other queries on Windows Hello on your device, you can leave a message in the comments box below.
Read our disclosure page to find out how can you help Windows Report sustain the editorial team. Read more


Improve this guide


User forum
0 messages