0x800f0907 Error Code: How to Fix it on Windows 10 & 11
Try manually updating the .NET Framework to fix the problem
![]() 4 min. read
4 min. read
![]() Updated on
Updated on
Share this article

Improve this guide
Read our disclosure page to find out how can you help Windows Report sustain the editorial team Read more
Key notes
- The 0x800f0907 error arises when upgrading the .NET Framework on a PC.
- This issue has been reported by both Windows 10 as well as Windows 11 users.
- You can try to resolve the issue by tweaking the Group Policy Editor as instructed in this guide.
Many of our readers have reported coming across the 0x800f0907 error code on their Windows 10 and 11 PCs. This error basically pops up when there is some issue with the .NET Framework component.
In this guide, we will share with you a list of solutions that have helped our readers resolve the 0x800f0907 error code on Windows 10 and 11. Let us get right into it.
What is the 0x800f0907 error on my PC?
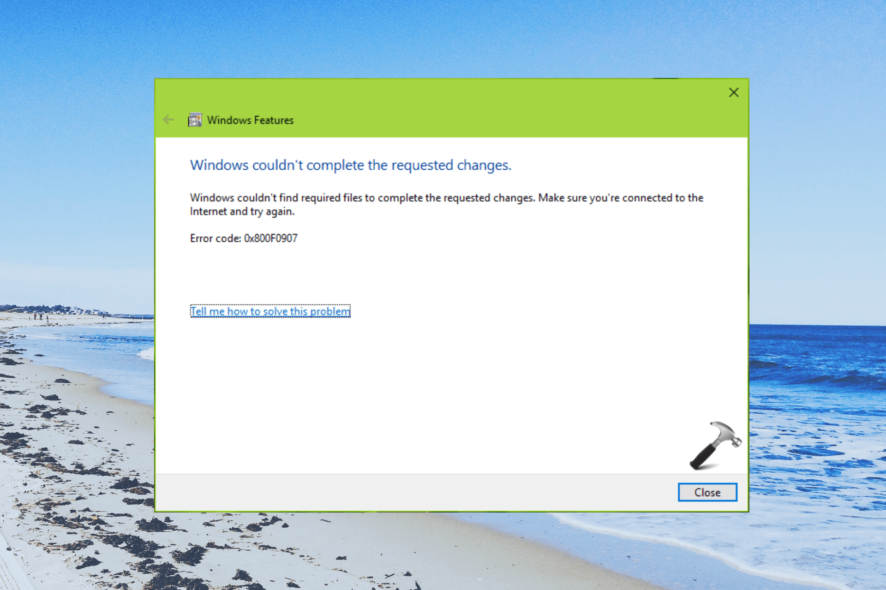
When you will come across the 0x800f0907 error, you will see the below error message displayed on your desktop.
Windows couldn’t complete the requested changes.
Windows couldn’t find the required files to complete the requested changes. Make sure you’re connected to the Internet and try again.
Error: 0x800F0907
Here are some of the common reasons why you would come across the 0x800f0907 error:
- The internet connection is faulty: The network to which your PC is connected might be problematic and cause this problem.
- Incorrectly configured Group Policy: There are some Group Policy settings that need to be selected to avoid coming across the 0x800f0907 error.
- Repair Windows: Chances are some important system files related to the Net Framework are corrupt and it needs repairing.
- Install the latest Net Framework: You might be running an old version of the Net Framework which is why you are getting the 0x800f0907 error.
Let us check the solutions to resolve the 0x800f0907 error quickly on your PC.
How do I fix the 0x800f0907 error on Windows 10 & 11?
 NOTE
NOTE
1. Use the .NET Framework repair tool
- Download the .NET Framework repair tool.
- Launch the program on your PC.
- Accept the terms and agreement and click Next to begin the diagnosing process.

- It will give you the changes that are required for the .NET Framework to run properly.
- Click Next to apply the changes.
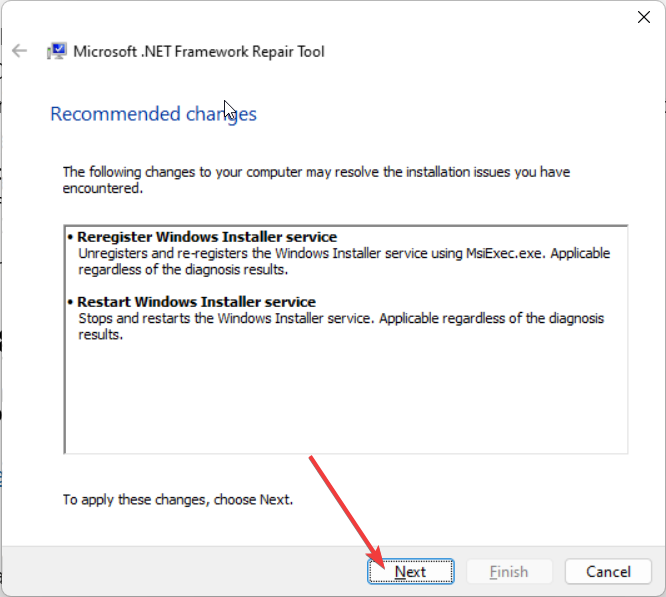
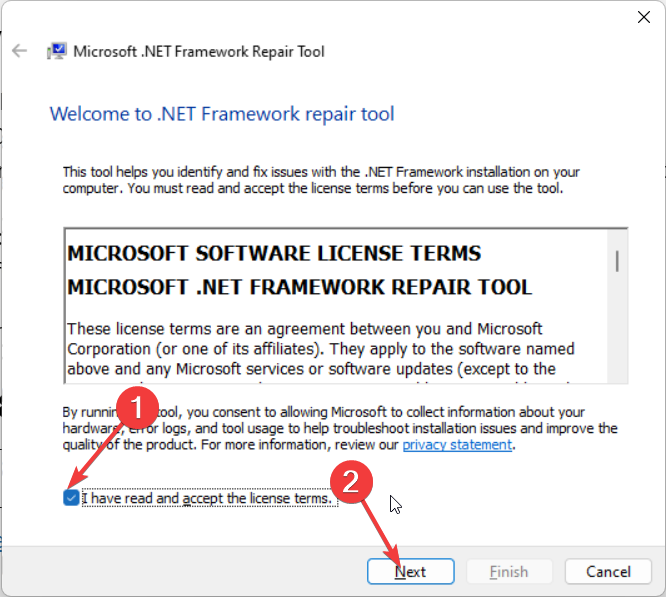
The .NET Framework repair tool is one of the best tools that is provided by Microsoft to fix any issues related to the .NET Framework.
However, we have a guide that lists some other solutions that will help you resolve any issues related to the .NET Framework quickly.
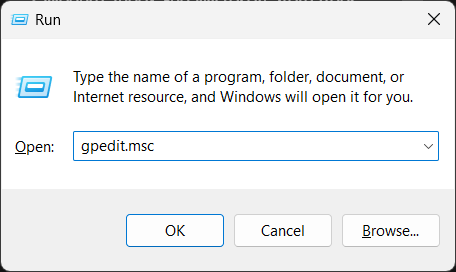
2. Tweak the Group Policy
- Press the Win + R keys to open the Run dialogue.
- Type gpedit.msc and press Enter.

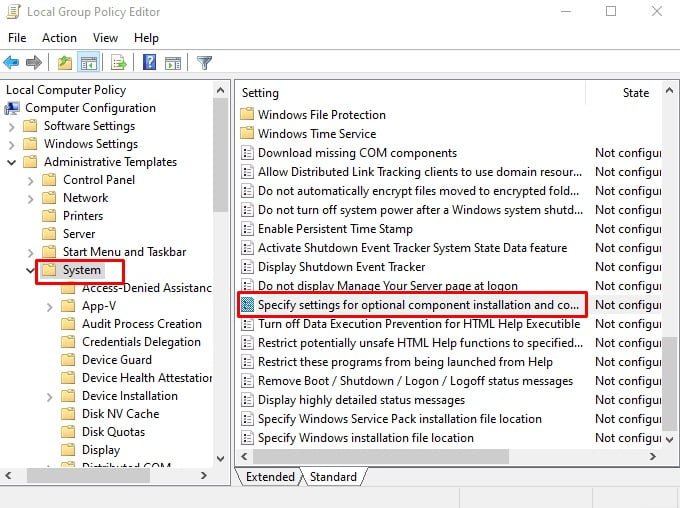
- Navigate to the below path:
Computer Configuration\ Administrative Templates\ System - Locate Specify settings for optional component installation and component repair and open it.

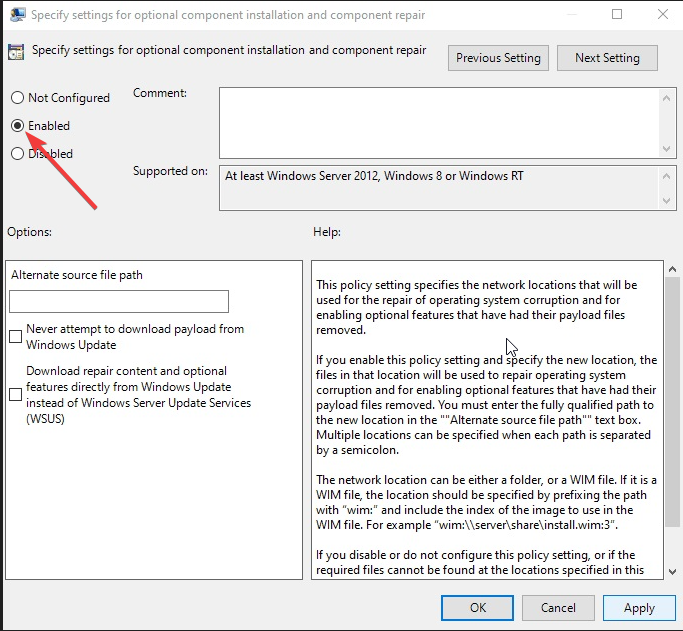
- Select the Enable radio button.

- Check the boxes for Never attempt to download payload from Windows Update and Download repair content optional features directly from Windows Update instead of Windows Server Update Services (WSUS).

- Click Apply and OK to save the changes.
- Press Win + R keys to open the Run dialogue.
- Type gpupdate /force and click OK to update the Group Policy Editor.
- Restart your PC.
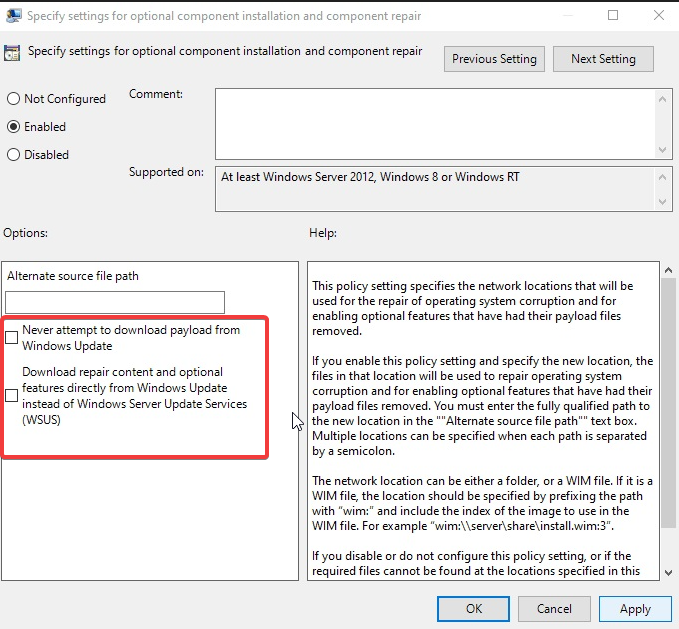
Many of our readers have reported that tweaking the Group Policy as shown above has helped them resolve the 0x800f0907 error.
3. Manually update the .NET Framework
- Note down the KB number of the failing .NET Framework.
- Visit Microsoft’s Update Catalog website.
- Search for the KB number of the .NET Framework and download it.

- Open the setup file and run the installation.
- Restart your PC.
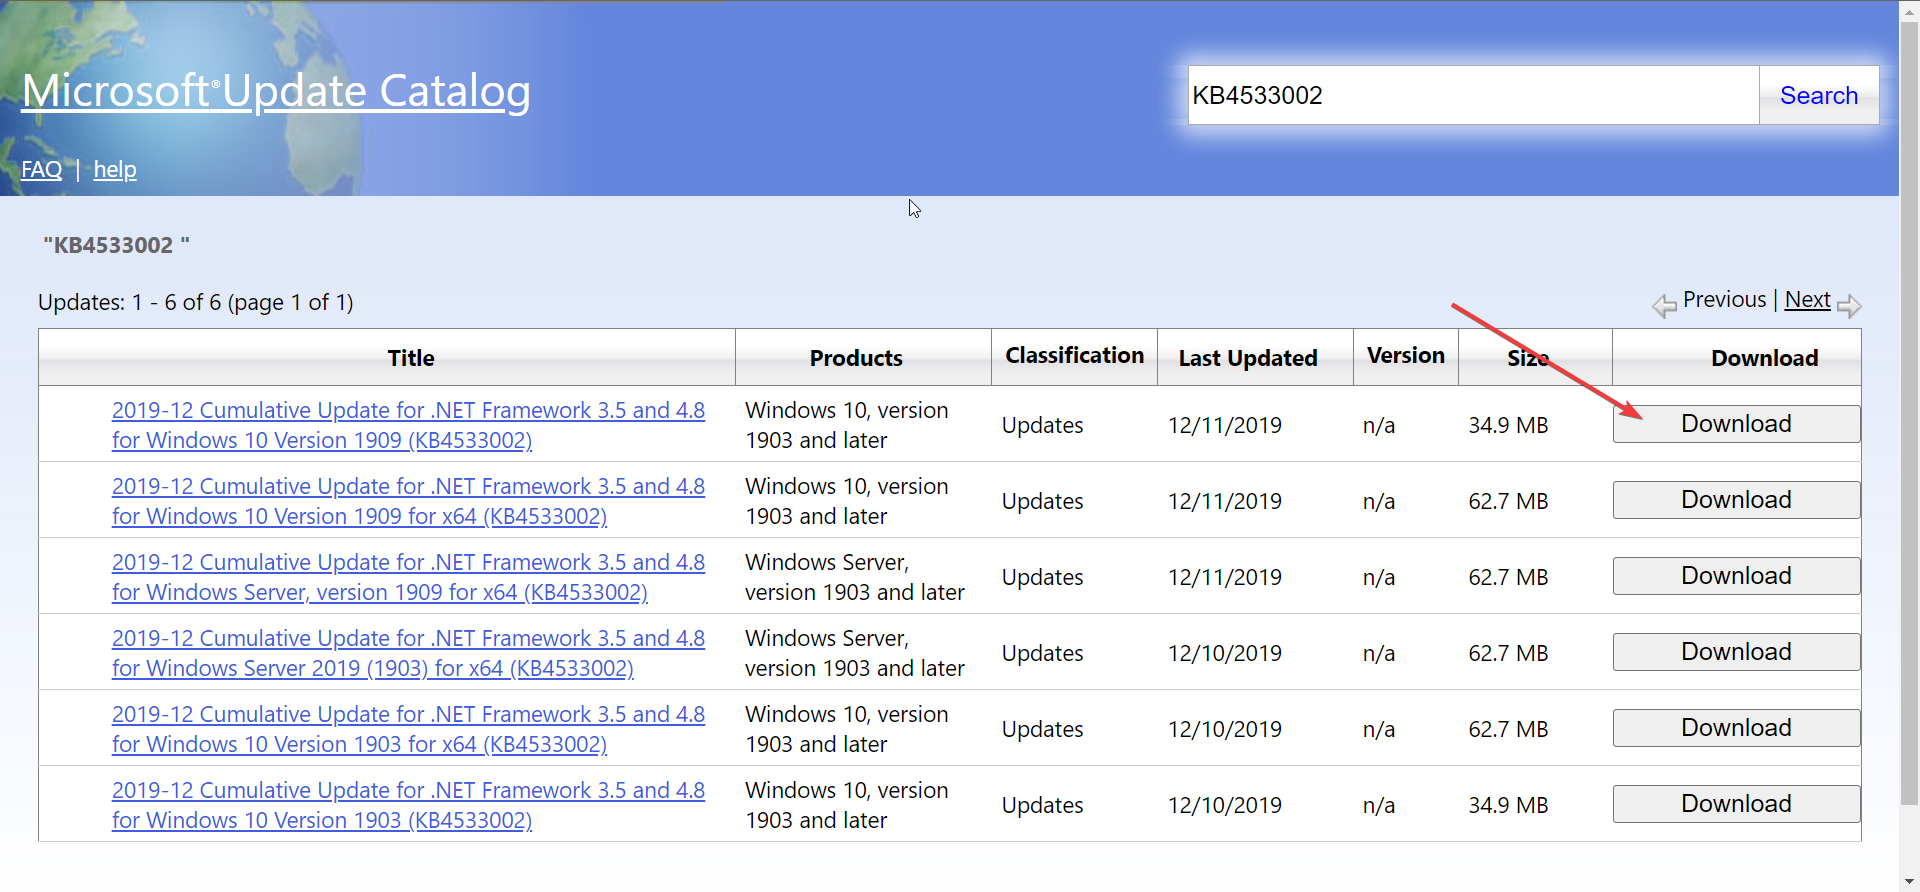
This way you will be able to install the failing .NET Framework update on your PC. Microsoft Update Catalog is a safe and official website and it fetches the download files right from the official source.
4. Run the SFC scan
- Press the Win key to open the Start menu.
- Type Command Prompt and run it as an administrator.

- Type the below command and press Enter.
sfc /scannow
- Wait for the process to complete and restart your computer.
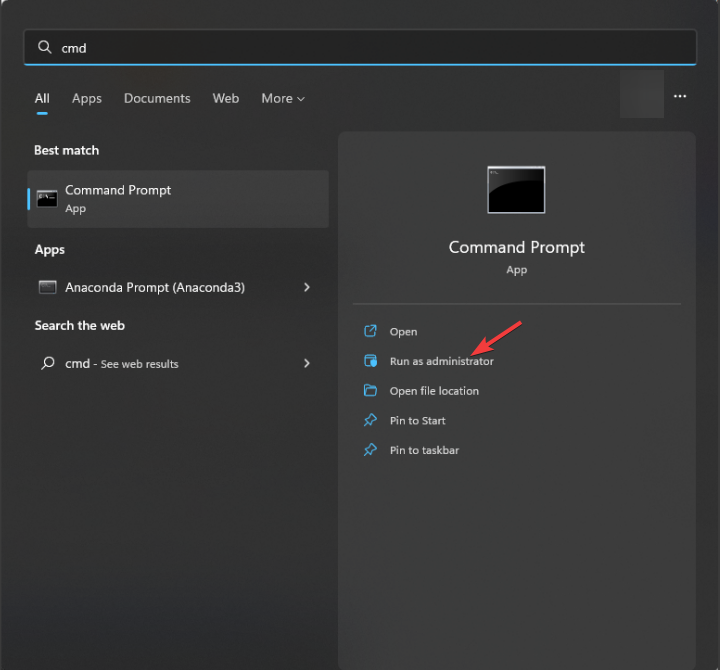
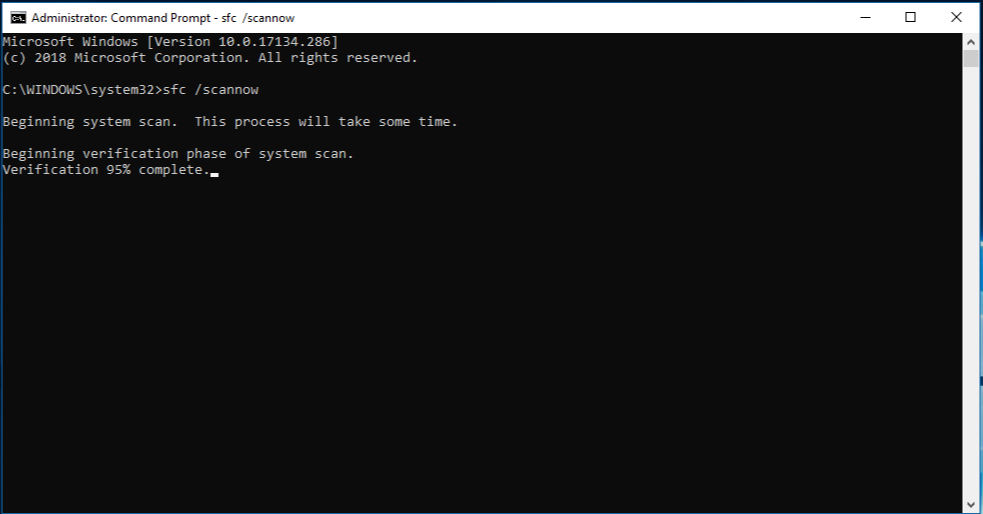
Some system files associated with the .NET Framework might be causing the 0x800f0907 error on your Windows 10 and Windows 11 PC. You can always try to run the SFC Scan to resolve the corrupt or missing system files.
5. Repair Windows using the installation media
- Download the Media Creation Tool.
- Insert a USB Drive to create a bootable media.
- Restart your Windows PC and press the Boot menu key (usually the Del key) to enter Windows Setup.
- Click the Repair your computer option.

- Wait for the process to complete.
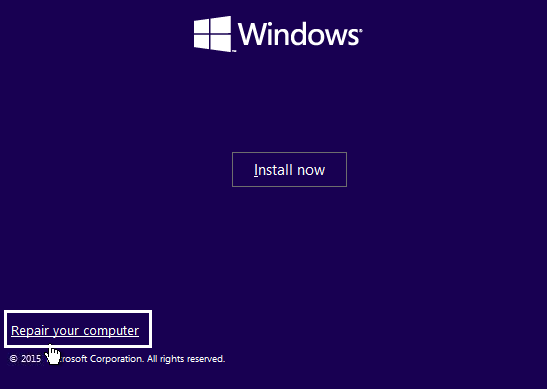
If nothing works then as a last resort, we recommend using the installation media and repairing your computer. This will definitely resolve the 0x800f0907 error on your PC.
That is it from us in this guide. Let us know in the comments below, which one of the above solutions fixed the 0x800f0907 error on your Windows 10 and Windows 11 PC.