Autopilot Error 0x81036502: How to Fix It in 4 Steps
Ensure you register the autopilot correctly on your PC
4 min. read
Updated on
Read our disclosure page to find out how can you help Windows Report sustain the editorial team Read more
Key notes
- The Autopilot Reset attribute in Windows allows you to reset and reconfigure your PC remotely.
- Service outage can affect the reset process causing error 0x81036502 on your computer.
- Updating or reinstalling the Windows operating system will help troubleshoot the Autopilot restart error.
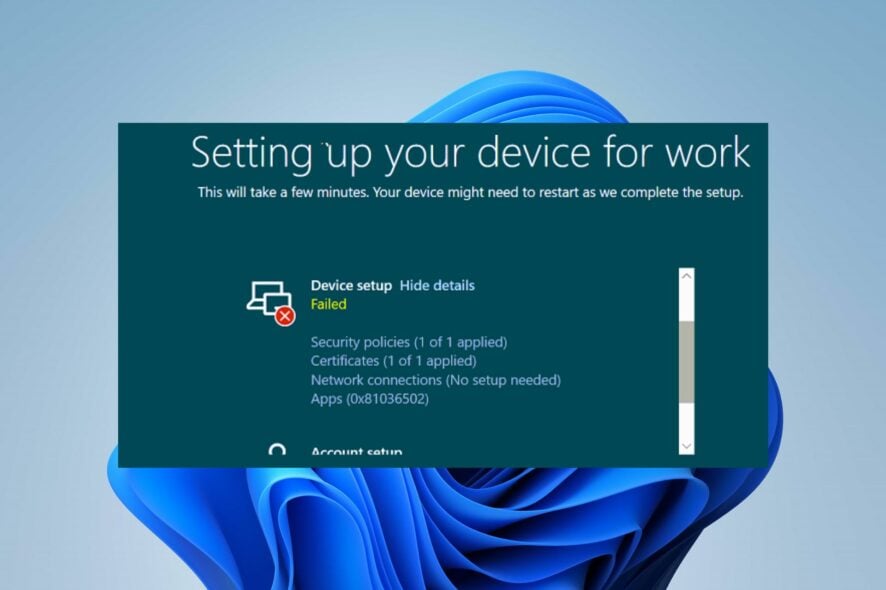
Windows Autopilot is a tool that simplifies the deployment and management of Windows devices. However, users report the Autopilot failing at the Enrollment Status page- error 0x81036502, and it can also be a timeout issue.
Hence, this guide will delve into the causes of this error and offer solutions to rectify it. Also, you may be interested in our guide on fixing Autopilot.dll WIL error reported on Windows 11.
What causes the Windows Autopilot Reset Error 0x81036502?
Error code 0x81036502 occurs due to a communication failure between the device and the Autopilot service in the cloud. Here are some common causes of this error:
- Incorrect date and time settings – The device’s date and time settings may be inaccurate, which can cause issues with the Autopilot service. Also, the error can occur if the computer’s clock is not synced correctly with the time zone.
- Improper registration – If the Autopilot service is not registered appropriately on your device or an incorrect Autopilot profile on the computer can cause the error.
- Service outage – The Autopilot service may be experiencing an outage or other technical issues with the Microsoft Endpoint Manager service not being available can cause the error to occur.
- Antivirus or security software interference – Antivirus or security software on your PC may interfere with the Autopilot reset process.
These causes are liable to vary on different computers. To resolve the error, proceed with the troubleshooting steps below.
How can I fix Windows Autopilot Reset Error 0x81036502?
Here are some preliminary checks you can perform:
- Turn off background apps running on your PC.
- Temporarily disable antivirus software.
- Confirm if the date and time are correct for the right zone.
- Restart Windows in Safe Mode and check if the error is solved.
Proceed with the following advanced troubleshooting if the error persists.
1. Uninstall third-party antivirus app
- Press the Windows button, type Settings and Enter.
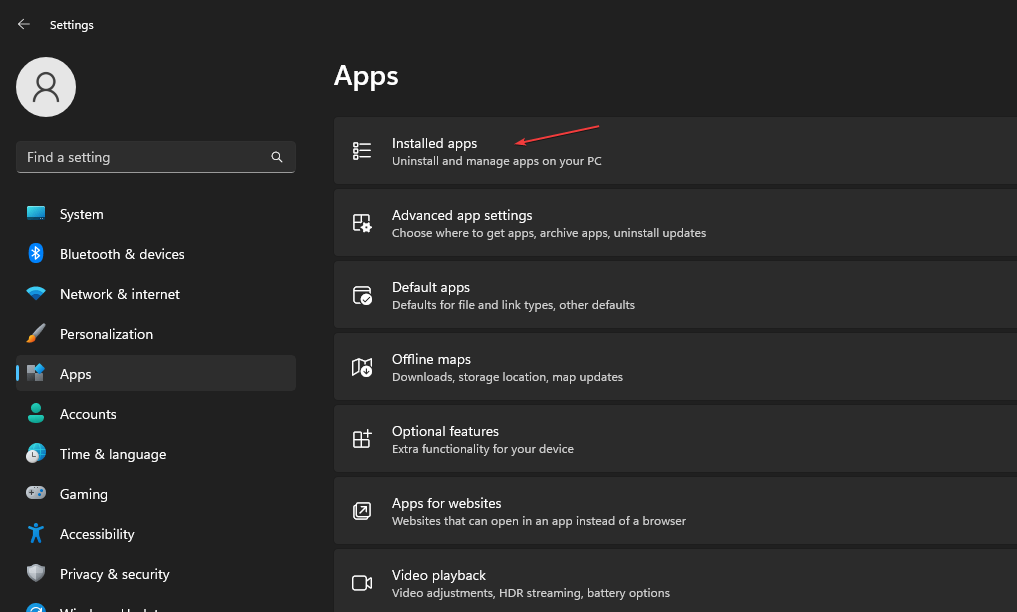
- Click the Apps category and click on Installed apps.
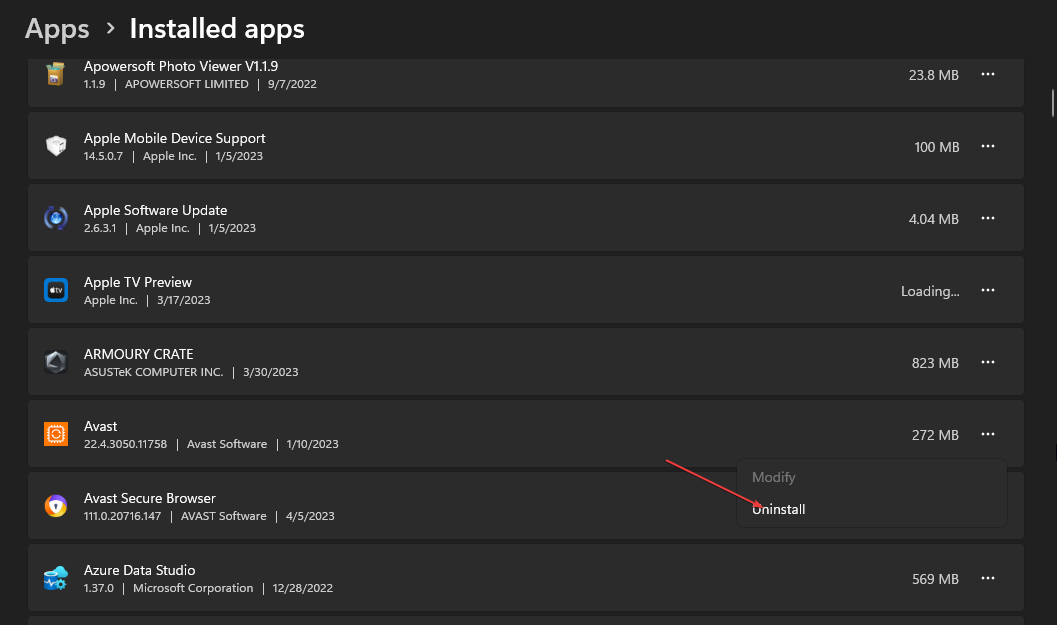
- Find the third-party antivirus app, right-click it, and click Uninstall.
- Follow the on-screen prompt to uninstall it.
Installing various antivirus apps on a device causes the antivirus apps to malfunction, so it is advisable to uninstall other antivirus software.
You can read about how to disable Windows Defender if you encounter issues.
2. Run an SFC/DISM scan
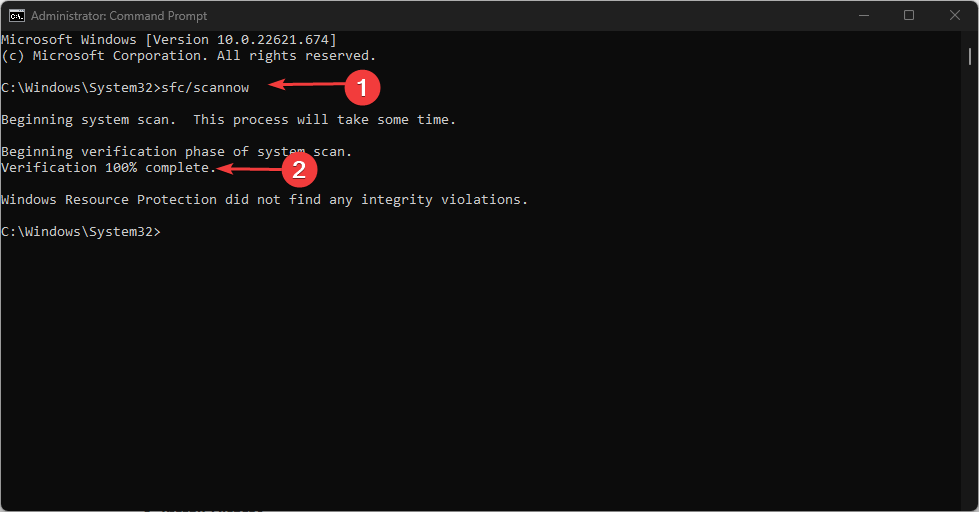
- Press the Windows button, type Command Prompt, and select the Run as administrator option to open it.
- Click Yes if the UAC Windows prompt appears.
- Type the following and press Enter:
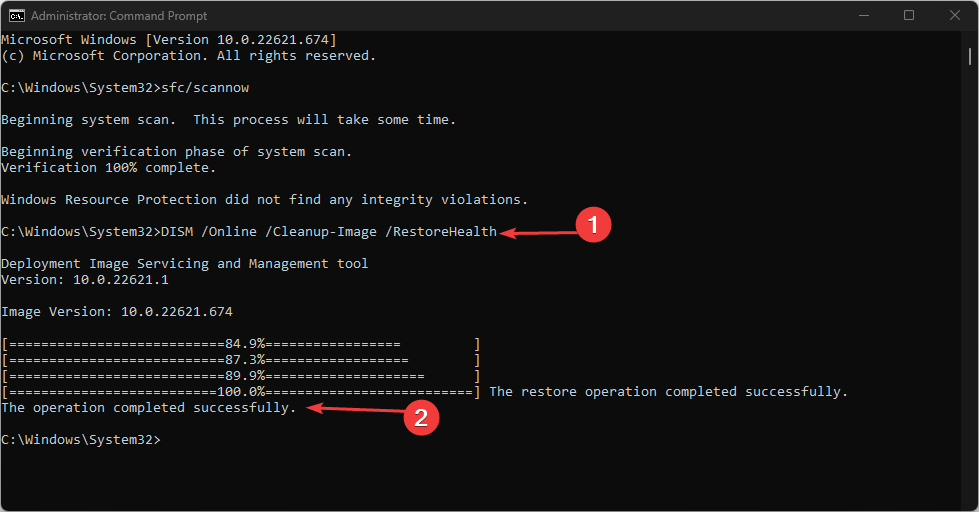
sfc /scannow - Then input the strings and press Enter:
Dism/Online/Cleanup-Image/RestoreHealth - Wait for the process to complete, restart your PC and check if the error persists.
The SFC/DISM scan will locate and fix corrupt system files on your Windows device. Check our guide about how to run an SFC scan on Windows.
Alternatively, you can better run a dedicated system repair solution that will detect Windows-related issues in minutes, will scan automatically, and repair any issues that cause the error code 0x81036502.
3. Update Windows OS to the latest version
- Press the Windows + I key to open the Windows Settings.
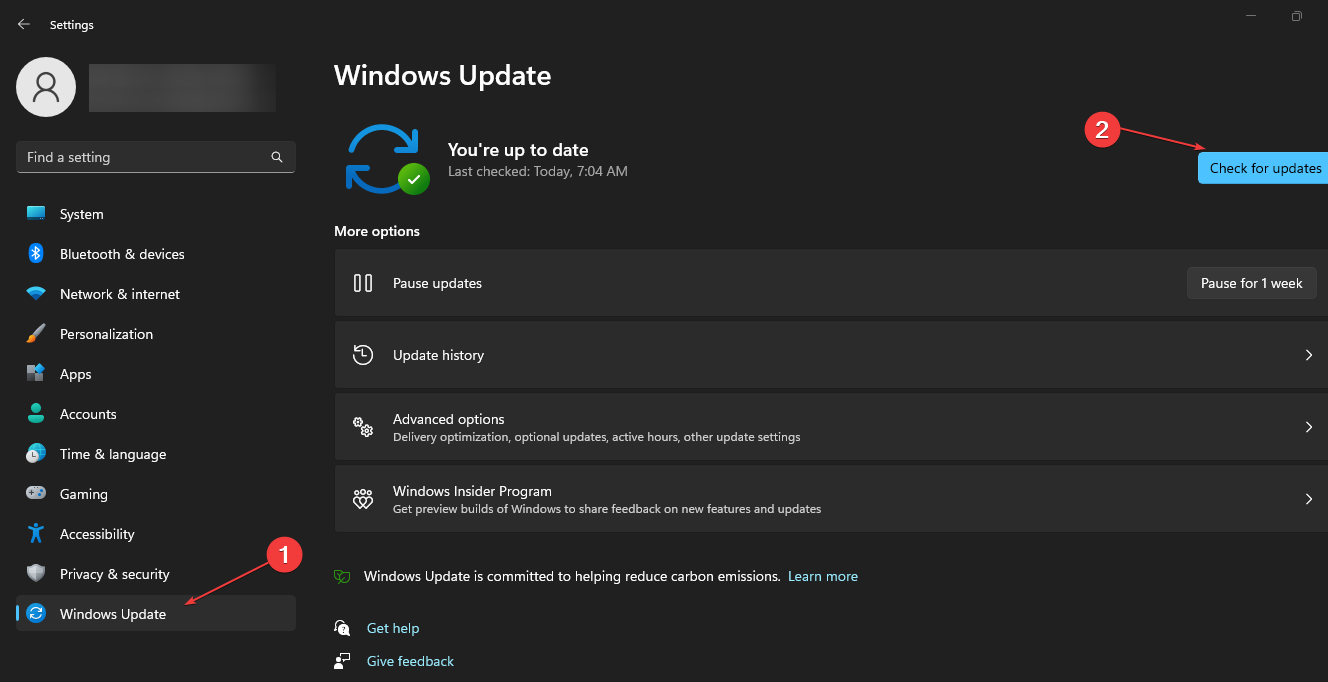
- Select the Windows Update and click on the Check for updates button. Wait for the process to complete, and select the Download & Install button for available updates.
Updating the Windows OS will download all the system requirements to complete the reset process and fix bugs impeding it.
4. Reset Windows
- Press the Windows + I key to open the Windows Settings.
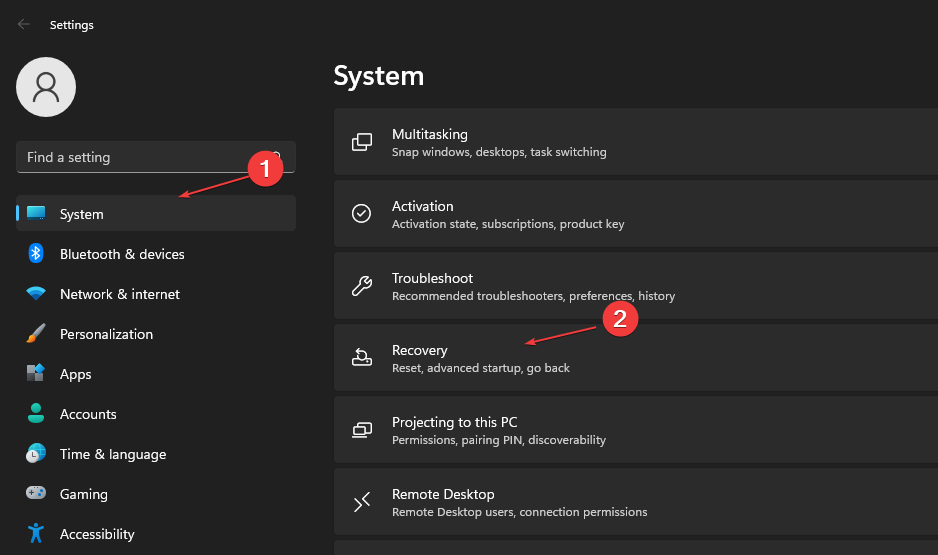
- Choose System and click on Recovery.
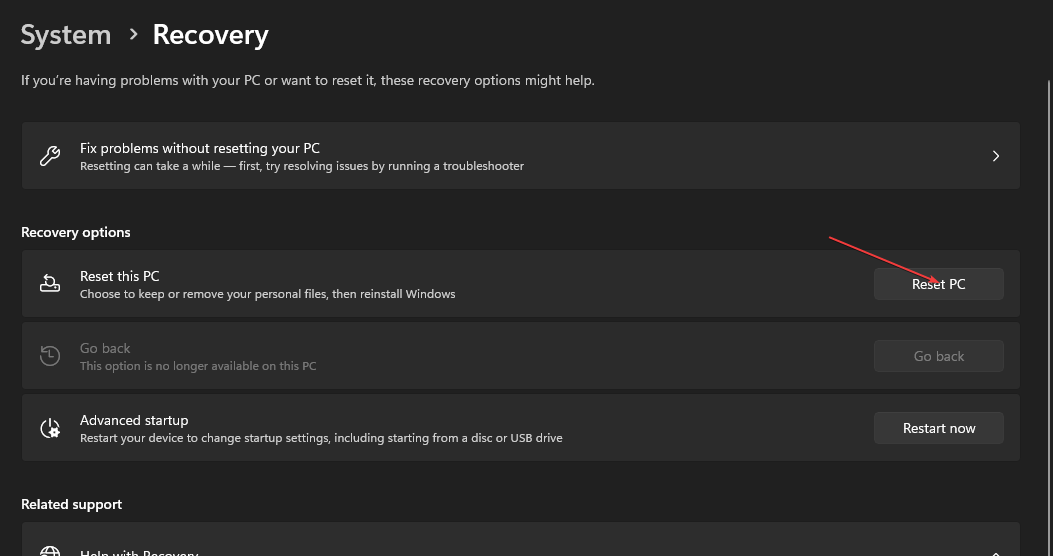
- Select the Reset PC button from the right side pane.
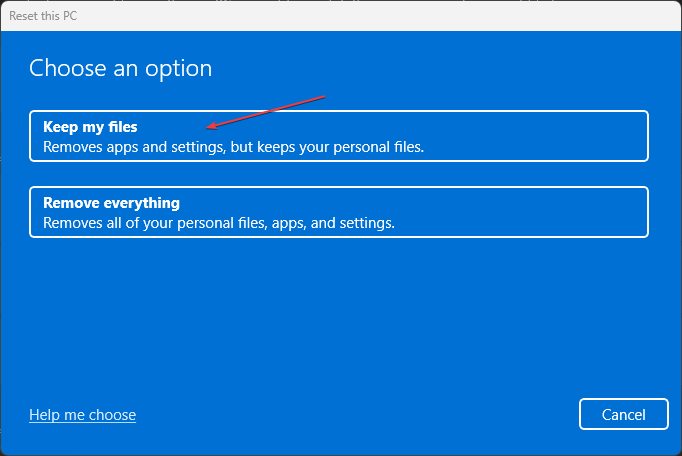
- Select the Keep My Files option or Remove everything option, to perform a full Windows reset.
The process above will restore Windows OS settings to factory default and delete third-party apps. We have a step-by-step guide on reinstalling Windows 11 OS on your computer.
In addition, you can read about how to fix Windows Update error 0xc1900223 on your PC. Also, do not hesitate to check our detailed guide about why Windows 11 update fails and how to fix it on Windows 11.
Should you have further questions or suggestions, kindly drop them in the comments section below.

