Windows Update Error 0x80070026: Fixed
5 min. read
Updated on
Read our disclosure page to find out how can you help Windows Report sustain the editorial team Read more
Key notes
- When updating your Windows, you sometimes get error code 0x80070026.
- It's not something to get extremely worried about and it should be easily fixed using one of the solutions below.
- Repair tools can come in handy on various occasions. See our recommendations in the Troubleshooters section.
- We've extensively documented most Windows 10 issues, so take a look at the Errors Hub.
The Windows update error code 80070026 usually appears in Windows 10 when you try to install the latest updates.
A possible reason as to why you get this error code is the fact that your C:Users folder was changed to another directory, like F:Users resulting in potential system errors with the Windows Update feature.
Luckily, there are a few very easy methods to fix error code 80070026 and resume your everyday work. So just follow the steps listed below in the order they are described and you’ll have your operating system up and running in no time.
How can I fix the Windows Update error 0x80070026?
- Delete the content of the Temp folder
- Copy the $$PendingFiles folder
- Check your antivirus
- Run DISM
- Refresh your PC
- Run the Windows Update Troubleshooter
- Reset Windows Updates components
- Install updates manually
1. Delete the content of the Temp folder
- Reboot your PC.
- Log in with your administrator account.
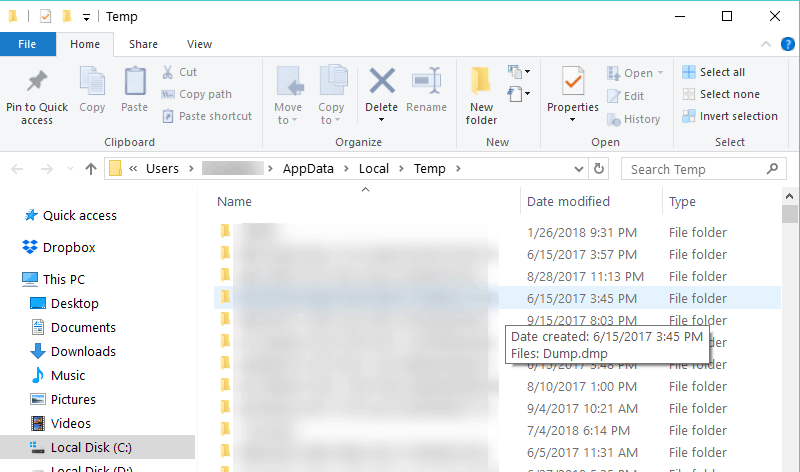
- From the “C:” partition (or your main partition) double-click the Users folder.
- Double-click the itnota folder.
- Open AppData, then go to Local.
- Now, open the Temp folder and delete all the contents.
Note: Before attempting the steps above backup call your important data like files and folders.
2. Copy the $$PendingFiles folder
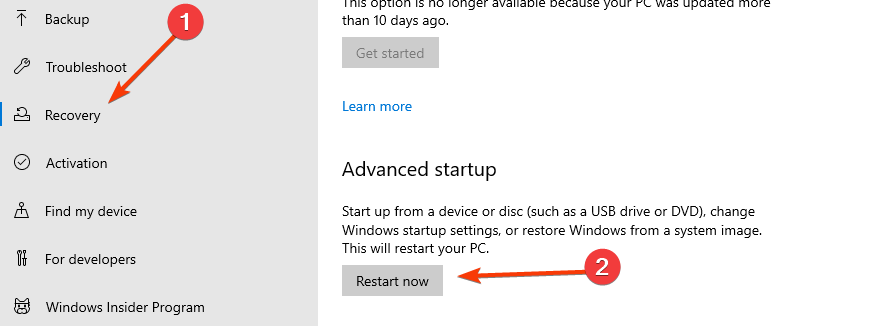
- Open the Windows 10 Settings menu.
- Choose Update & Security.
- In the Recovery tab, scroll down to Advanced Startup.
- Click on Restart now.
- After the reboot process has finished, you should get to a window that says Choose an option.
- Select Troubleshoot and look for the Advanced options.
- Next, click or tap on Command Prompt.
- Write the following command and press the Enter:
dir C: - Do this for all your partitions to determine which one is on the SSD or external hard drive, and which one is on the internal hard drive. (We are going to take partition G as the external hard drive and partition H as the internal hard drive.)
- In the command prompt window, write the following and press Enter:
robocopy /copyall /mir /xj G:$$PendingFiles H:$$PendingFiles - Afterward, run the following and press again Enter:
rmdir /S /Q G:$$PendingFiles - Now open the File Explorer and see what letter the Internal HDD has. (We are going to use C.)
- Write in the command prompt window the following and hit Enter:
mklink /J G:$$PendingFiles C:$$PendingFiles - Exit Command Prompt and reboot your device.
- When the device starts you will need to open your Windows Update feature and check again if you still get the error code 80070026.
Note: If some of the steps listed for the second solution are not available on your Windows 10 device, skip this solution completely and go to the next one.
3. Check your antivirus
Quite frequently, your antivirus prevents you from updating your computer. To check if your antivirus tool is the culprit, temporarily disable it and then hit the Check for updates button.
Many times, disabling your antivirus won’t be enough so you will need to uninstall it completely. If this proved helpful, that means you should consider switching to another solution.
There are numerous valuable antivirus programs available, and many of them are designed with unique and interesting features for each user’s needs.
4. Run DISM
- In the search dialog box, write Command Prompt and open as admin.
- Write the following and hit Enter: DISM.exe /Online /Cleanup-image /Scanhealth
- Then, run the following and press Enter: DISM.exe /Online /Cleanup-image /Restorehealth
- Exit and reboot your operating system once more.
See if your Windows Update feature is working correctly.
5. Refresh your PC
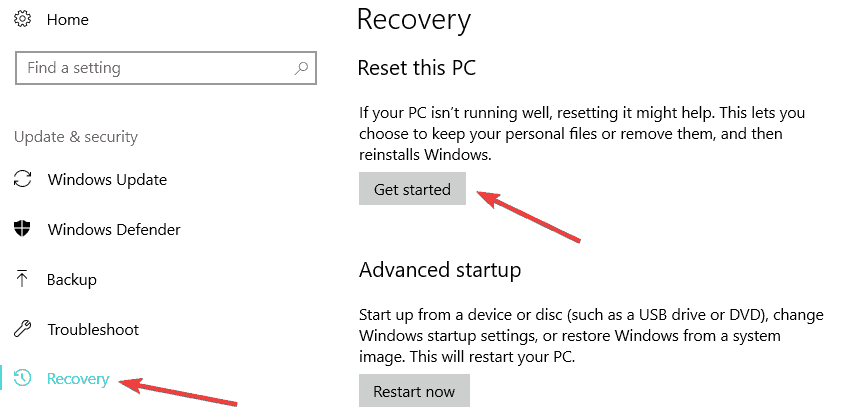
- Open the Recovery menu as shown in the second solution.
- In the Reset this PC section click on Get Started.
- Follow the instructions on the screen to finalize the System Refresh and try again your Windows Update feature to see how it goes.
6. Run the Windows Update Troubleshooter
If the issue persists and you want to take a short break from any complex troubleshooting solutions, then you can run Windows’ built-in update troubleshooter.
This useful tool can help you fix general update issues so that you can finish installing the latest OS updates on your PC.
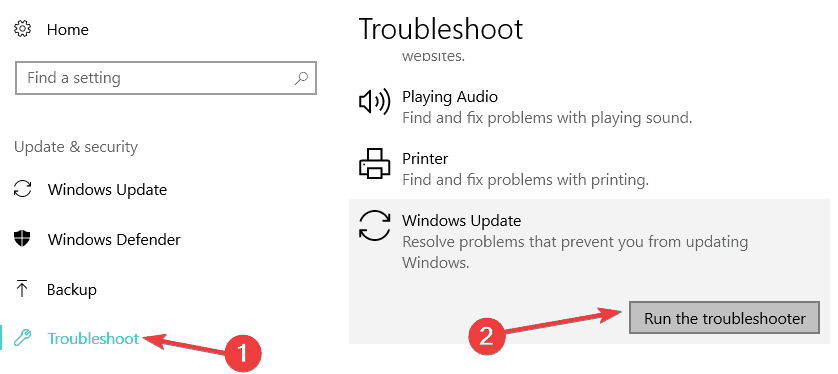
If you’re running Windows 10, go to Settings > Update & Security > Troubleshooter and run the update troubleshooter as shown in the screenshot below.
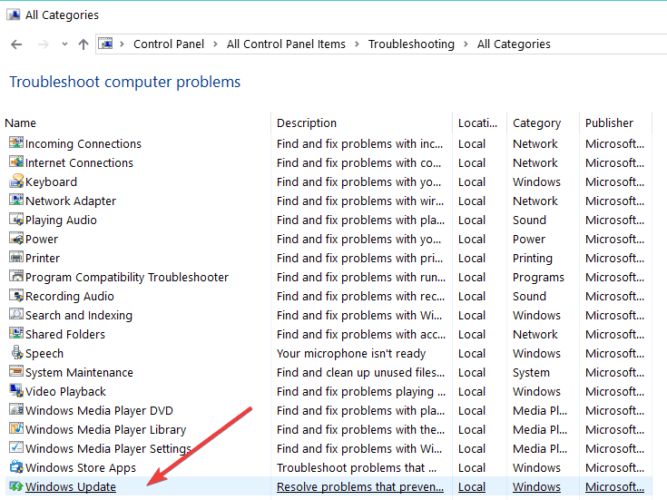
If you’re running Windows 7 or Windows 8.1, you can launch the Update troubleshooter from Control Panel.
Type troubleshoot in Contol Panel windows, open the tool and select View All to list all the troubleshooting tools. Locate and run the Update troubleshooter.
7. Reset Windows Updates components
- Launch Command Prompt as admin again.
- Stop the Windows Update Services by typing the following commands and hit Enter after each one:
net stop wuauservnet stop cryptSvcnet stop bitsnet stop msiserver - Rename the SoftwareDistribution and Catroot2 folder by typing the commands:
Ren C:WindowssoftwareDistribution SoftwareDistribution.oldRen C:WindowsSystem32catroot2 Catroot2.old - Restart the Windows Update Services by typing the following commands:
net start wuauservnet start cryptSvcnet start bitsnet start msiserver - Exit Command Prompt, restart your computer and check if you can install the latest updates.
8. Install updates manually
If the Windows Update service is still not working, try to install the problematic updates manually.
For example, if you’re trying to install the latest hardware driver updates, go to the manufacturer’s website and get the updates from there.
If you’re trying to install the latest Windows patches, go to Microsoft’s Update Catalog, enter the KB number of the respective update(s) and hit the download button.
If you’ve carefully followed the methods above, you now have a working Windows Update feature on your device.
If you need further assistance, you can write to us in the comments section of the page situated below and we will get back to you as soon as possible.

