How To Turn Off Mouse Acceleration in Windows 10 With Ease

Learn how to turn off mouse acceleration in Windows 10 in easy steps.
This setting adjusts the mouse cursor’s speed based on fast or slow movements. If you turn on acceleration and move the mouse slowly, the cursor will move on the screen slowly, and vice versa.
However, it can stand between you and your success in first-person shooter PC games, graphic design, and digital art. Read on as I present tried and tested methods to optimize your mouse cursor movements by disabling acceleration.
How To Turn Off Mouse Acceleration in Windows 10
Here’s how to easily deactivate mouse acceleration or pointer precision:
Using the Mechanical DPI Button
Most of the advanced and premium gaming mice come with a DPI button. It controls the sensitivity as well as the acceleration level physically. Therefore, you don’t need to make any changes on your PC.

You must consult the mouse’s user manual to learn which is the DPI button and how to reduce or go back to the default DPI. Usually, you can change it on repeated presses.
The effect is real-time, so you’ll immediately see the change on your screen. Certain RGB mice will also show a flashing RGB light to confirm that changes have become effective. For example, a RedGear mouse shows one red flash when you reduce the DPI setting to default.
Using the Windows Settings App
- Press the Windows + I keys to launch the Windows 10 Settings app.
- Type Mouse in the Find a setting search field and click on the Mouse settings option.

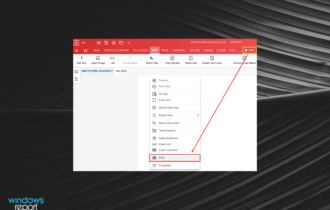
- Click on the Additional mouse options hyperlink below the Related settings section.

- You should now arrive in the Mouse Properties dialog box. The Buttons tab will be the default selection.
- Navigate to the Pointer Options tab.
- Uncheck the box for Enhance pointer precision.
- Click Apply and then select OK to save the changes.

Using a Command Prompt Script
You can create a batch script file to automate the process mentioned above. Once the batch script is ready, execute it once and reboot the PC to ensure the changes take effect. Here’s how:
- Open the Notepad from the Start Menu by typing in its name.

- Copy and paste the following script inside the blank Notepad file you’ve just opened:
REG ADD "HKEY_CURRENT_USER\Control Panel\Mouse" /v MouseSpeed /t REG_SZ /d 0 /f
REG ADD "HKEY_CURRENT_USER\Control Panel\Mouse" /v MouseThreshold1 /t REG_SZ /d 0 /f
REG ADD "HKEY_CURRENT_USER\Control Panel\Mouse" /v MouseThreshold2 /t REG_SZ /d 0 /f
- Press Ctrl + S to save the file.

- Now, rename the file to disable_mouse_acceleration.

- Again, rename, and this time delete the TXT extension and replace that with the BAT extension.

- If there’s any confirmation dialog, click Yes to confirm the change.
- Right-click on the batch file and choose Run as administrator to disable mouse acceleration.

You can save the batch script file on the Desktop to access it quickly.
To undo the changes you’ve made, you can create another batch script in the same way as mentioned earlier. But, this time use the following script:
REG ADD "HKEY_CURRENT_USER\Control Panel\Mouse" /v MouseSpeed /t REG_SZ /d 1 /f
REG ADD "HKEY_CURRENT_USER\Control Panel\Mouse" /v MouseThreshold1 /t REG_SZ /d 6 /f
REG ADD "HKEY_CURRENT_USER\Control Panel\Mouse" /v MouseThreshold2 /t REG_SZ /d 10 /f
You can rename this batch file to enable_mouse_acceleration.bat and save it in Desktop for easy access. When you execute it, Windows 10 will set the MouseSpeed, MouseThreshold1, and MouseThreshold2 values back to their default settings.
Using the Custom Curve LE Tool
If you’re looking to enhance gaming accuracy, you should try the Custom Curve LE mouse adjustment tool.
You can download a free and test edition from the official MouseAcceleration.com portal. After you visit the website, click on the Download LE button.

Install the app on your PC. You should see its shortcut on the Desktop as well.
Firstly, disable mouse acceleration by any of the methods mentioned earlier.
Now, run the app from the Desktop.
You should see a graph and control interface as shown below.

The velocity is plotted on the X-axis and the corresponding sensitivity is on the Y-axis.
Click on the point on the Y-axis to move it up or down to increase or decrease sensitivity.

To adjust the DPM (Dots Per Millisecond) value, click on the point that’s parallel to the X-axis and move it left or right to decrease or increase the DPM.

You might have to do a few trials and errors to fine-tune the mouse performance curve. The changes will take effect in real time. Don’t forget to click Apply to save the changes you’ve made.
I’ve used this tool to optimize my mouse for fast-paced gaming events where I needed both slow and quick moves.
Take fast-paced first-person shooters for example. Spotting enemies requires quick flicks of the mouse to snap your aim from target to target. But then, in a split second, you might need to switch to magnified optics and make precise micro-adjustments for a headshot. This constant shift between lightning-fast swipes and pinpoint control is why optimizing your mouse settings is so important.
In such a challenging situation, Custom Curve LE along with disabled acceleration produces the best results.
Summary
So far, you’ve learned how to turn off mouse acceleration in Windows 10 using tried and tested methods. You’ve also found out how to create automated batch scripts to disable and enable it. Moreover, if you’re having trouble with cursor flickering, we’ve got just the guide for you.
To improve gaming navigation, you can use the third-party tool-based method to fine-tune the mouse cursor’s movements.
Read our disclosure page to find out how can you help Windows Report sustain the editorial team. Read more


Improve this guide


User forum
0 messages