Windows 11 Administrator Account Locked Out: 9 Proven Fixes
9 min. read
Updated on
Read our disclosure page to find out how can you help Windows Report sustain the editorial team. Read more
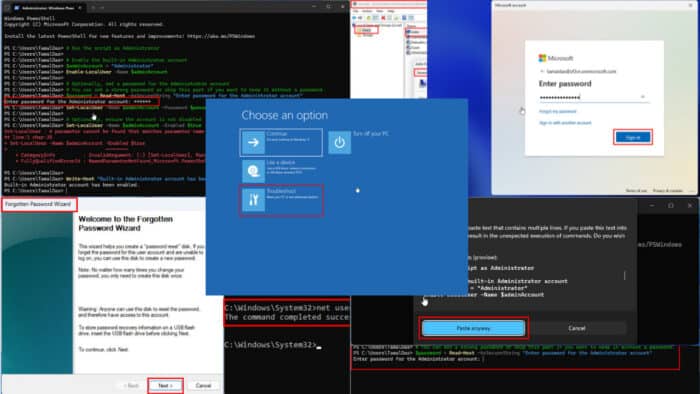
Is your Windows 11 administrator account locked out? Try these proven fixes for a quick resolution.
This can happen for various reasons, such as:
- Too many failed login attempts
- Account Lockout Policy settings
- Domain Policy settings
- Too many failed remote access attempts
- A corrupted user profile.
You’ll need trusted solutions that don’t waste your time or put your files at risk. To address this, I’ve tested different approaches to recover an admin account in Windows 11. Here are the methods that worked for me.
How To Fix Windows 11 Administrator Account Locked Out
Follow the steps in the order they appear in:
Use Microsoft Account to Reset Password
This method has a higher success rate than others. However, the only downside is you must be connected to the internet and should know the work or personal Microsoft Account credentials before attempting. Keep your account information handy and try these steps:
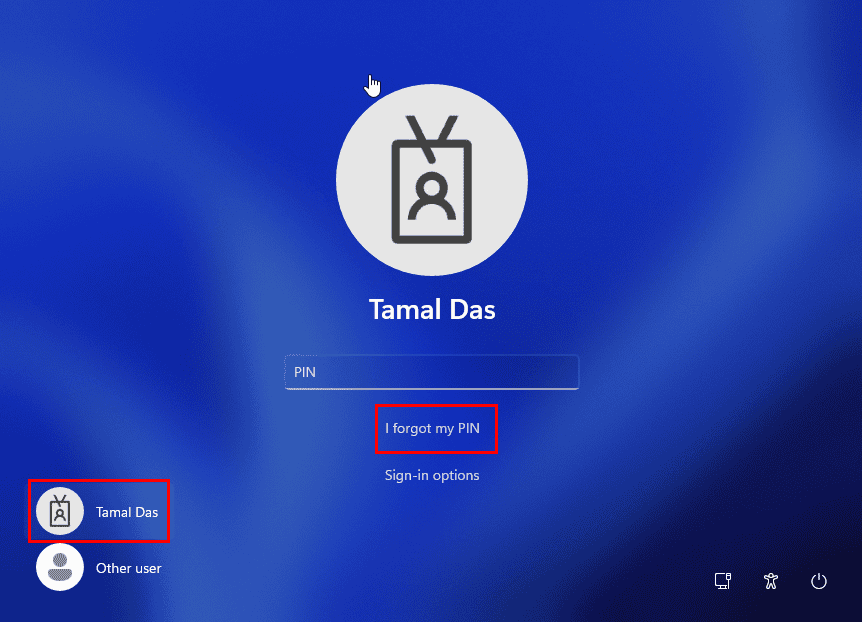
- Go to the Windows 11 Sign-In screen.
- Select the admin account you want to sign in with from the lower left corner.
- Click on the I forgot my PIN link.
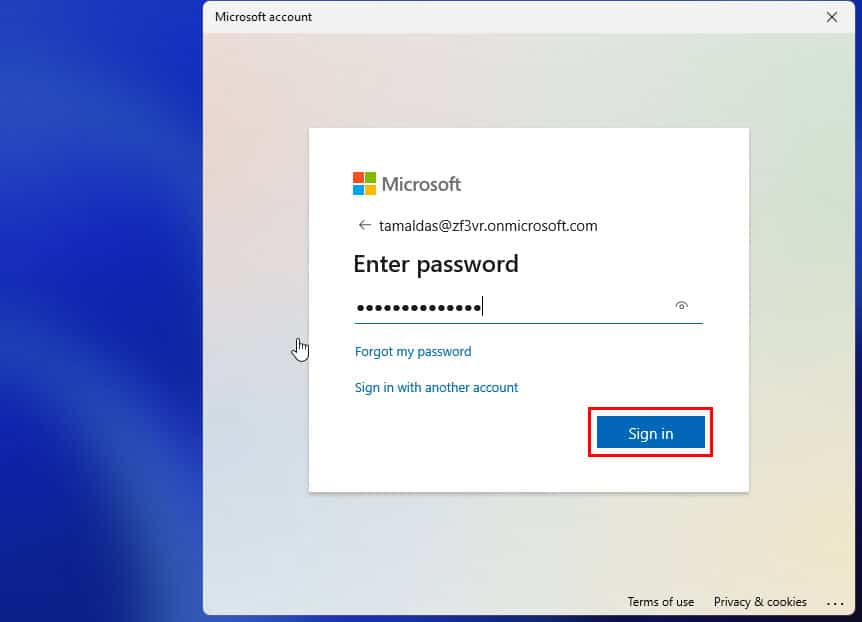
- The Microsoft Account sign-in dialog will open.
- Enter your password to continue.
- On the Approve sign-in request screen, use the Microsoft Authenticator app on your phone.
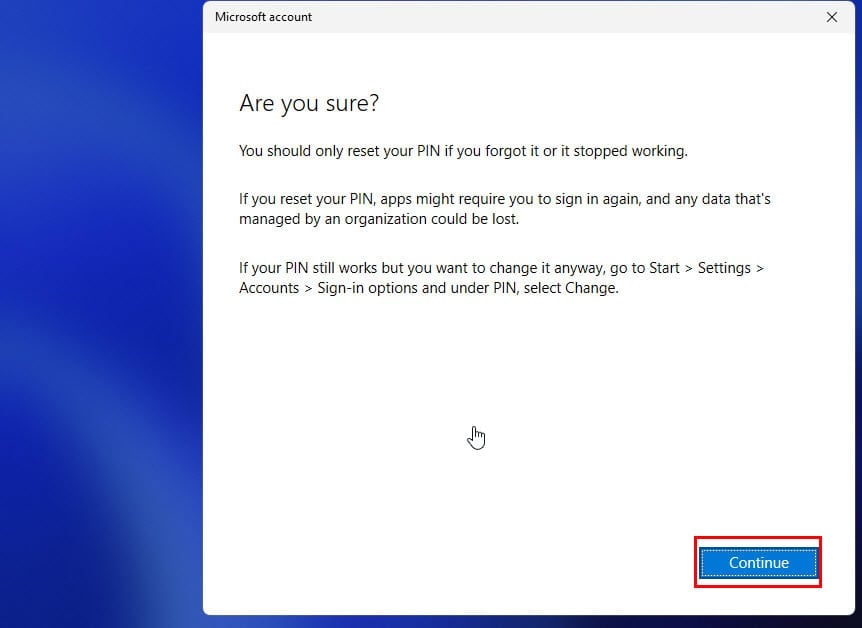
- You’ll see a warning screen explaining to you the risks involved in the process.
- Click Continue and follow the on-screen instructions to unlock your admin account.
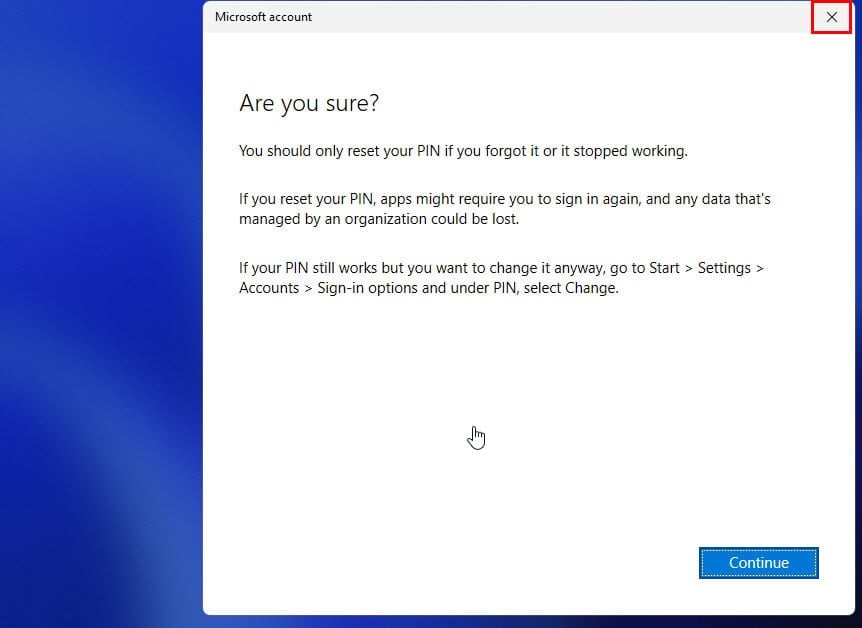
If you don’t wish to continue after the 8th step with resetting your PIN and syncing your Microsoft Account from scratch, there’s a workaround you can try.
Close the Are you sure? dialog box.
Windows 11 should show your user account’s avatar or initials briefly and automatically take you to the Desktop, bypassing the sign-in screen.
The above approach will only work if the underlying user account files in the Windows 11 PC aren’t corrupted.
Use Another Administrator Account
- If another admin user can access the same PC, use that to log in.
- Click the Start menu button and type Computer.
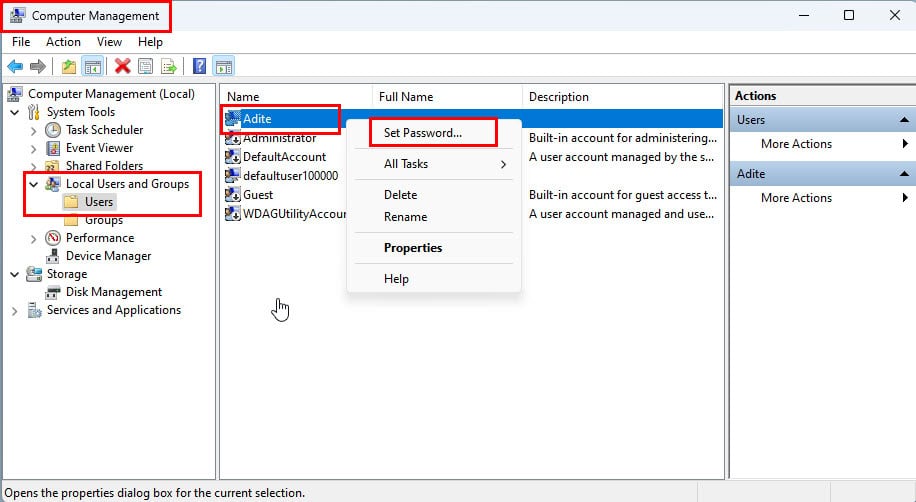
- Select the Computer Management tool below the Best match section on the Start menu.
- On the Computer Management interface, select the Local Users and Groups menu in the left-side navigation panel.
- Double-click the Users menu on the right.
- You should now see all the user accounts.
- Select the one that’s locked out.
- If you can’t log in due to a password issue, right-click and select Set Password.
- On the warning message that pops open, click Proceed and follow on-screen instructions.
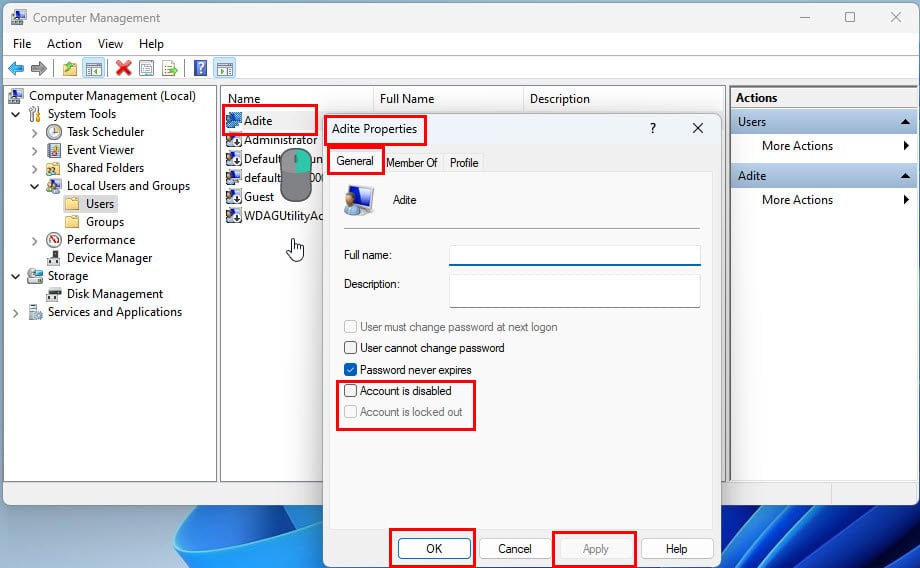
- If the PIN isn’t the issue, right-click on the selected user account and choose Properties from the context menu.
- Go to the General tab and uncheck the following boxes:
- Account is disabled
- Account is locked out
- Click Apply and OK.
Restart the PC to log in using your own admin account.
Use a Password Reset Disk
If you’ve got a password reset disk, here’s how you can put it to use when the Windows 11 administrator account is locked out:
- On the Windows 11 log-on screen, enter an incorrect PIN.
- When you see the Use a password reset disk instead prompt, click on that link.
- Insert the USB stick or CD/DVD disk you’ve got.
- Follow the onscreen prompts on the Password Reset Wizard to create a new PIN or password.
- Try to log back into your admin account.
If you haven’t got a Windows password reset disk, here’s how you can create one for future use:
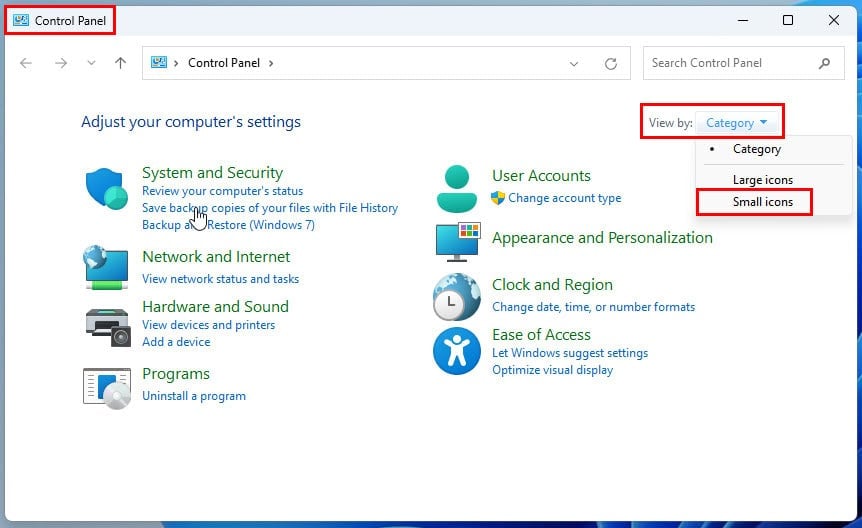
- Bring up the Start menu and type Control.
- Click on the Control Panel tool below Best match.
- Select the View by drop-down menu on the Control Panel interface and select Small icons.
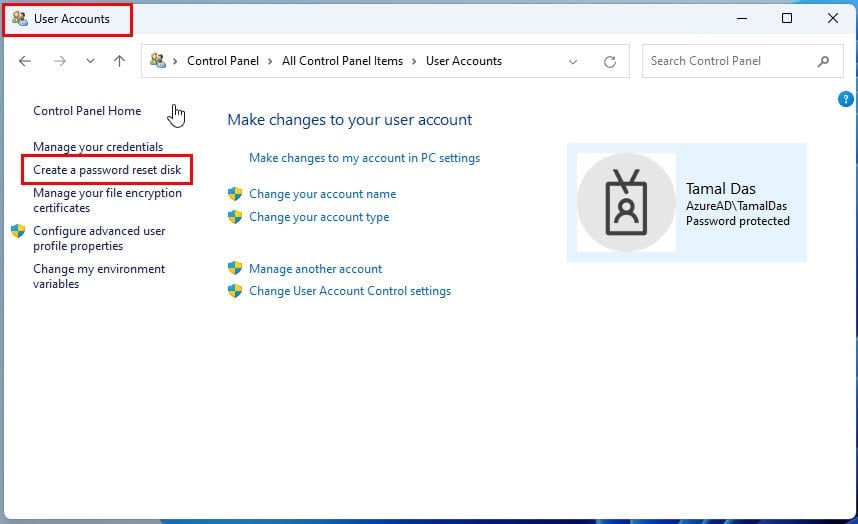
- Now, select the User Accounts link from the list of Control Panel resources.
- Click on the Create a password reset disk on User Accounts.
- The disk will be created for the currently logged-in account. To make a password reset disk for a different one, switch users on the PC.
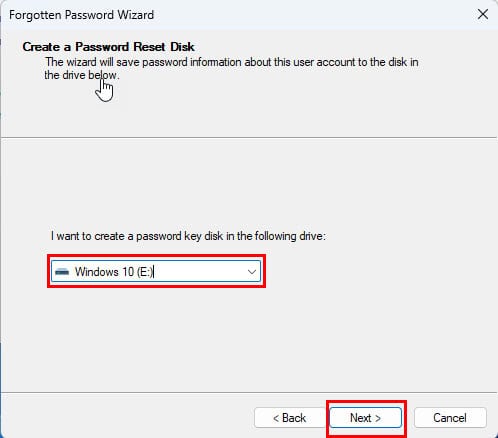
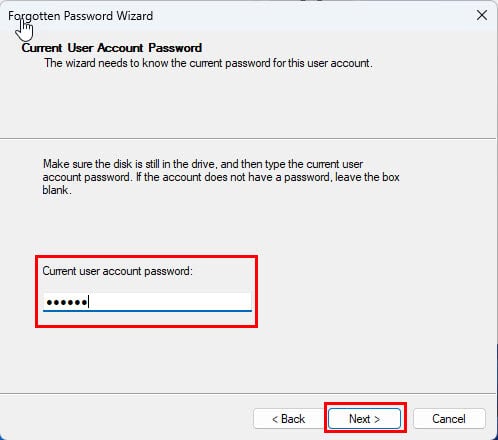
- The Forgotten Password Wizard will open. Click Next.
- Windows will automatically select the USB stick or CD/DVD available on the PC, if any.
- If none are there, insert any of the above alternative password reset disk media.
- Click Next.
- Enter the password or PIN for the logged-in user account on the next screen and hit Next.
- Now, follow the on-screen guidance to complete the process.
Activate Built-in Admin Account Using CMD
You can use a standard or admin account to enable the factory-configured administrator account that usually isn’t visible to a basic user. Here’s how:
- Press the Windows key and type CMD.
- Click on the Command Prompt tool shown below Best match.
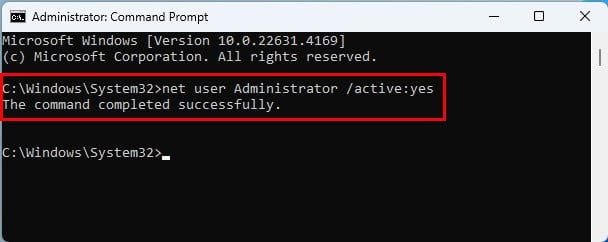
- Copy and paste the following command inside the CMD terminal:
net user Administrator /active:yes- Hit Enter to execute the code.
- If standard CMD doesn’t work, try it with admin privileges. Choose Run as administrator from the Start menu when you search for CMD.
Restart the PC. When it reaches the log-in screen, you should see a second user account as Administrator. Click on that and sign in.
Enable Hidden Administrator Account Using PowerShell
Windows PowerShell gives you more access to personalize the built-in admin account, like setting a custom password. You must first use an alternative administrator account to log in and perform these steps:
- Press Windows + X on the keyboard to bring up the Power User context menu.
- Click on the Terminal (Admin) option.
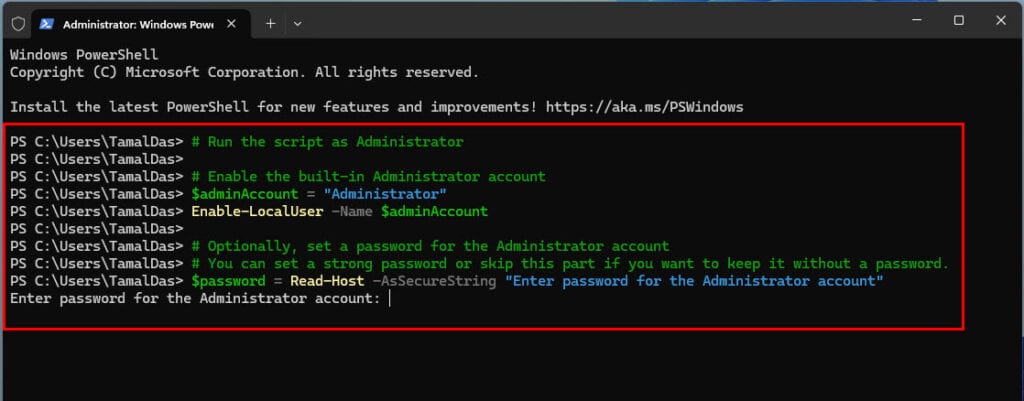
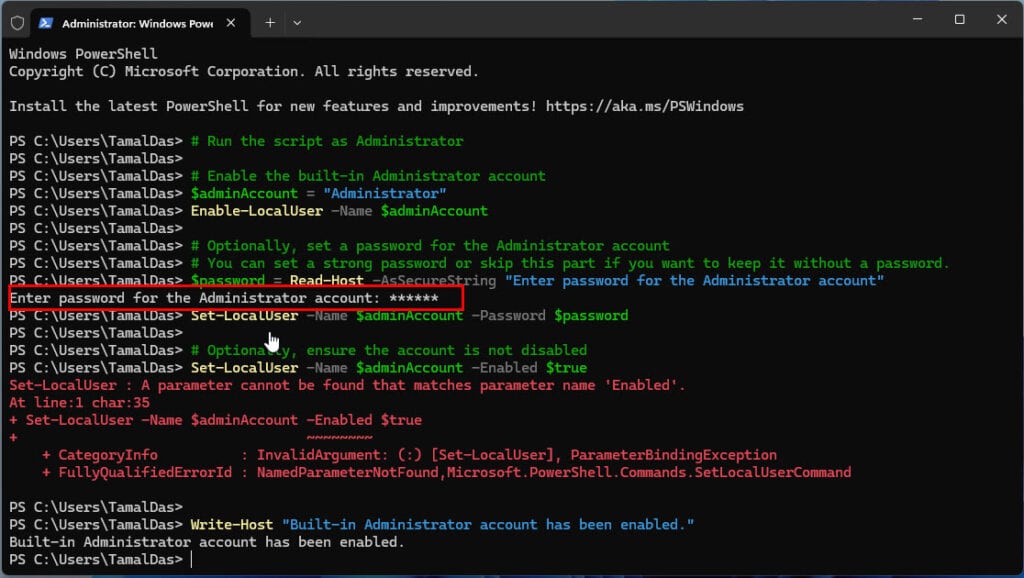
- PowerShell will open with administrative privileges. Copy and paste the following script into the console:
# Run the script as Administrator

# Enable the built-in Administrator account
$adminAccount = "Administrator"
Enable-LocalUser -Name $adminAccount

# Optionally, set a password for the Administrator account
# You can set a strong password or skip this part if you want to keep it without a password.
$password = Read-Host -AsSecureString "Enter password for the Administrator account"
Set-LocalUser -Name $adminAccount -Password $password

# Optionally, ensure the account is not disabled
Set-LocalUser -Name $adminAccount -Enabled $true

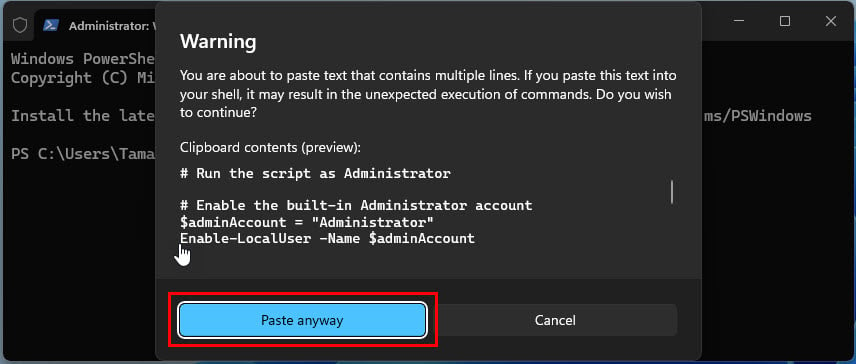
Write-Host "Built-in Administrator account has been enabled."- You might need to click on a Paste anyway pop-up.
- The script will run automatically and pause to ask you for the custom password.
- Type in the one you want to set and hit Enter.
- The script will continue to run and show the ‘Built-in Administrator account has been enabled.‘ message once done.
- Restart the PC and sign in with the newly activated admin account.
Using the Local Security Policy Tool
The Local Security Policy interface allows Windows 11 to control account lockout duration, threshold, and the lockout counter. So, use another admin account to access the PC and make the following changes in this security tool:
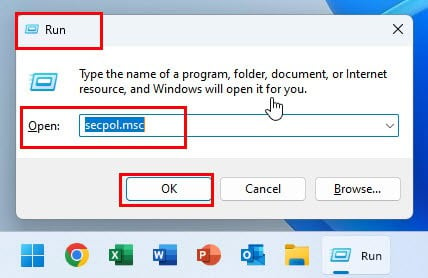
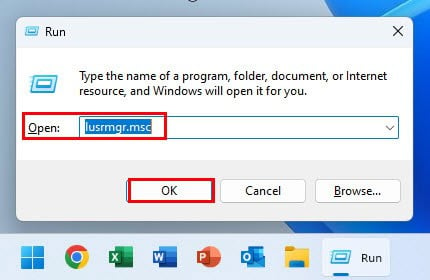
- Bring up the Run command by pressing the Windows + R keys together.
- Type
secpol.mscinside the Open field and hit Enter.
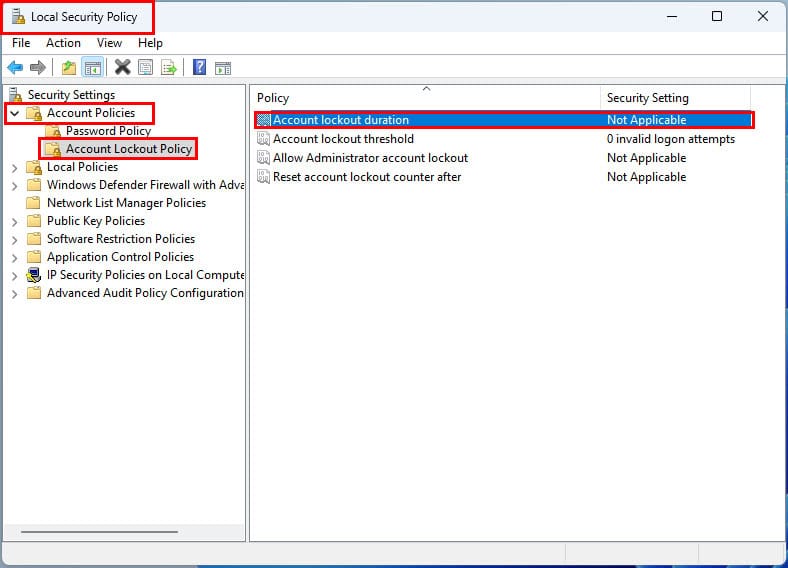
- The Local Security Policy tool will open.
- Double-click on the Account Policies directory in the left-side navigation panel.
- Select the Account Lockout Policy below the Password Policy directory.
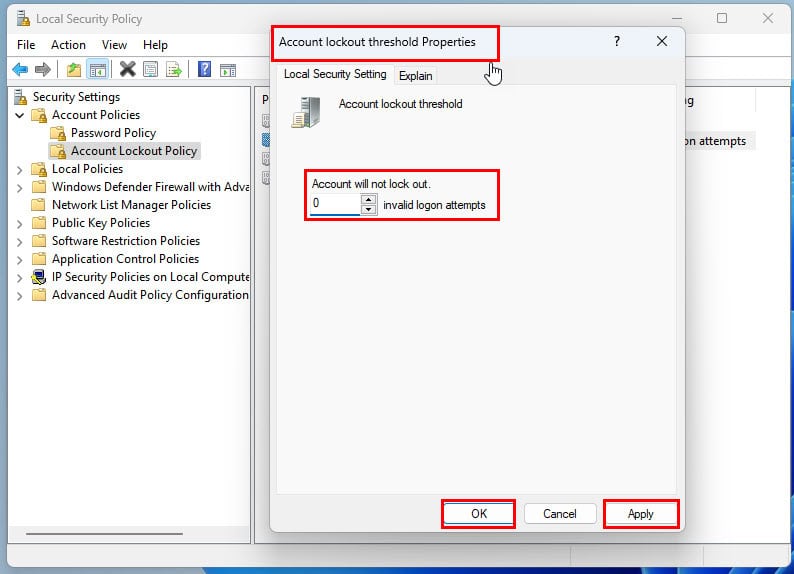
- On the right side, a few binary files will show up. Here are the changes you need to make:
- Account lockout duration: 00 minutes
- Account lockout threshold: 00 invalid logon attempts
- Allow administrator account lockout: Disabled
- Reset account lockout counter after:
Not Applicable, the features disable automatically as you edit the previous three binary files.
- Close the Local Security Policy app.
- Again bring up the Run command and execute the
lusrmgr.msccommand.
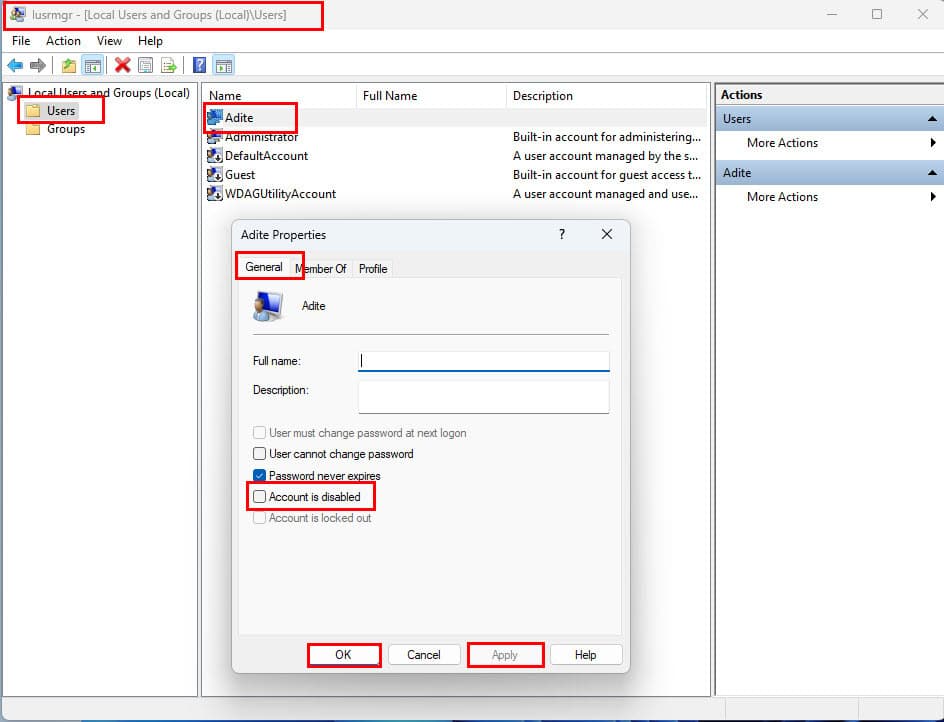
- The Local Users and Groups dialog will open.
- Select Users on the left and double-click your admin account on the right.
- Make sure the Account is disabled option isn’t checked on the General tab of the User Account Properties dialog.
- Make necessary changes if needed, click Apply, and hit OK.
- Restart the PC and attempt to log in using your admin account again.
Use Command Prompt via Recovery Mode
When you can’t log in with any alternative admin account, you must enable the hidden admin or fix the existing one with a CMD interface in WinRE. Here’s how:
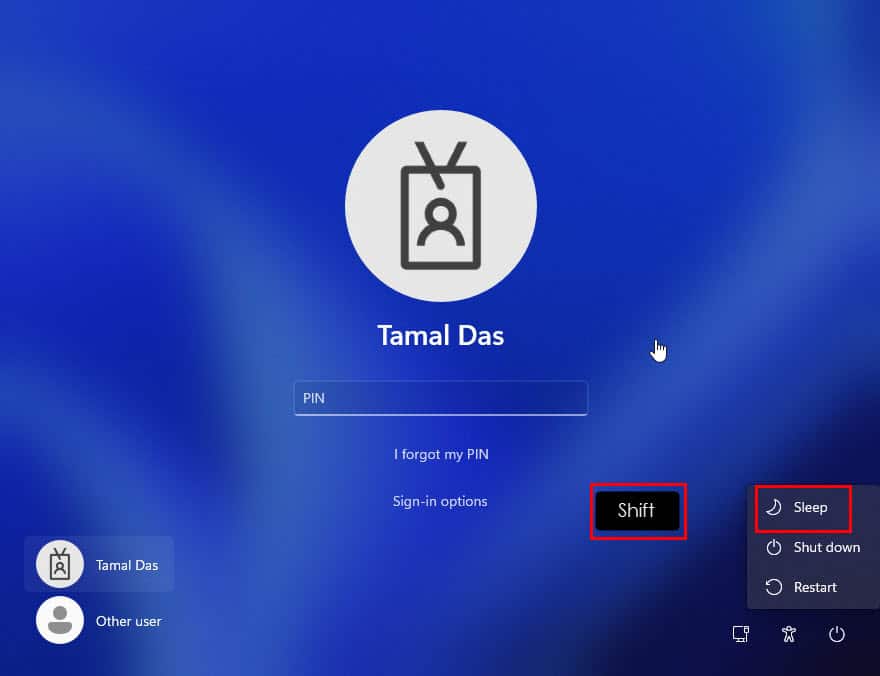
- Press the Shift key and click on the Power button on the log-in screen.
- Select Restart. Keep the Shift key pressed until you see the Please wait screen after the reboot.
- When you see this screen, release the Shift key.
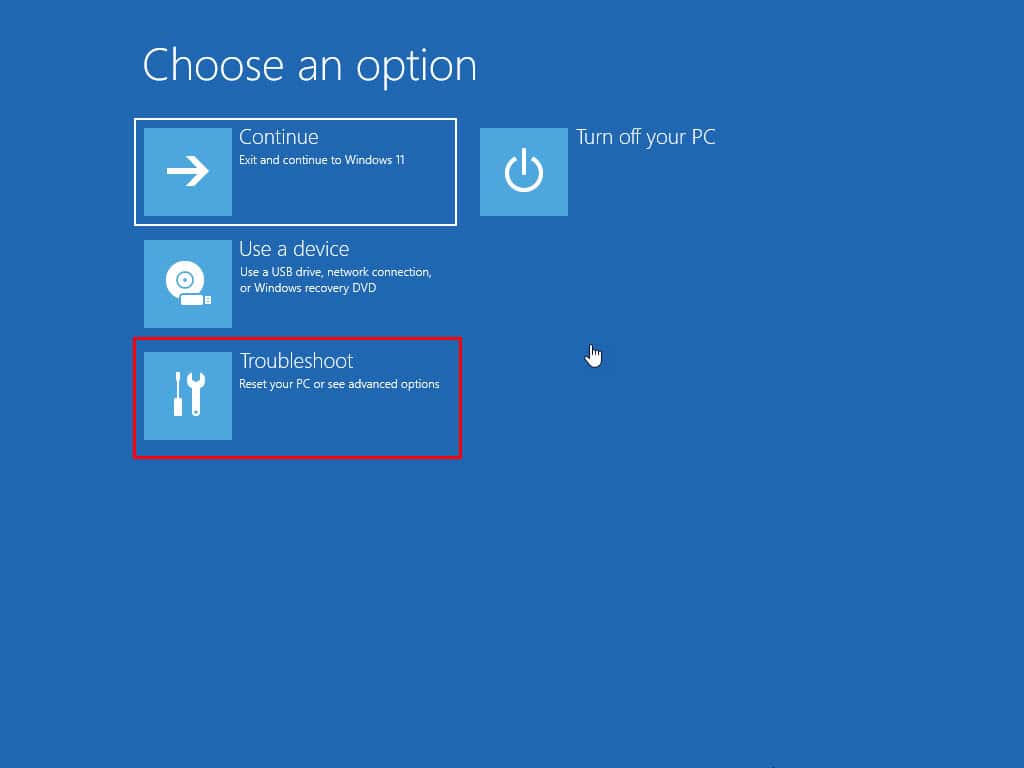
- You’re now on WinRE.
- Click on the Troubleshoot option.
- Select Advanced options on the next screen.
- Hit the Command Prompt button.
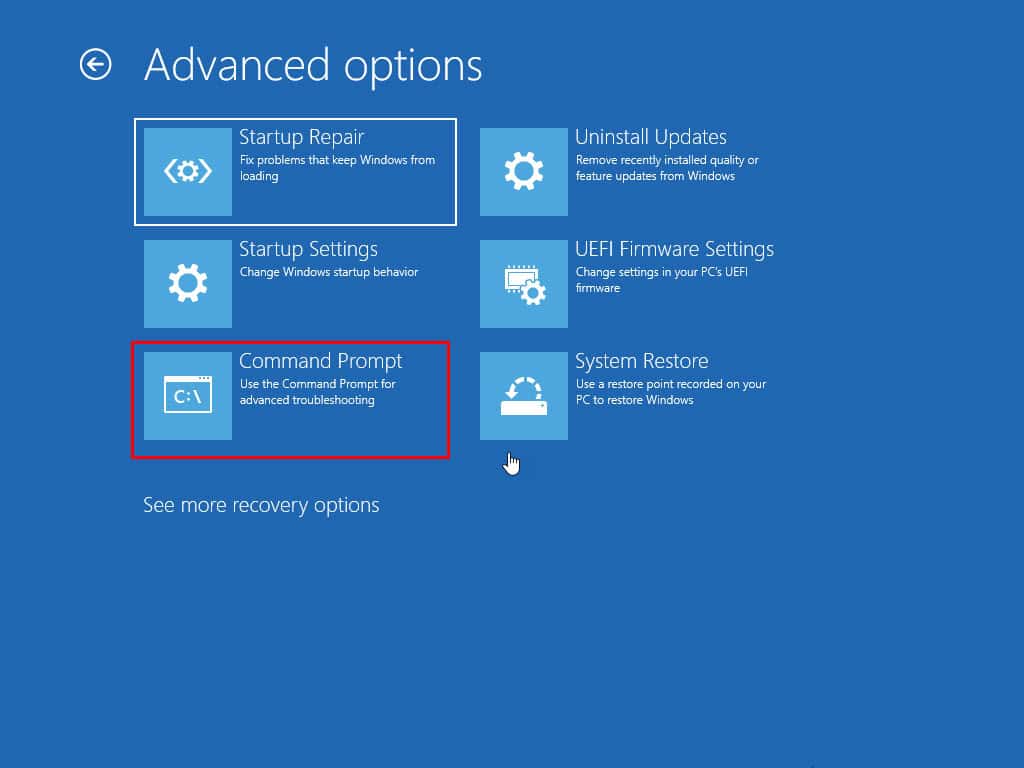
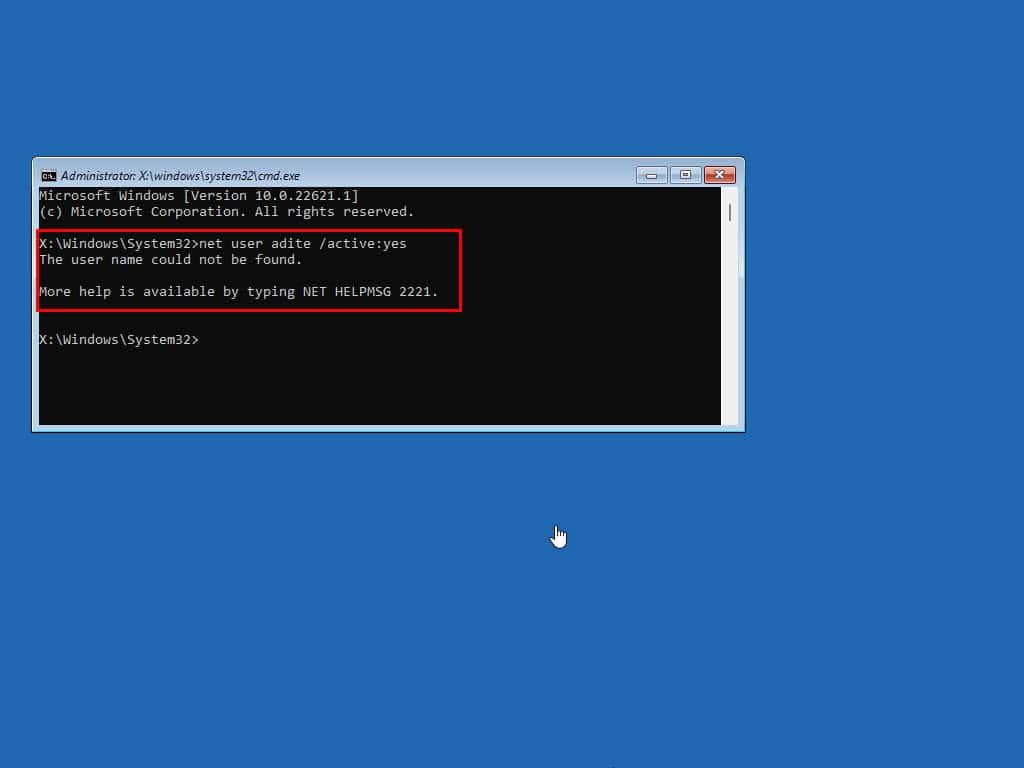
- Enter the following command into the terminal:
net user adite /active:yes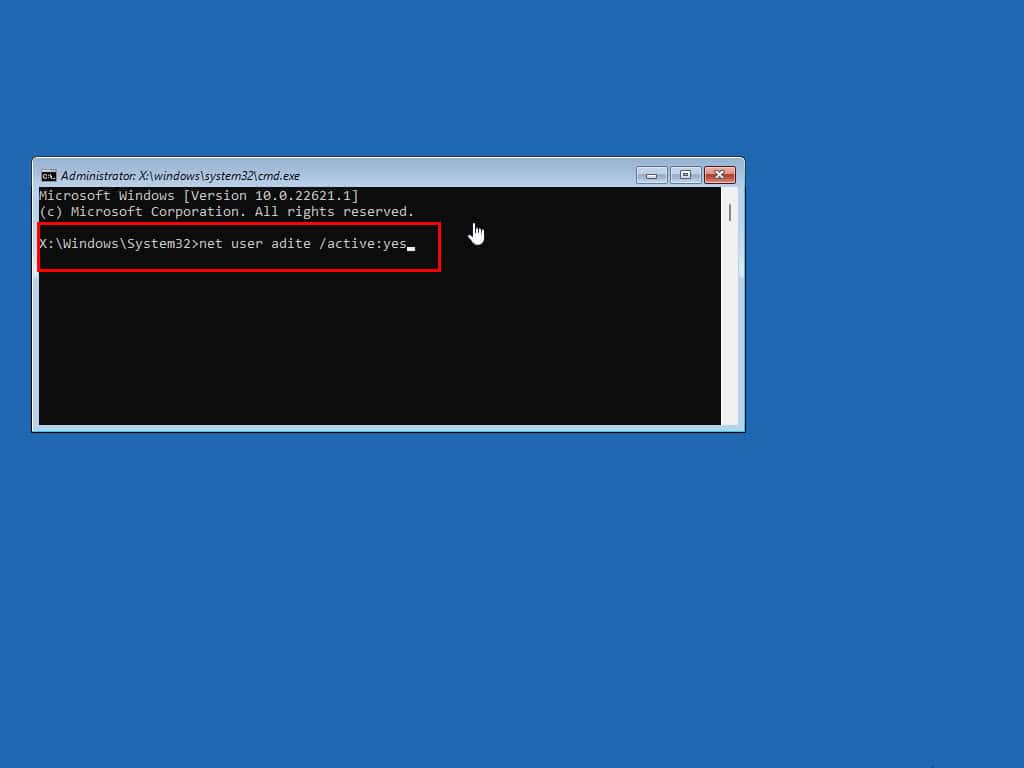
- Don’t forget to edit the username part of the command after the
net usersyntax. - Hit Enter.
- If the account exists or the underlying user profile files are in working condition, you’ll see a positive confirmation.
- When the account doesn’t exist or the user profile directory is corrupted, you’ll get an error message.
- Restart the PC to log in now using your existing admin account.
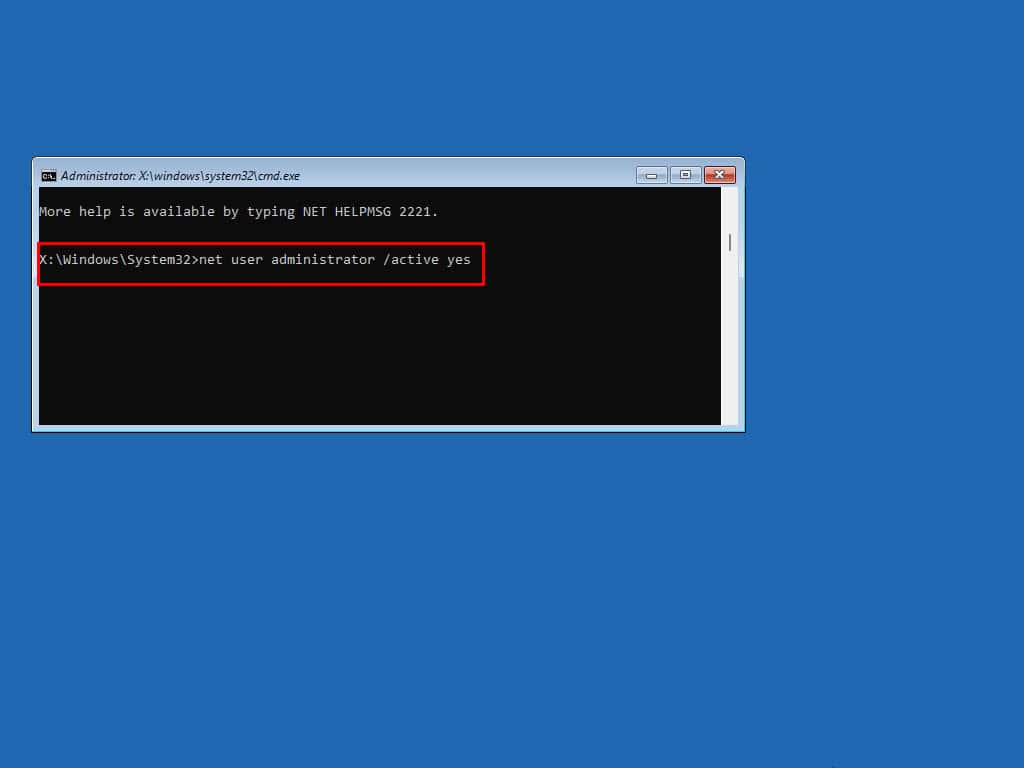
- If you’re unable to fix the existing user account, activate the hidden admin by following everything until step 8 and use the following command instead:
net user administrator /active:yesRestart the PC and sign in using the admin profile.
Contact Microsoft Support
If none of the above worked, visit the Microsoft Windows Troubleshoot & repair portal and go to the Need more help? form.
Type in the issue and hit Enter to create a ticket and contact a chat, phone, or email support specialist.
Reset Windows 11 (Without Losing Data)
If you’ve got enough time, you can also attempt a Windows 11 PC Reset by following these instructions:
- Follow the steps mentioned earlier to access WinRE.
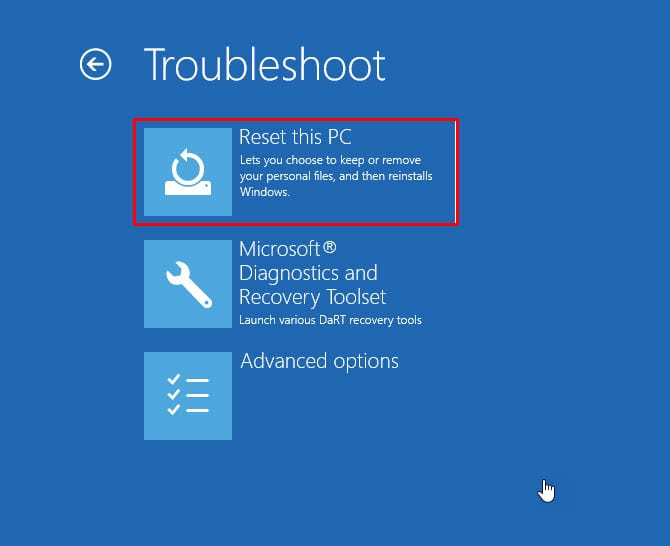
- Click Troubleshoot.
- Hit the Reset this PC button on the next screen.
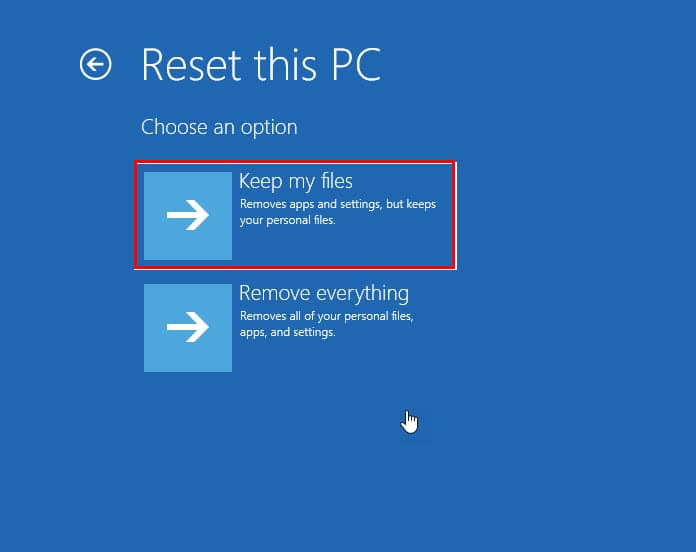
- Choose an option that suits you:
- Keep my files: Keeps personal files only. Windows discards apps and settings.
- Remove everything: This option will delete everything from the installation drive.
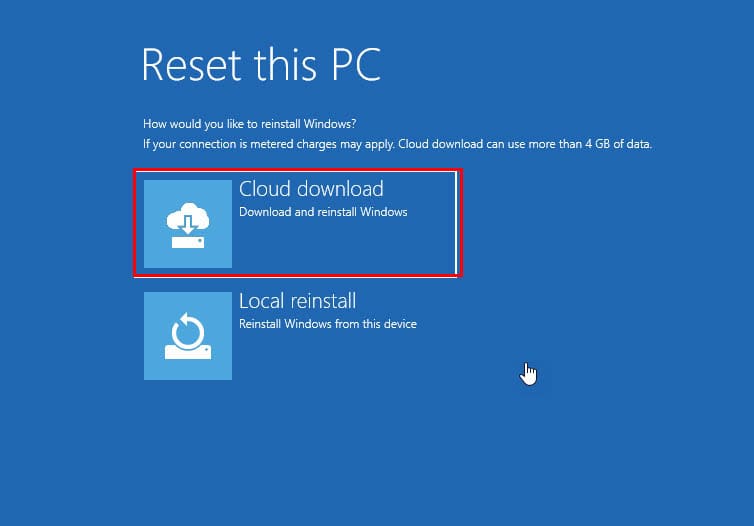
- The next screen is about selecting a source for the Windows 11 installation media.
- If you’re connected to the internet, choose Cloud download.
- If you aren’t, select Local reinstall.
- WinRE will take a while to process background files and settings.
- Hit the Reset button when it appears.
Summary
So, now you know what to do when your Windows 11 administrator account is locked out. Which method has worked for you? If there’s anything I missed, feel free to comment below.
You can also learn how to change the administrator account in Windows 11, force unlock Windows 11, or enable or disable super administrator.


User forum
0 messages