iPhone AutoPlay not working on Windows 10? Here's what to do
5 min. read
Updated on
Read our disclosure page to find out how can you help Windows Report sustain the editorial team. Read more
Key notes
- Want a quick way to deal with iPhone AutoPlay not working on your PC? We’re here to help you.
- The guide below explains how to troubleshoot this precise issue, so take a closer look right now.
- Since you are here already, feel free to check out a few great iPhone emulators for Windows 10.
- These issues don’t usually arise alone. However, you can bookmark our Windows 10 Errors Hub.

The Windows 10 AutoPlay feature lets you play multimedia automatically, but many Windows 10 users reported that iPhone AutoPlay is not working.
According to users, even the AutoPlay window doesn’t come up even though you may occasionally hear the sound acknowledging that you have plugged in your iPhone.
So, how do you restore your iPhone’s AutoPlay feature for Windows 10 machines?
What to do if iPhone is not listed in AutoPlay devices?
- Reset Windows 10 AutoPlay settings back to default
- Modify the registry
- Run the ShellHWDetection command
- Turn AutoPlay off then back on
- Update your drivers
- Run Windows 10 hardware/devices troubleshooter
- Reinstall the driver
- Disconnect other USB devices
1. Reset Windows 10 AutoPlay settings back to default
- Press Windows Key+S keys and type control panel. Choose Control Panel from displayed results.
- As soon as your Control Panel opens, select AutoPlay.
- In the AutoPlay settings, check the box next to Use AutoPlay for all media and devices.
- Now, tap on the Reset all defaults This resets Windows 10-iPhone AutoPlay settings back to default.
If iPhone AutoPlay is not working, try the above procedure. Now test if your AutoPlay starts when you connect your iPhone.
You can’t open Control Panel? Take a look at this step-by-step guide to find a solution.
You may also opt to alter your AutoPlay settings via the Settings app:
- Click Start, then select Settings.
- Select the Devices section.
- Click AutoPlay from the left-hand side of the menu and choose the options that says Ask me every time (on the right-hand pane) for Removable drive as well as a Memory card.
2. Modify the registry
- Copy the following text in Notepad.
Windows Registry Editor Version 5.00[HKEY_CURRENT_USERSoftwareMicrosoftWindowsCurrentVersionPoliciesExplorer] "NoDriveTypeAutoRun"=dword:00000091
[HKEY_LOCAL_MACHINESOFTWAREMicrosoftWindowsCurrentVersionPoliciesExplorer]"NoDriveTypeAutoRun"=-
- Save the Notepad your desktop then close the note pad.
- Now right-click this file (on the desktop) and rename it with a .reg extension.
- Now right-click on the saved file then choose Run as administrator to alter the registry.
In some instances, iPhone AutoPlay is not working due to your registry setting. You should hence run a text file to amend the troublesome registry entries.
Then, just reconnect your iPhone and retry the AutoPlay feature.
3. Run the ShellHWDetection command
- Click on the Start button and type cmd (in the search box).
- Right-click on the cmd option and select Run as administrator.
- When the Command Prompt window starts, type net start shellhwdetection then press Enter.
- Restart your computer.
The ShellHWDetection command helps manage the Shell Hardware Detection, a service that provides notifications for Windows 10 AutoPlay.
If iPhone AutoPlay is not working, perhaps this service is the problem, so complete the above procedure.
5. Update your drivers
Outdated drivers can cause problems with AutoPlay. As a reminder, you should always make sure that your PC’s drivers are properly updated.
Not only should this keep your computer in good working condition, but it also has an impact on all functions and apps, including AutoPlay.
Then, don’t forget to perform a simple restart for the changes to take effect. Besides that, keep in mind that this is your chance to solve all driver-related issues.
Moreover, you can automatically search for drivers updates on your computer to check if any of your system drivers need an update. If yes, you should proceed with simple steps in order to get the latest drivers.
Thus if you need a helping hand regarding the update process for your drivers, you can find some best driver update software to streamline the method even more.
If iPhone AutoPlay is not working, try to disable the AutoPlay feature temporarily, as described above.
6. Run Windows 10 hardware/devices troubleshooter
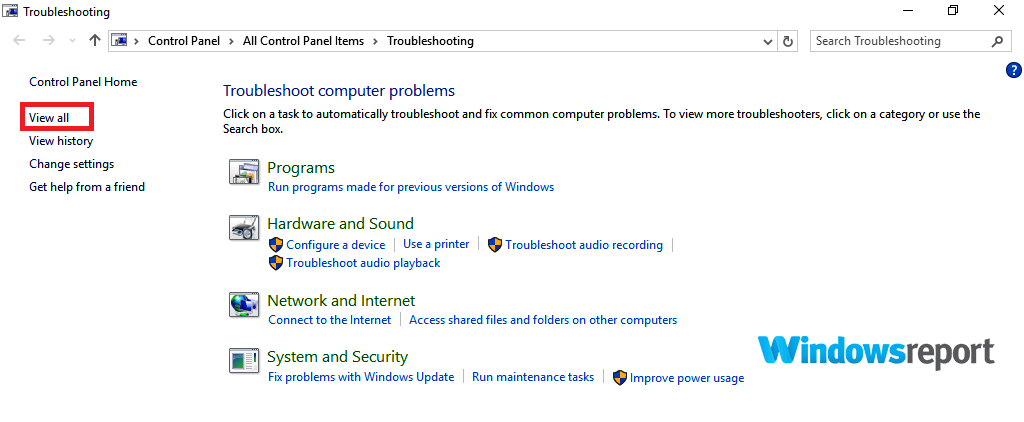
- Click on the Start button and type troubleshooting in the search box.
- Select Troubleshooting from the list of results.
- Choose View all and then tap on Hardware and Devices.
- Click Next, then follow the on-screen instructions.
Running your computer’s hardware and devices troubleshooter may help if iPhone AutoPlay is not working. Now check if the problem is resolved.
If the Troubleshooter stops before completing the process, fix it with the help of this complete guide.
7. Reinstall the driver
- Open the Device Manager.
- Right-click on Portable devices.
- Look for the Apple iPhone entry and right-click on it.
- Select Uninstall device and follow the instructions on the screen.
- Plug in your iPhone to the USB. Windows will reinstall the driver software. If not, go back to Device Manager and right-click on the iPhone and choose Update driver.
In case the driver update doesn’t help, try reinstalling your Apple iPhone driver.
8. Disconnect other USB devices
Can you try to disconnect all other USB devices before reconnecting your iPhone? Though rather odd, this solution sometimes works.
If iPhone AutoPlay is not working on your PC, be sure to try all of our solutions, and let us know in the comments section if we managed to solve your problem.
[wl_navigator]


User forum
0 messages