7 Best Windows 11 Graphics Settings for Gaming
7 min. read
Updated on
Read our disclosure page to find out how can you help Windows Report sustain the editorial team. Read more
Key notes
- One of the Windows 11 gaming settings that you need to always enable is the useful Game Mode.
- Assigning your dedicated GPU to games is a great way to ensure top graphics performance.
- Updating the graphics card drivers will help keep your gameplay smooth at all times.
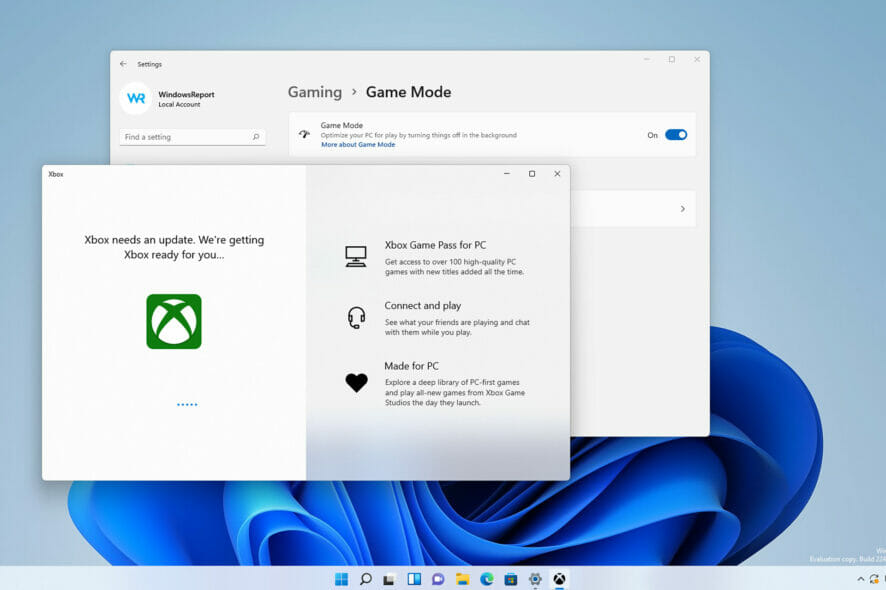
Windows 11 brings improved gaming performance with its Auto HDR and DirectStorage. While these new options will certainly make a difference, your gaming performance is also influenced by your settings. Thus, we’ll show you the best Windows 11 settings for gaming that you can tweak.
Optimizing your system isn’t always simple, especially if you’re not tech-savvy and don’t know what to change or how to access it.
No matter how you manage your settings for gaming, having a good Windows 11 gaming laptop can make an immense difference, allowing you to run the latest games released.
Luckily, this isn’t too complicated, and in today’s guide, we’ll show you the best Windows 11 settings for gaming that you need to use.
What gaming features does Windows 11 have?
Microsoft is bringing some Xbox features to Windows, and the first feature is the Auto HDR. While this feature doesn’t affect performance, it makes the games look more detailed with vibrant colors.
To use this option, you’ll need a monitor that is HDR-compatible. Keep in mind that you need to change your settings first since it’s not enabled by default.
Enabling Auto HDR in Windows 11 is as easy as you can imagine, and proves very useful if you have a monitor which can support this feature.
The other feature is DirectStorage, which will allow games to load faster by forwarding calls for 3D assets directly to the GPU. However, to use this feature, you’ll need a high-speed SSD.
Do startup apps interfere with gaming?
Startup applications usually don’t interfere with your gaming sessions, but this depends heavily on the type of apps you use.
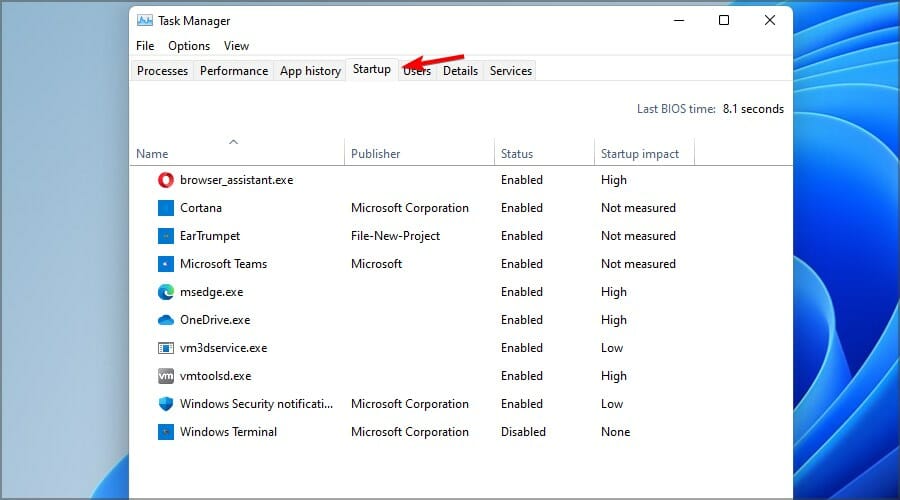
Disabling them will make your system start faster, thus giving you a small performance boost. You can turn off the startup apps by doing the following:
- Press Ctrl + Shift + Esc. This will start the Task Manager.
- Head over to the Startup tab.
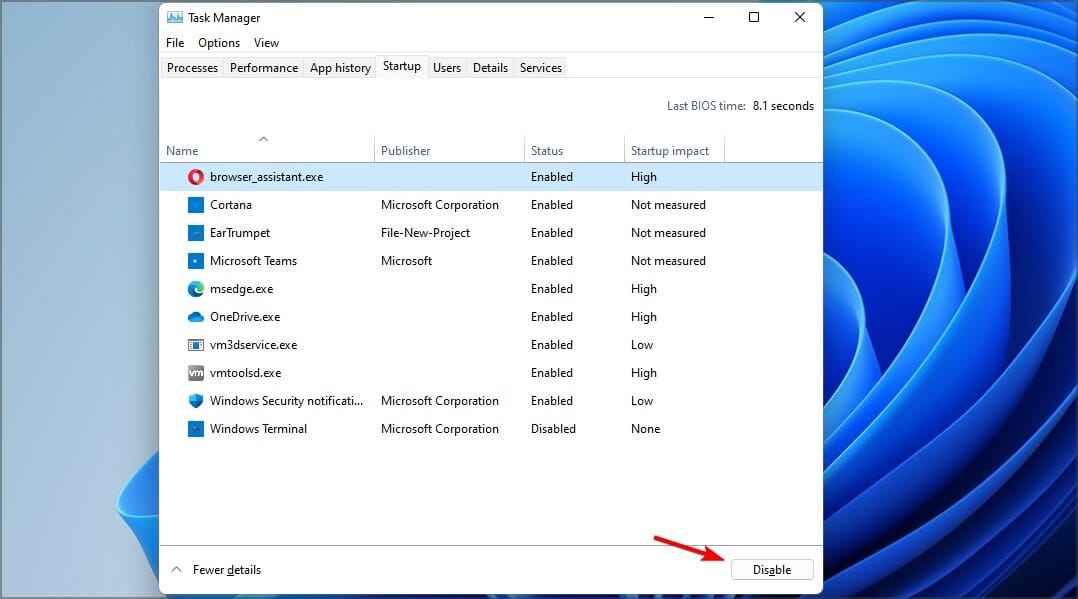
- Select the desired startup app and click on Disable.
- Do this for all nonessential apps that you don’t need.
How to optimize Windows 11 for gaming?
1. Update your graphics card drivers
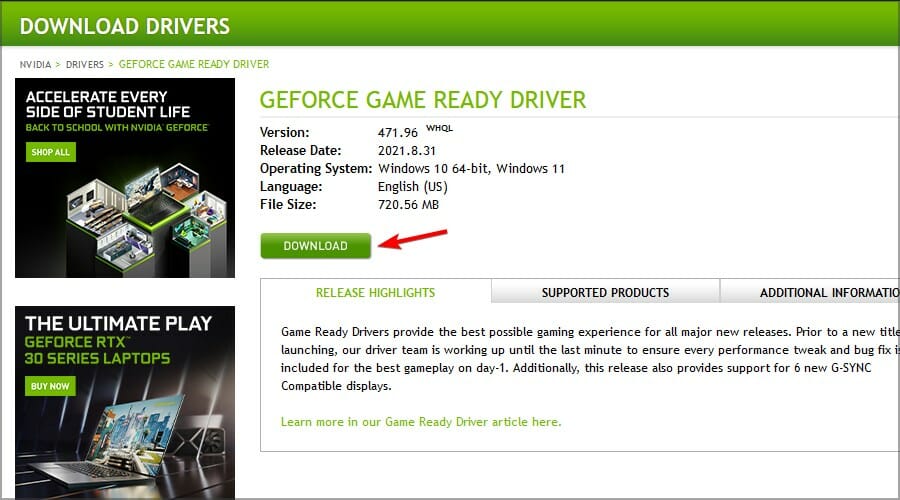
- Visit your graphic card manufacturer’s website and go to the Downloads or Drivers section.
- Select the model of your graphics card and click on Search.
- Click the Download button to download the latest drivers.
- Once the software is downloaded, run the setup file to install it.
Updating drivers manually can be tedious, and if you want to make this process both simpler and faster, we suggest using a specialized tool to find the best driver versions automatically.
2. Enable the Game mode and change the Graphics settings
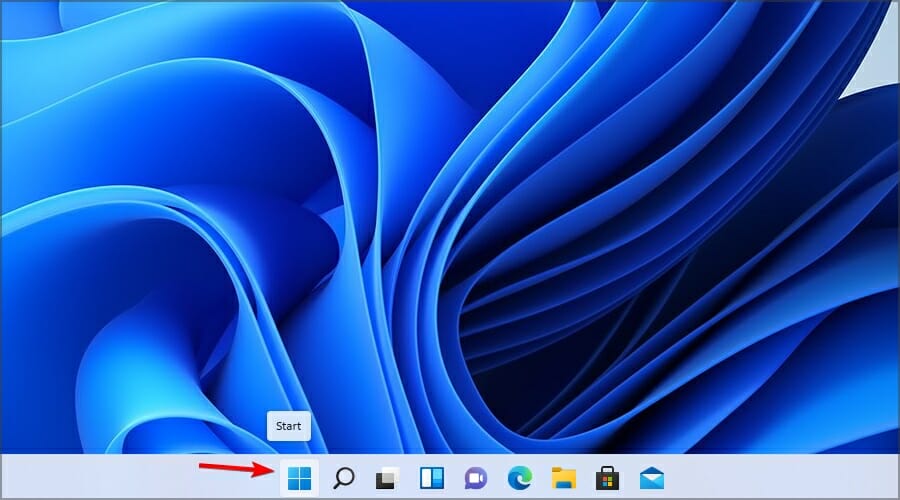
- Click the Start button in the Taskbar.
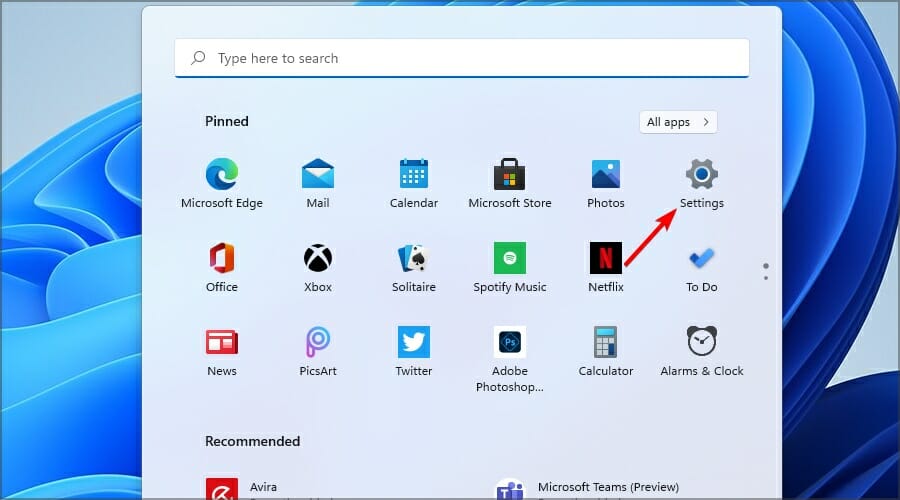
- Now select Settings from the menu.
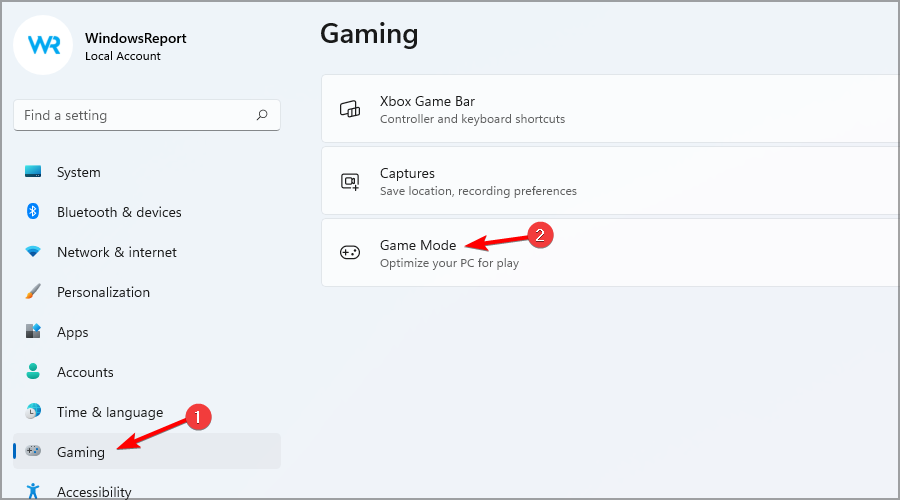
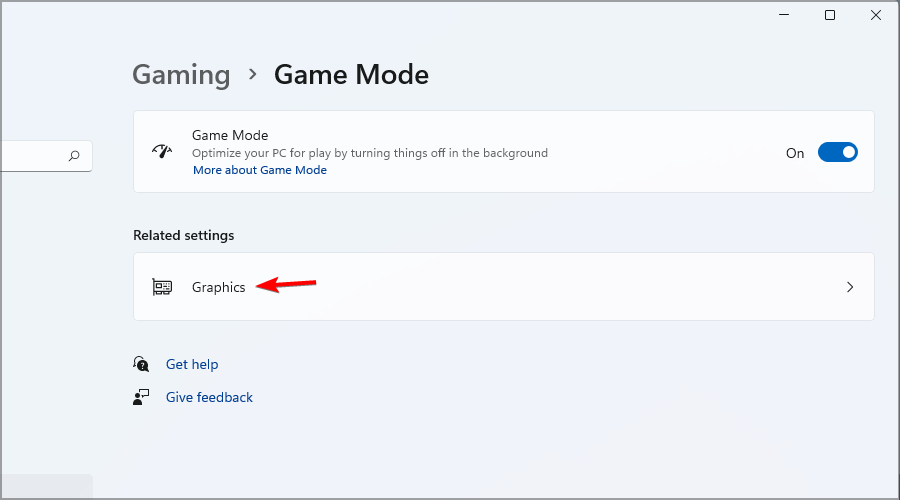
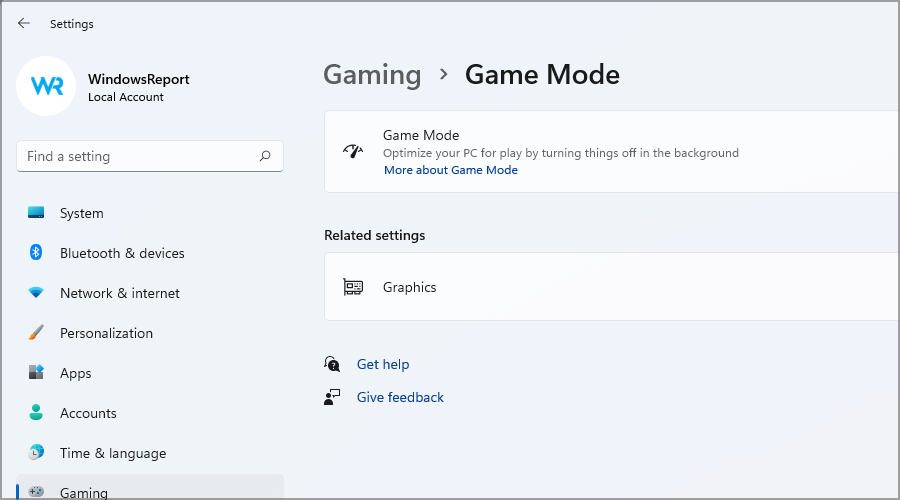
- From the left pane, select Gaming. In the right one, choose Game Mode.
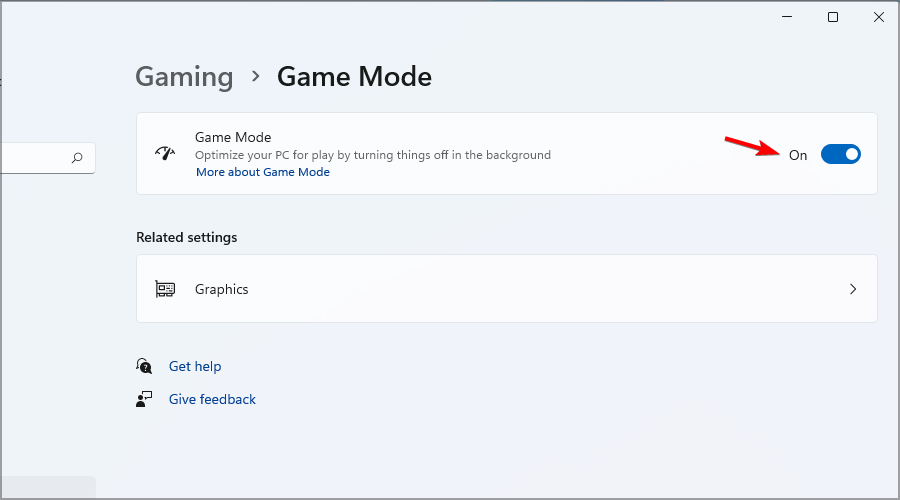
- Make sure that Game Mode is set to On.
- Now select Graphics in the Related settings.
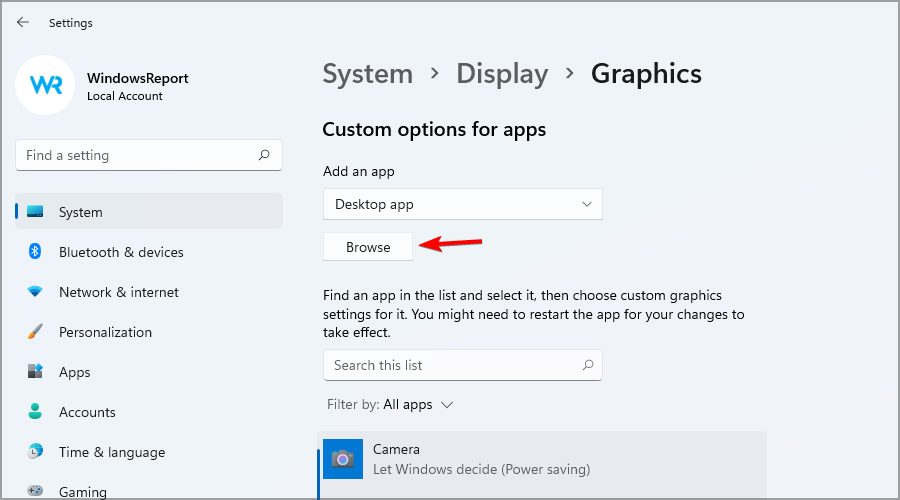
- Look for the desired game on the list. If it’s not available, click the Browse button and add it manually.
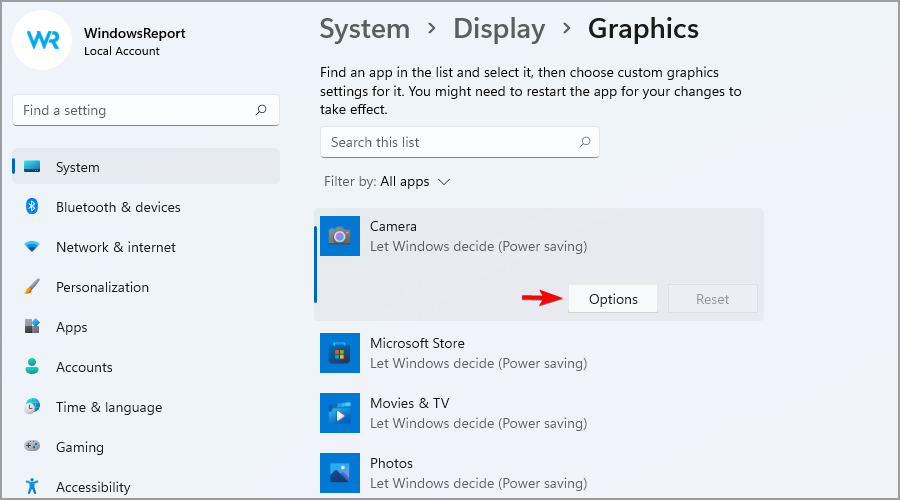
- Choose the game and click on Options.
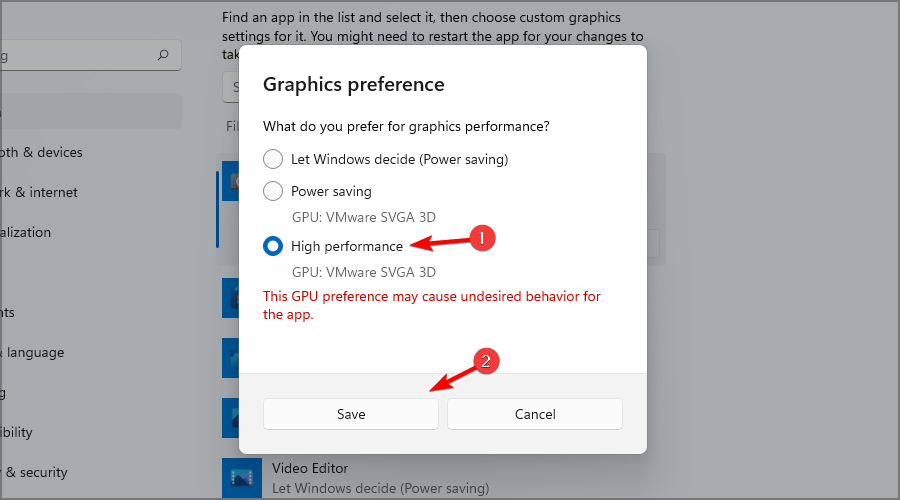
- Select High performance and click on Save.
- Repeat steps 6-8 for all games that you play.
If you’re having issues after enabling this feature, be sure to visit our guide on how to disable Game Mode for ways to fix them.
3. Use the dedicated graphics card software
- Open your graphics card software.
- Navigate to the Settings section.
- Choose one of the presets or manually adjust the settings.
This is an advanced solution, and it differs depending on the type of graphics you have. To achieve the best results, you’ll have to experiment with different settings.
4. Select the High-performance power plan
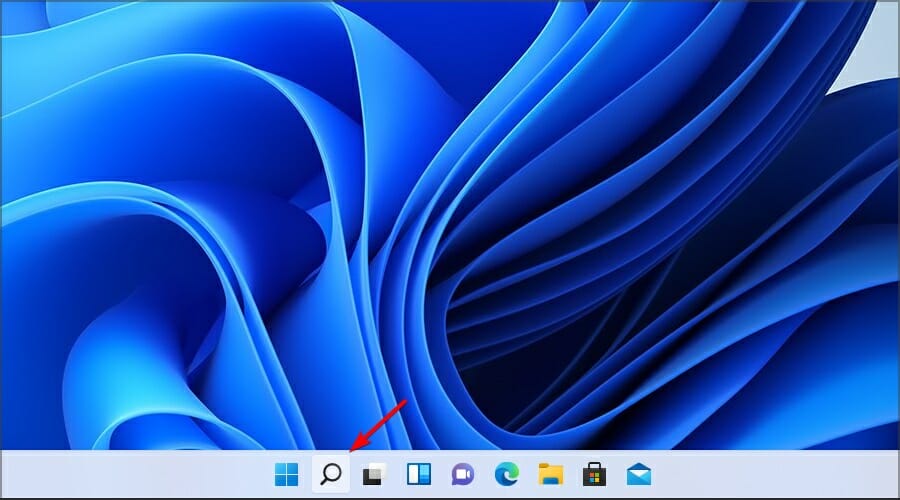
- Click the Search icon in the Taskbar.
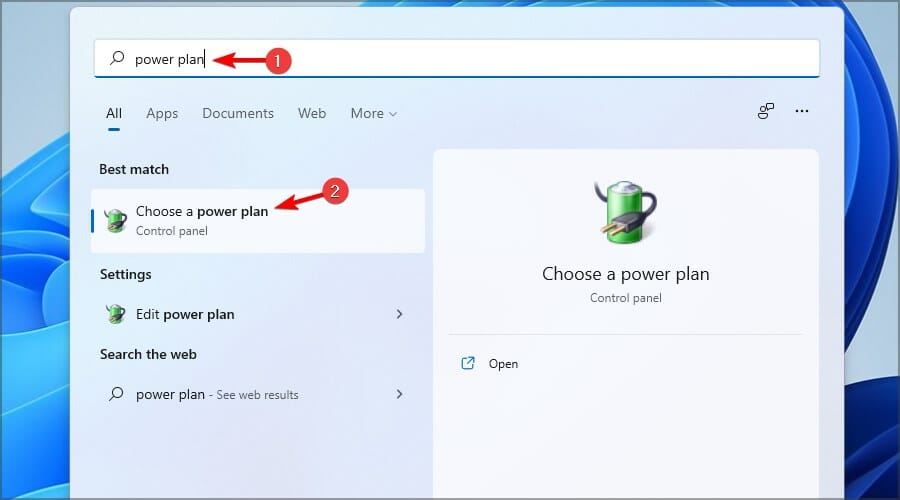
- Enter power plan. Now select Choose a power plan.
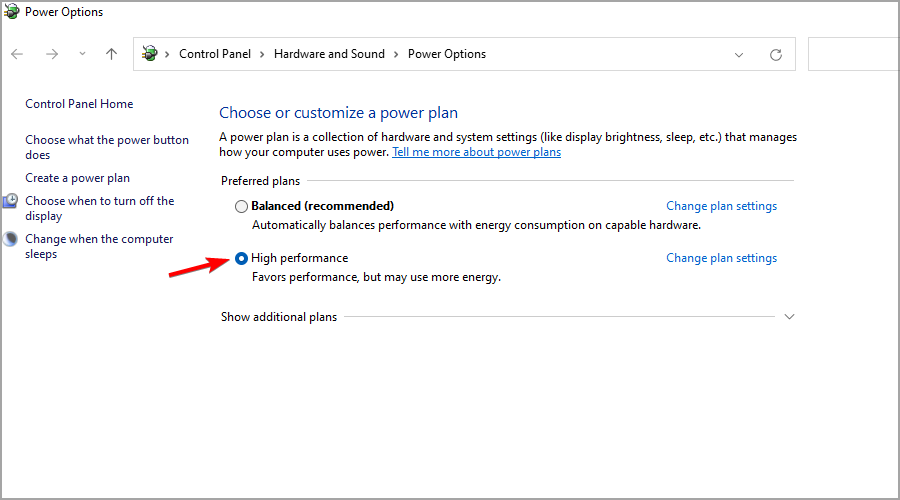
- Select High performance power plan. If it’s not available, look for it in the Show additional plans section.
5. Disable resource-intensive applications
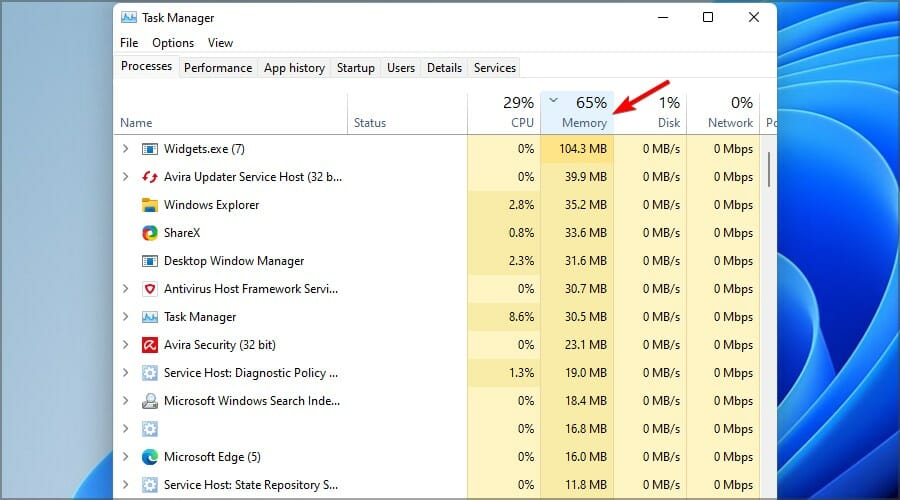
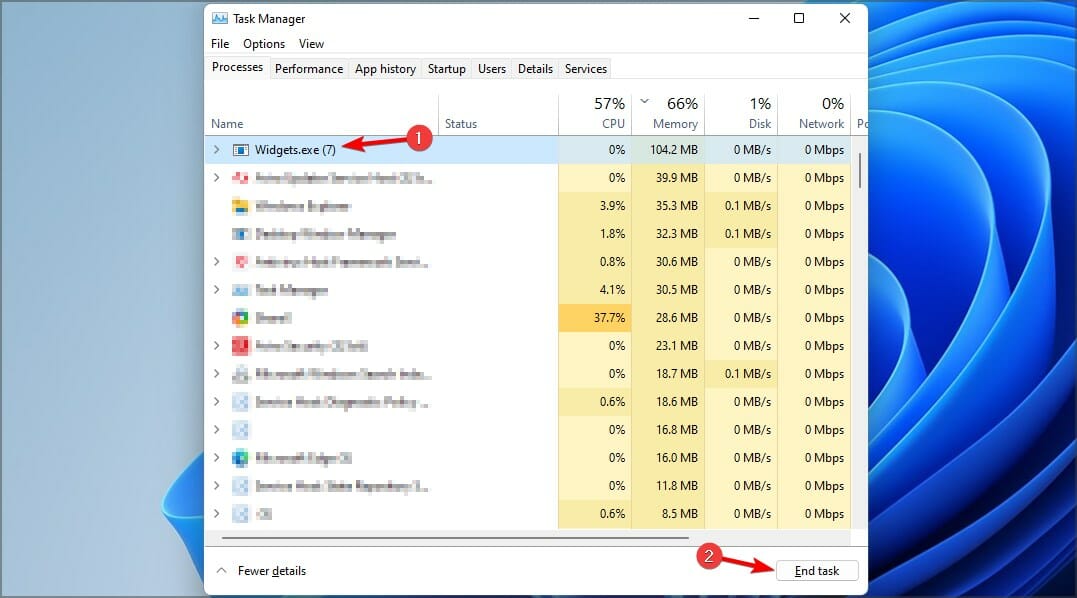
- Press Ctrl + Shift + Esc to open Task Manager.
- Now click on CPU or Memory to sort apps by usage.
- Select the process that you want to stop and click on End task.
- Repeat these steps for all non-essential processes.
6. Disable animations
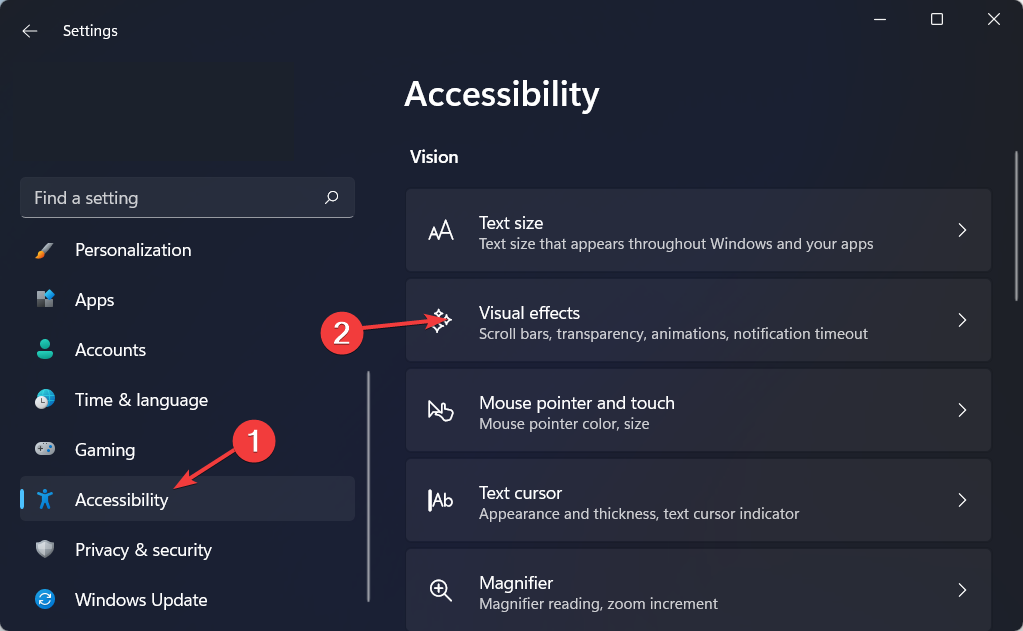
- Press Windows + I to open Settings and navigate to Accessibility from the left menu followed by Visual effects on the right side.
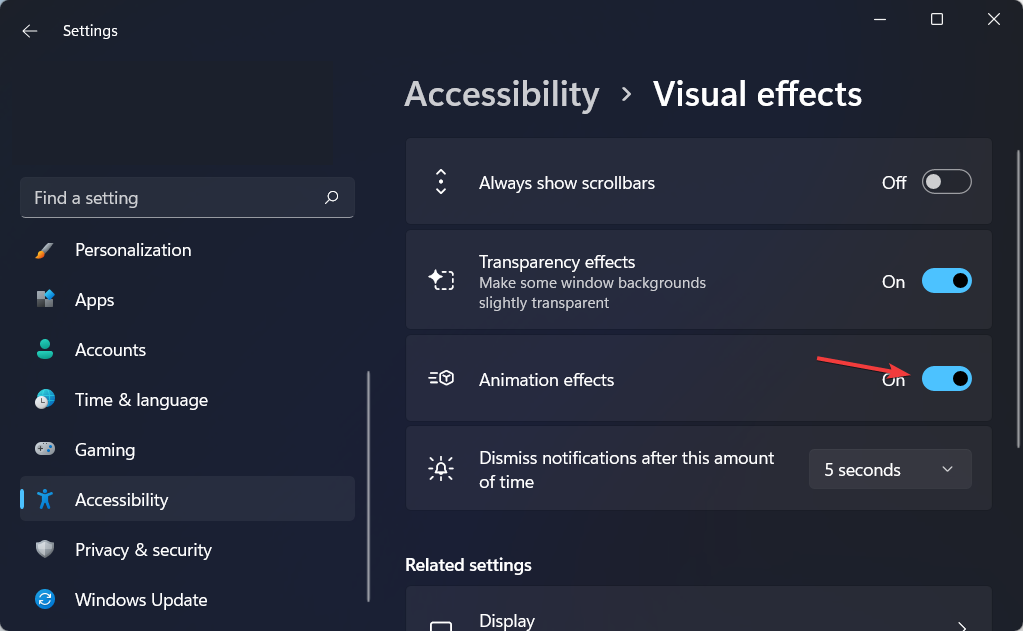
- Next, make sure the toggle next to Animation effects is turned off.
The user interface of Windows 11 appears to have a smoother flow due to the animation effects. Enabling animations on a slower system, on the other hand, might give a sluggish experience in which programs take some time to launch or dismiss.
If you value speed more than appearance, turning off the animation effects in Windows 11 is as simple as possible.
7. Disable automatic Windows Updates
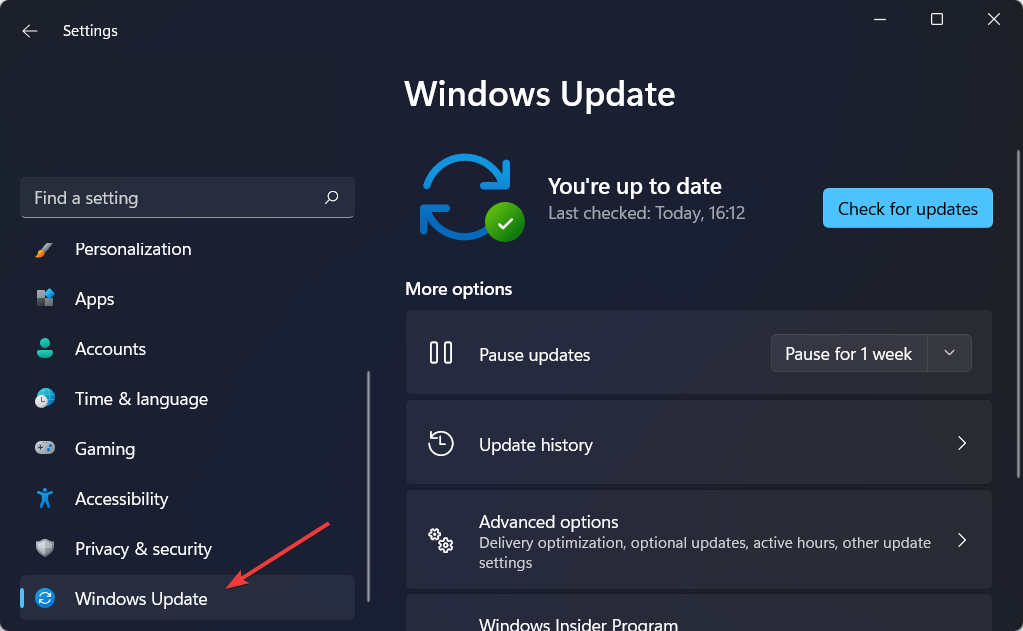
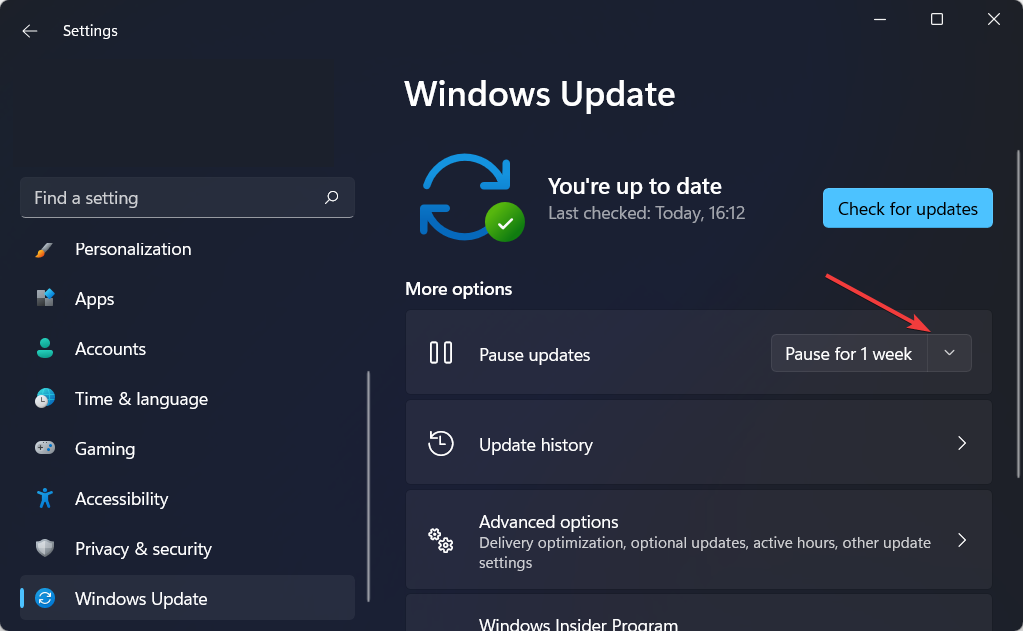
- Hold Windows + I to open the Settings app and navigate to Windows Update.
- Here, select the amount of time you want the updates to be paused next to the Pause updates option. This is one of the best windows 11 settings for gaming that you can edit to make sure you don’t get interrupted mid-gaming.
Windows 11 is automatically updated with maintenance and security patches every month and more frequently if necessary. These updates are designed to close security loopholes, eliminate bugs, enhance the system’s speed, and (sometimes) introduce new features.
Even though this method ensures that devices always have access to the most recent bits, it is one of the most annoying aspects since the quality control of updates has been called into doubt.
This is not only because they still need to be restarted to finish applying the changes, which can disrupt your gaming, but also because the number of updates that contain bugs that negatively affect the experience has significantly increased over the past few years.
What does Game Mode do?
This feature allows you to enjoy your favorite games without any interference. This means that driver installations will be prevented, as well as restart notifications.
In addition, this feature will improve the frame rate in certain games. The best thing about it is that it’s enabled by default, so you don’t have to change anything to use it.
Is Windows 11 better for gaming than Windows 10?
When talking about Windows 11 vs Windows 10, in terms of performance, both systems perform the same, with the former having a smaller advantage over its predecessor. However, the advantage was almost negligible.
Where the new operating system shines are the new features, most notably Direct Storage, that will push the boundaries of gaming on systems that can support it.
Many are worried about compatibility with older games, but there are ways to run old games on Windows 11, so you won’t experience any issues.
These are just a couple of settings that you can change on your computer and get better performance. For example, here you can find the best DualSense Edge settings for Warzone & other games. By combining these methods, you’ll be able to get a better frame rate while gaming.
As processing speed is an important factor when playing games, being capable of making Windows 11 faster can improve your overall experience considerably.
If you are a sucker for new games, Tekken 8 is out, and if you have it on Xbox, check the best Tekken 8 settings before playing; read this to learn more.
We hope that you found our gaming performance tweaks useful. What settings do you use for your gaming sessions? Please share them with us in the comments section below.





User forum
0 messages