Fix: Class Not Registered Chrome Error on Windows 10/11
Key notes
- Google Chrome is one of the most popular web browsers on the market.
- The article below will guide you on how to fix the Class not registered error in Chrom
- There are many tricks that will fix this issue, including reregistering the DLL files, and changing the prefix of the Chrome shortcut.
- We give you step-by-step instructions on them, plus other similar fixes, and you can even find some alternative software recommendations.

Google Chrome is the most popular web browser on the market with millions of active users. Despite its popularity, Google Chrome still has some issues, and many users reported Class not registered error message while using Chrome.
This error can prevent you from starting Chrome, and today we’re going to show you how to solve this problem on Windows 10.
Class not registered Chrome.exe error, how to fix it on Windows 10?
1. Completely remove Google Chrome and reinstall it
If you’re having this problem, you might want to try reinstalling Google Chrome. In most cases, you need to completely remove Chrome, and the best way to do that is to use Revo Uninstaller or any other similar tool.
Using this tool you’ll remove Chrome along with its registry entries and associated files. After removing Chrome completely, reinstall it and check if the problem still appears.
2. Delete Chrome registry values
To remove the problematic values, do the following:
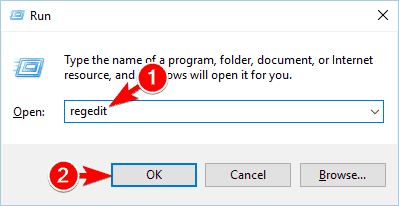
- Press Windows Key + R and enter regedit. Click OK or press Enter.
- Optional: Before making any changes to the registry it’s always a good idea to create a backup. To do that, click on File > Export.

Set All as Export range, choose a safe location and save name and click on Save button. If any problems occur after modifying the registry, you can always run this file to restore it to its previous state.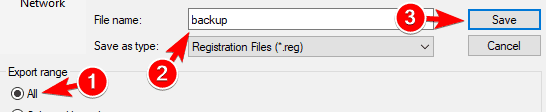
- Now you need to delete the following keys from your registry:
HKEY_CLASSES_ROOTChromeHKEY_LOCAL_MACHINESoftwareClassesChromeHKEY_CURRENT_USERSoftwareClassesChromeHKEY_LOCAL_MACHINESoftwareClassesChromeHTMLshellopencommandDelegateExecuteHKEY_CURRENT_USERSoftwareClassesChromeHTMLshellopencommandDelegateExecute
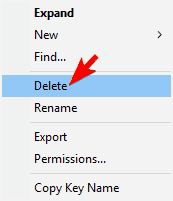
To do that, simply select the desired key from the left pane, right-click it and choose Delete from the menu. When the confirmation message appears, click on Yes.
After deleting these keys Chrome should start working again without any problems.
If you’re looking for a faster way to delete these keys, you might want to try using Command Prompt. Using Command Prompt you can delete these keys by running few commands. To do that, follow these steps:
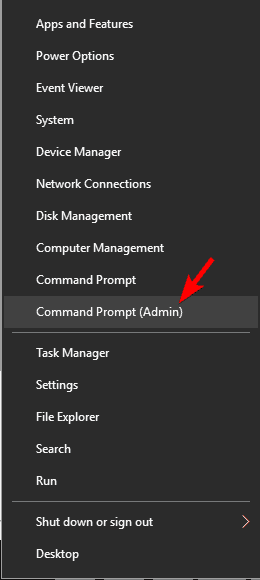
- Press Windows Key + X to open the Win + X menu and choose Command Prompt (Admin).
- If the Command Prompt isn’t available, you can also use PowerShell.
- When Command Prompt opens, enter the following commands one by one:
HKEY_CLASSES_ROOTChromeHKEY_LOCAL_MACHINESoftwareClassesChromeHKEY_CURRENT_USERSoftwareClassesChromeHKEY_LOCAL_MACHINESoftwareClassesChromeHTMLshellopencommandDelegateExecuteHKEY_CURRENT_USERSoftwareClassesChromeHTMLshellopencommandDelegateExecute
Several users reported that other values can also cause this problem to appear. To fix the issue, you need to locate and remove the following keys from your registry:
HKEY_CURRENT_USERSoftwareClassesWow6432NodeCLSID{5C65F4B0-3651-4514-B207-D10CB699B14B}HKLMSoftwareClassesChromeHKLMSoftwareClassesChromeHTMLshellopencommandDelegateExecute
After removing those keys, the problem should be fixed.
Sometimes certain registry values can interfere with your system and cause this error to appear. To fix this problem, you need to remove those values from your registry.
Keep in mind that modifying the registry can cause certain problems, so be aware that you’re modifying it at your own risk.
3. Repin Chrome shortcut to the Start Menu
This is relatively simple and you can do it by following these steps:
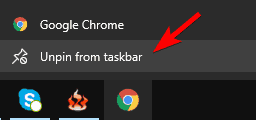
- Unpin Chrome if it is pinned to your Taskbar. To do that, simply right click it and choose Unpin from Taskbar option.
- If Chrome is pinned in Start Menu, be sure to unpin it by following the same steps.
- Press Windows Key + R and enter appdata. Press Enter or click OK.
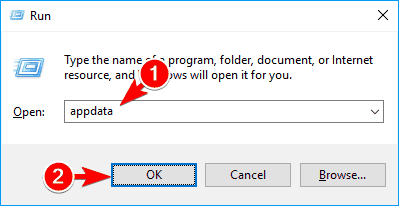
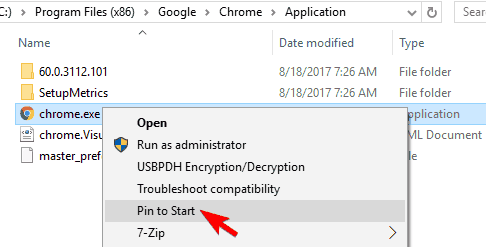
Now navigate to the LocalGoogleChromeApplication directory. If this directory isn’t available, go to the Chrome installation directory. - By default, it should be
C:Program Files (x86)GoogleChromeApplication.. - If you’re using the 64-bit version of Chrome, you might want to go to the Program Files directory instead.
- Right-click chrome.exe and choose Pin to Start option from the menu.
- Alternatively, you can simply drag and drop chrome.exe to the Taskbar to pin in there.
If you’re having this problem on your PC, you might be able to solve it simply by repinning Chrome shortcut to the Start Menu or your Taskbar.
After repinning Chrome, you just need to use the pinned shortcut and your browser should start without any errors.
4. Launch Chrome using a .bat file
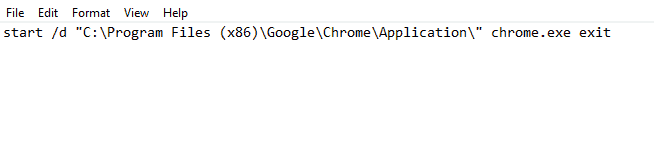
You can easily run several commands at once on your PC by using a .bat file. These types of files allow you to create your own scripts and run different applications. According to users, you can also use a .bat file to circumvent this error. To create a .bat file, do the following:
- Open Notepad.
- Enter start /d “C:Program Files (x86)GoogleChromeApplication” chrome.exe exit in your document. Keep in mind that you must use the correct installation directory for Chrome if you want this script to work.
- Now click on File > Save as.
- Set Save as type to All files and enter chrome.bat. Choose a save location you can quickly access and click on Save.

- After saving the file, you just need to run chrome.bat to start Chrome.
Keep in mind that this is a workaround, and if you want to avoid this problem, you need to start Chrome always by using the chrome.bat file.
5. Reregister DLL files
Sometimes Class not registered error message can appear in Chrome because your DLLs aren’t properly registered. To fix the problem, you need to reregister your DLLs and check if that solves the problem. To do that, follow these steps:
- Start Command Prompt as an administrator.
- When Command Prompt opens, enter
FOR /R C: %G IN (*.dll) DO "%systemroot%system32regsvr32.exe" /s "%G"command and press Enter.
Keep in mind that you might get several error messages while this command is running. After the command is executed, restart your PC and check if the problem is resolved.
6. Change the prefix of Chrome’s shortcut
According to users, you might be able to fix this error message simply by adding a prefix to Chrome’s shortcut. To do that, follow these steps:
- Be sure to remove all Google Chrome shortcuts that are pinned on your Taskbar.
- Now go to Chrome’s installation directory, locate chrome.exe and create a shortcut of it.
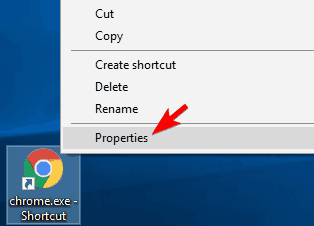
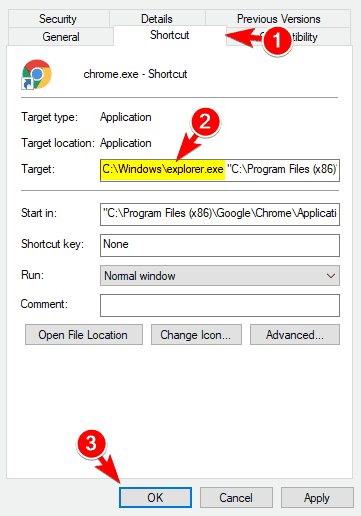
- Move the shortcut to your Desktop, right-click it and choose Properties.
- Go to Shortcut tab and in the Target section add C:Windowsexplorer.exe. Be sure to add this line before the quotes and don’t change anything else in the Target field. Now click on Apply and OK to save changes.
After making these changes, you need to start Chrome using this shortcut. Keep in mind that this is just a workaround, and if you want to avoid this problem, you need to use this shortcut every time you want to start Chrome.
7. Remove the problematic keys and set Chrome as a default app for PDF files
Few users claim that this problem occurs when trying to view PDF files in Chrome. According to them, the problem might be a certain key in your registry. To fix the issue, first you need to remove this key by following these steps:
- Open Registry Editor.
- Navigate to
HKEY_CURRENT_USERSoftwareClasses key in the left pane. Locate the pdf_auto_filekey in the left pane and delete it.
If you can’t find this key in your registry simply proceed to the next segment. Now you just have to set Chrome as default application for PDF files. To do that, follow these steps:
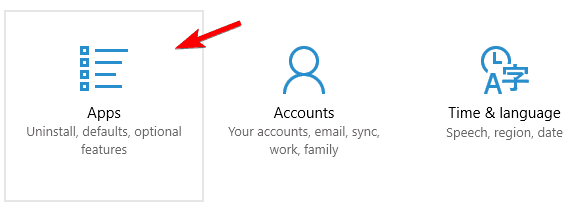
- Press Windows Key + I to open the Settings app. Navigate to the Apps section.
- Go to Default apps section and select Choose default apps by file type option from the right pane.

- List of file types will now appear. Locate .pdf file extension and click the application next to it.

- Choose Google Chrome from the list.

There’s another way to set Chrome as a default application for PDF files. To do that, follow these steps:
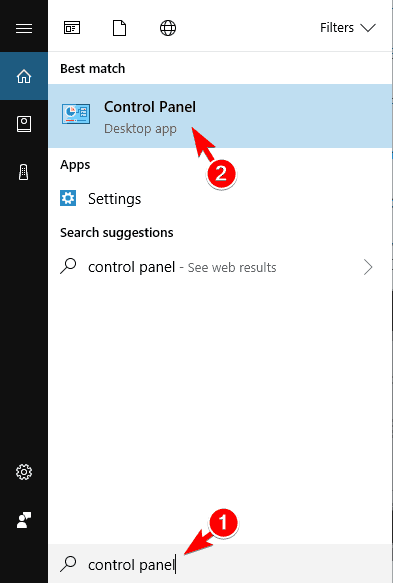
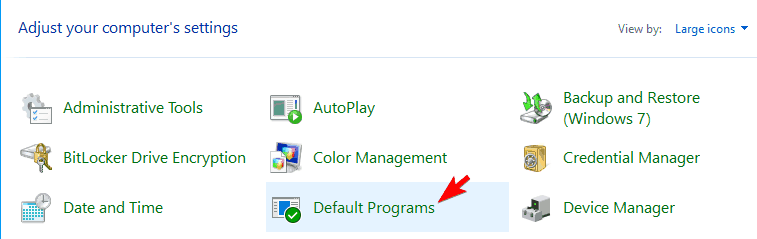
- Press Windows Key + S and enter control panel. Choose Control Panel from the list of results.
- List of options will appear. Select Default Programs from the list.
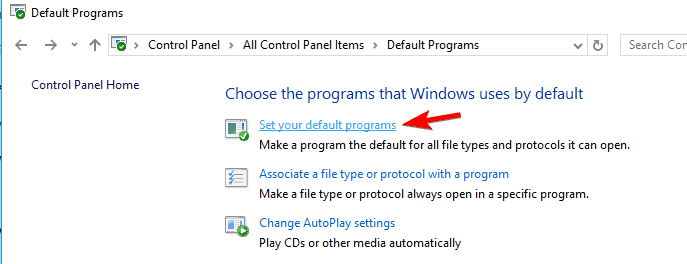
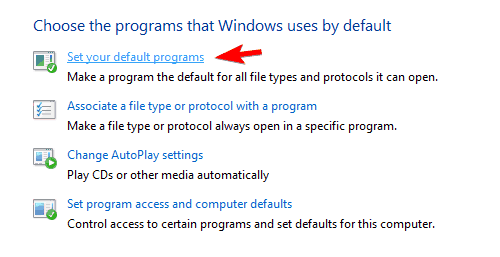
- Go to Set your default programs.
- List of all applications will appear. Select Google Chrome in the left pane and select Choose defaults for this program.

- Check .pdf from the list of extensions and click on Save.

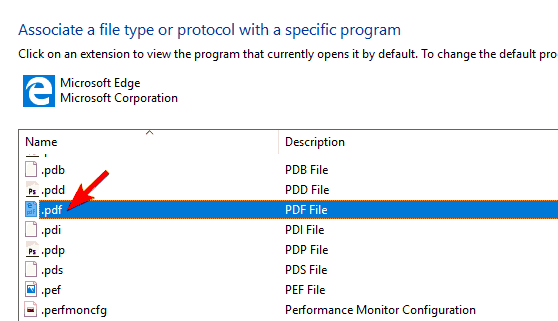
You can also use Associate a file type with a program option to set defaults. You can do that by following these steps:
- Go to Default Programs section and click on Associate a file type or protocol with a program.

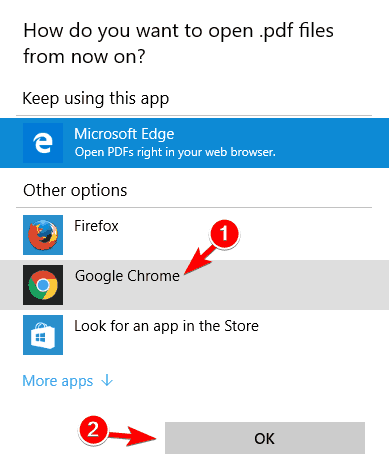
- Locate .pdf on the list and double click it.
- Choose Google Chrome from the list and click on OK to save changes.
After doing that, Google Chrome will be a default application for PDF files, and that will hopefully fix this error on your PC.
8. Set a different browser as default
Few users claim that you can fix Class not registered error message in Chrome simply by setting a different browser as default. To do that, follow these steps:
- Open the Settings app and go to Apps section.
- Go to Default apps section and click on Google Chrome in Web browser section.

- Select any other browser from the list to set it as default.

You can also set a different default browser by doing the following:
- Navigate to Control Panel > Default Programs and click on Set your default programs.
- Select any web browser from the list on the left and choose Set this program as a default. After you’re done, click OK to save changes.

After setting a different web browser as default, start Google Chrome again. Now you should see a message asking you to set Chrome as a default browser. Set Chrome as default and check if the problem is resolved.
9. Update the Chrome to the latest version
If you’re having this problem in Google Chrome, you might be able to fix it simply by updating Chrome to the latest version. To check for updates, you need to do the following:
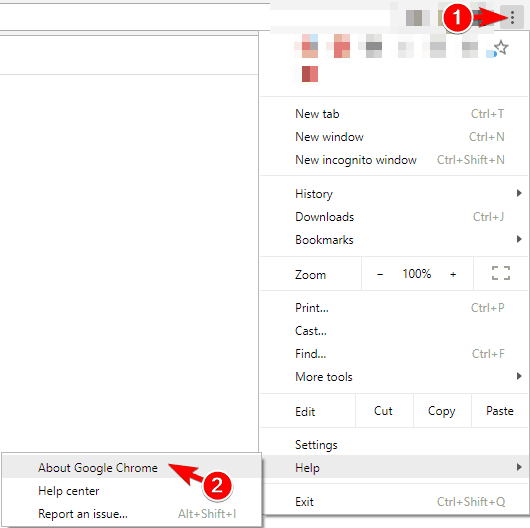
- Start Chrome.
- Go to the Menu icon in the top right corner and choose Help > About Google Chrome from the menu.
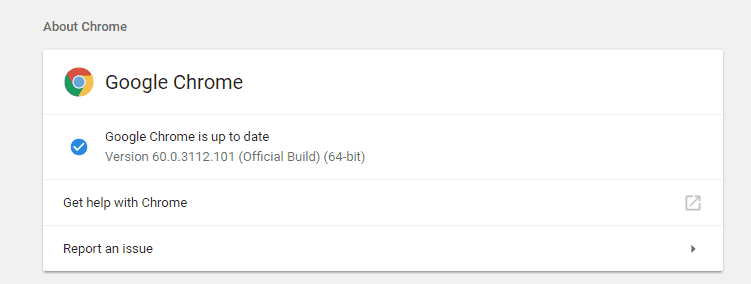
- Chrome will now check for updates. If updates are available, they will be installed automatically.
If you can’t open Chrome at all, you need to remove it and download the latest version from the official website.
This error message might be fixed in the upcoming version of Chrome, but if you can’t wait for the new version you can always download the Canary or Beta version of Chrome and use it instead.
Keep in mind that this version might not be as stable, so you can experience other issues while using it.
You also have the option to use a different browser that may not cause this issue at all. Opera One is one of the most reliable browsers out there with great security and up-to-date features that allow you seamlessly navigate the Internet and it also comes with free native AI.

Opera One
Get a seamless, error-free connection and stay secure with great privacy, a built-in VPN, and tons of add-ons.Keep in mind that this issue can affect other browsers. To learn more, visit our Microsoft Edge WebDriver error: Solutions and fixes article.
If you need to know more about browsers, check out our website’s Browser page. For more guides covering this amazing tool, check out our dedicated Chrome Hub.
Read our disclosure page to find out how can you help Windows Report sustain the editorial team. Read more


Improve this guide


User forum
0 messages