How to Fix DirectX Not Installing in Windows 10 [6 Tested Ways]
Seamlessly install DirectX with our solutions in a jiffy

DirectX is a crucial component required by many multimedia applications, but some users complain that they can’t install DirectX in Windows 10.
This might be due to some DirectX errors on Windows 10. Thankfully, you can solve them. Today we’re going to show all the different ways to do it.
Here’s a quick video summary. Find more in-depth details below if you’re unable to complete DirectX setup.
1. Reinstall your graphics card drivers
- Press Windows Key + X and choose Device Manager.
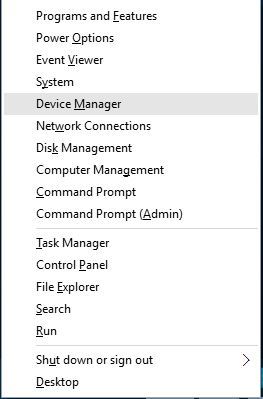
- When Device Manager starts, go to Display Adapters section and locate your graphic card driver.
- Right-click the driver and choose Uninstall.
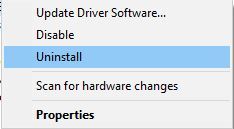
- Check Remove the driver software for this device and click OK.
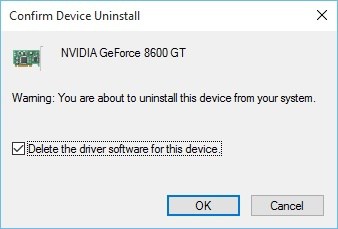
- After you’ve uninstalled the driver, restart your computer.
- After your computer restarts, go to your graphic card manufacturer’s website and download the latest drivers for your graphic card.
- Install the downloaded drivers.
2. Reinstall one of the previous updates
- Open the Settings app and go to Update & Security.
- Go to Windows Update section and click on Advanced options.

- Click View your update history.

- Click on Uninstall updates.

- Before uninstalling an update you have to do some research and find which of these updates is a DirectX update.
- Uninstall that update and restart your computer.
Sometimes previously installed updates can cause issues with DirectX; if that’s the case, you might have to uninstall these updates.
If you’re having trouble opening the Setting app, take a look at this article to solve the issue. Find out if a specific update is installed or not with the help of this guide.
3. Download Visual C++ Redistributables

- Download the package.
- Run the setup.
- Follow the instructions and install the Visual c++ Redistributables.
- If installing the whole package doesn’t fix the problem, you can try installing a specific version from the list.
Few users reported that installing Visual C++ Redistributables has fixed DirectX errors. Make sure you install the whole package or a specific version. Downloading the missing Visual C++ Redistributables will do the trick when you can’t install Directx in Windows 11.
4. Download the missing .dll files
Few users report that you can fix DirectX errors on Windows 10 simply by downloading the missing .dll files and moving them to the WindowsSystem32 or WindowsSysWOW64 folder.
This solution might not be the safest if you download these missing files manually, so keep that in mind. Alternatively, you can copy the missing .dll files from another computer you use.
 NOTE
NOTE
Use a third-party .DLL fixer
You can restore. DLL files if you use a specialized program that can download missing system files and restore corrupted ones.
A tool like this can also keep you safe by performing periodic scans and checks to make sure your computer is healthy and unaffected by malware or spyware.
5. Make sure you meet the recommended system requirements
- Open the Windows search bar.
- Type in dxdiag and select it.
- In the System tab, check to see your RAM and CPU model.

- In the Display tab, check to see your GPU model.


I know it’s probably unlikely, but if you’re using an older computer, you might want to check if it meets the minimum system requirements for running DirectX. Here are the minimum system requirements for DirectX 12:
- Windows 7 32 bit or 64 bit
- DirectX 12 compatible graphics card
- .NET Framework 4
- 1 GB RAM
- 2 GHz Duo Core CPU
6. Install .NET Framework using the Command Prompt
- Go to the Search, type cmd, and open Command Prompt as Administrator.
- Type the following command and press Enter:
DISM /Online /Enable-Feature /FeatureName:NetFx3 /All /LimitAccess /Source:D:sourcessxs
- Wait for the process to finish.
- Restart your computer.
To install the .NET Framework, you must use the good old DISM (Deployment Image Servicing and Management) service. If DSIM fails, quickly fix it with this step-by-step guide.
However, we’re not going to use the whole tool, but just a part that will allow us to install the .NET Framework.
Is there a way to reinstall DirectX?
While there’s no reliable and dedicated uninstaller software to remove DirectX and then manually install it, you can always reinstall DirectX through several methods.
Since updates for DirectX are released alongside Windows Update in the newer iterations, checking for these should get you the latest version, and the OS will reinstall it over the previous one.
DirectX is an integral part of all Windows operating systems, therefore, any DirectX problems can cause your favorite applications to stop working.
If you have any DirectX problems on Windows 10, feel free to try some of our solutions. For more suggestions or questions, reach out to the comments section below.
Read our disclosure page to find out how can you help Windows Report sustain the editorial team. Read more


Improve this guide


User forum
0 messages