DISM Source Files Could not be Found: 3 Ways to Fix it
A Windows Repair Upgrade can fix the issue
Key notes
- If the DISM process has failed to run optimally, you cannot start the repair and recovery process for your Windows OS.
- To rectify this issue, you must use the Windows Repair Upgrade app, clean the WinSXS folder, and use an alternative repair source file.

Some users have reported that their DISM process has failed with the error message The source files could not be found after they used the DISM /Online /Cleanup-Image /RestoreHealth command inside Command Prompt or PowerShell.
This means some routine servicing of the Windows OS will be impossible. We help you skip this situation by showing you the most trusted solutions in this guide.
What causes the DISM source files could not be found error?
For users who have encountered this error, there are a few known causes. These include:
- Internet issues – If the DISM service can not establish an internet connection, you should expect the command to fail and trigger some error codes.
- Corrupted system files – If, for instance, your install.wim file is bad or corrupted, you will have issues running the DISM command.
- File duplicates – Once again, the install.wim file duplicated in the exact location may trigger this error. You will need to do some house cleaning to get rid of it.
Even though the main body of this error message is the same, the code for the error might differ: Here are a few possible options:
- 0x800f081f – In this instance, the OS has been unable to locate the .NET source file needed for an installation to proceed.
- 0x800f0906 – The DISM command cannot locate files needed to fix other harmful files.
- 0x800f0907 – It implies some system files critical to an update are missing.
Now let us discuss some of the best methods to solve this issue once and for all.
How do I fix the DISM source not found issue?
1. Use Windows Repair Upgrade to fix the issue
1.1 Download the Windows Repair tool
- Visit the official page and click on Download to get the Windows Media Creation tool.

- Run the installer and accept the License Terms.

- Click the Upgrade this PC now option and then press Next.

- Wait for the process to be completed.
1.2 Start the Windows repair process
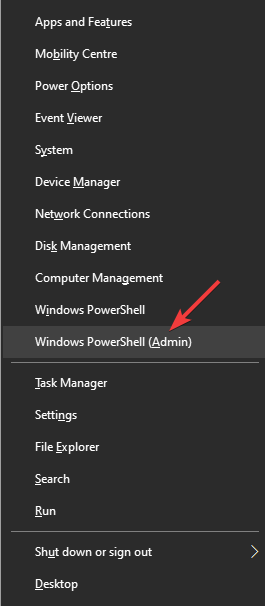
- Press the Windows + X keys and select Windows PowerShell(Admin) or Command Prompt(Admin).
- Copy-paste and run the following commands (in the same order), hitting Enter after each script:
DISM /Online /Cleanup-Image /StartComponentCleanupDism /Online /Cleanup-Image /RestoreHealthsfc /scannow - Restart the PC.
If your administrator account is disabled in Windows 10, find out how you can enable it in this helpful guide.
2. Clean and perform analysis of the WinSXS folder
- Press the Windows + X keys and select Windows PowerShell(Admin) or Command Prompt(Admin).
- Copy-paste and run the following commands (in the same order), hitting Enter after each script:
DISM /Online /Cleanup-Image /StartComponentCleanupsfc /scannowDISM /Online /Cleanup-Image /AnalyzeComponentStoresfc /scannow - Restart the computer, then rerun the DISM restore Health script:
DISM /Online /Cleanup-Image /RestoreHealth
3. Use an alternative repair source in DISM
 Tip
Tip
3.1 Find out the Index value of your Windows OS:
- Connect the USB device containing the Windows installation (or mount the ISO image) to your PC.
- Open Windows Explorer and navigate to the drive that you just mounted.
- Open the Sources folder and check if an install.wim or install.esd file is present at that location.

- Press the Windows + X keys and select Windows PowerShell(Admin) or Command Prompt(Admin).
- Copy-paste either of the following commands (depending on the file format found inside the Sources folder), and hit Enter:
dism /Get-WimInfo /WimFile:X:sourcesinstall.wimdism /Get-WimInfo /WimFile:X:sourcesinstall.esd
Note: After completing the process, note the Index value from the results.
3.2 Start the repair process for Windows:
- If you have the install.wim file, copy-paste the script below and hit Enter.
DISM /Online /Cleanup-Image /RestoreHealth /Source:WIM:X:sourcesinstall.wim:IndexNumber /LimitAccess - If you have the install.esd file, copy-paste the script below, and hit Enter.
DISM /Online /Cleanup-Image /RestoreHealth /Source:ESD:X:sourcesinstall.esd:IndexNumber /LimitAccess
Note: Replace the X inside the above-mentioned commands with the letter corresponding to the drive, and also replace IndexNumber with the results of the process completed earlier. - After the process, you see the message Operation is completed successfully. Now run the following script inside the Command Prompt window:
sfc /scannow
If you can’t run the /sfc runnow command successfully inside Command Prompt, find out how to fix it by checking out this helpful guide.
In today’s guide, we compiled the best methods available that should solve your issue once and for all. Furthermore, we chose to present the methods in such a way that allows you to try out the minor invasive actions first and the most complicated/intrusive ones at the end.
These solutions will come in handy if DISM source files cannot be found in WIM, on your iso, or if you get a NetFx3 error.
Before you leave, find out how to convert Windows install.wim file to install.esd.
If you want to share your experience with us, don’t hesitate to contact our team. You can do so by using the comment section below.
Read our disclosure page to find out how can you help Windows Report sustain the editorial team. Read more


Improve this guide


User forum
1 messages