Enable Legacy Boot on Windows 10 [How to]
Making changes in BIOS lets you enable legacy boot on your PC
Key notes
- Enabling legacy boot is simple, and the process is the same for Dell, HP or any other brand.
- To enable this feature, boot to BIOS and make a couple of changes.

Many PC come with legacy boot disabled in favor of UEFI. However, many are wondering how to enable legacy boot on Windows 10 for compatibility issues.
Speaking of issues, we covered legacy boot issues in one of our older guides, so be sure to check it out.
If you still want to turn on legacy boot on Windows 10, this guide will show you the best way to do it.
UEFI boot vs Legacy boot
Let’s start with explaining why one would choose to use the Legacy boot option instead of the UEFI on a compatible PC.
Most of the contemporary configurations support both Legacy BIOS and UEFI booting options. And the latter is the default version.
However, if you have a Windows 10 installation drive with an MBR (Master Boot Record) partitioning style, you won’t be able to boot and install it in the UEFI boot mode. And this is a common problem.
Also, if you have HDD partitioned and formatted as a GPT drive, you won’t be able to install Windows 10 from an MBR drive. And vice versa.
But, this is a story for some other time, as we’ll try to focus on enabling Legacy BIOS boot on your PC today.
Now, if you, for any reason, need to boot your PC in the Legacy BIOS mode instead of UEFI, the BIOS/UEFI settings are the place to be.
There, you should have an easy time changing the Boot mode from one to another. However, with Windows 10 and its Fast Boot, the mere accessing the BIOS/UEFI settings isn’t exactly a walk in the park.
How can I enable legacy boot on Windows 10?
Access BIOS
- Press Windows key + I to open Settings.
- Choose Update & Security.
- Select Recovery from the left pane.
- Under the Advanced startup, click Restart now.
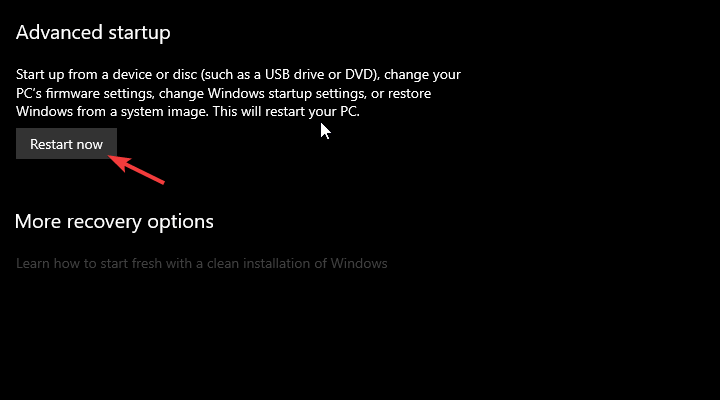
- Choose Troubleshoot.
- Select Advanced options.
- Choose UEFI Firmware Settings and click Restart.
Once there, navigate to the Boot section and replace UEFI with the Legacy (or Legacy BIOS) option. On the other hand, if the option is grayed out, you’ll need to set the Administrator password and reboot your device.
As you can see, enabling legacy BIOS mode on Windows 10 is pretty simple.
Enter the boot password and access the BIOS/UEFI settings again. You should be able to switch to Legacy mode this time. We suggest removing the Administrative password afterward, as it’ll pop up every time you boot the PC.
If you want to learn more, we have a great guide on how to enable Secure Boot without BIOS that you might want to check out.
That’s it. If you have any alternative ways you can provide us with, feel free to do so. The comments section is just below.
Read our disclosure page to find out how can you help Windows Report sustain the editorial team. Read more


Improve this guide


User forum
0 messages