How to Give Read/Write Permissions But Not to Delete
You can easily assign permissions using the file properties window
Key notes
- Revoking delete permissions will prevent unauthorized users from deleting files or folders.
- This setting can be changed in a matter of seconds with the command line tool.

File permissions prevent unauthorized access and modification of your files, and this is why many users want to assign read and write folder permissions but not delete privileges.
Setting up these permissions is simpler than you think, and this guide will show you a couple of methods you can use to prevent your files from being deleted.
Can you delete files with read/write permissions?
Read/write permissions usually allow you to modify and delete files and folders. However, you can always adjust the advanced settings and revoke delete permission if needed.
How do I set up read/write permissions for files and folders?
1. Use file Properties
- Right-click the desired file or folder and choose Properties.

- Navigate to the Security tab and click on Edit. From here, you’ll be able to modify basic permissions.

- If the desired account isn’t on the click, click on Add.
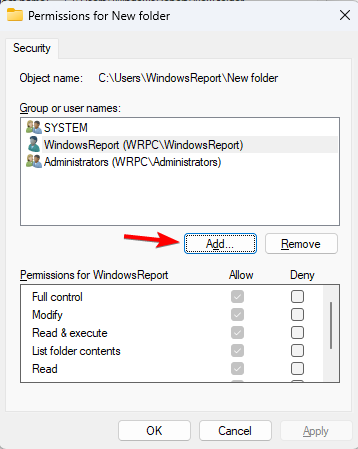
- Next, type the account name, click Check names, and then OK.

- Select the desired account. Next, check the directory permissions you want to assign to it in the Allow column and lastly click Apply and OK to save changes.

2. Use advanced security settings
- Right-click the desired file and choose Properties.
- Navigate to the Security tab and click on Advanced to open the advanced security permissions window.

- If your account isn’t on the list, click on Add.

- Click on Select a principal.

- Enter the desired username, click on Check names, and then click OK.
- Select the individual permissions and click on OK.

- Click Apply and OK to save changes.
3. Use command line
- Press the Windows key + X and select Terminal (Admin).

- Run the following command:
icacls "C:\Users\WindowsReport\New folder" /grant "Test:(R,W)"
- After that, the Test user will have read and write privileges over the New folder.
How do I remove delete permissions for files and folders?
1. Use advanced security settings
- Locate the desired file or folder, right-click it, and choose Properties. Next, go to the Security tab and click Advanced.
- Double-click the desired account. Click on Show advanced permissions.
- Lastly, uncheck Delete and Delete subfolders and files and click on OK.

- After that, you’ll only have Windows permissions to create files but not delete.
2. Use the Terminal
- Press the Windows key + X and select Terminal (Admin).
- Run the following command to remove delete permission:
icacls "C:\Users\WindowsReport\New folder" /remove "Test:D"
- To remove delete permissions from a folder and subfolders, use:
icacls "C:\Users\WindowsReport\New folder" /remove "Test:(DC)"
Tips for maintaining permissions settings
- Plan carefully which privileges you want to assign to users or groups, and assign only the necessary file permissions to users.
- Try to utilize built-in groups in Windows since they already have predefined permissions.
- Use deny permissions rarely since improper configuration can lead to issues.
- If you’re managing multiple users or computers, document all permissions and access rules.
It’s easy to manage read and write folder permissions, and for less experienced users we suggest using file or folder properties, while more advanced ones can use the command line to quickly change their settings.
Permissions are extremely useful since users need to provide administrator permission to delete certain folders on their PCs. You can also use this feature to limit folder access, and if you do so, restricted users will get access denied to folder messages when trying to open certain directories.
Keep in mind that permissions are quite sensitive, and you can cause issues if you’re not careful, but luckily, you can always reset all permissions to default on your PC.
How do you configure your folder permissions? Share your favorite methods with us in the comments below.
Read our disclosure page to find out how can you help Windows Report sustain the editorial team. Read more


Improve this guide


User forum
0 messages