Quick Steps to Set Up a Local Printer on Windows 11

Installing a local printer on Windows 11 is a straightforward process, whether you’re setting up a brand new device or reconnecting an existing one. This guide will walk you through each step to ensure a smooth and easy printer setup.
Table of contents
How to Install a Local Printer on Windows 11?
1. Prepare Your Printer and PC
Before starting the installation process, make sure that:
- Your printer is powered on.
- Your printer is properly connected to your PC using either a USB cable or through your local network (Wi-Fi or Ethernet).
For full steps on setting up a Wi Fi device from scratch, see our guide on adding a wireless printer in Windows 11.
2. Install Printer via Settings
Follow these steps to install your printer via the Settings app:
- Press Windows + I to open the Settings app.
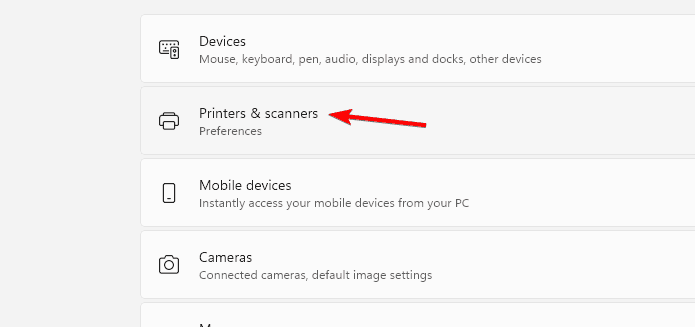
- In the Settings app, click on Bluetooth & devices from the left sidebar.

- Select Printers & scanners.
- Click on Add device. Windows will automatically search for available printers connected to your PC.

- From the list of detected devices, select your printer. If your printer isn’t listed, click The printer that I want isn’t listed to manually add it by entering its details.
- Windows will automatically install the necessary drivers for the printer. Once the installation is complete, your printer will appear under Printers & scanners.
If you want more control over queued jobs and drivers, you can install Print Management in Windows 11 and manage printers from a central console.
Troubleshoot Printer Installation
If your printer doesn’t appear or fails to install, try the following steps:
- Ensure the printer is correctly connected to your PC via USB, Ethernet, or Wi-Fi. Double-check the cables and the network settings if you’re using a wireless printer.
- Restart both your PC and printer. Sometimes, this can resolve installation issues.
- Visit the printer manufacturer’s website to download and install the latest drivers for your printer model. After installing the new drivers, try adding the printer again.
- Run the built-in printer troubleshooter:
- Go to Settings > Update & Security > Troubleshoot.
- Click on Additional troubleshooters and select Printer.

- Follow the on-screen instructions to detect and resolve issues.
If your printer still doesn’t appear, you can follow the steps in this guide to find printers in Windows.
You can confirm your printer activity by checking print logs, and the guide on how to check print history in Windows 11 helps you verify that your system records each job correctly.
Conclusion
Installing a local printer on Windows 11 is simple and can be completed in just a few minutes. By following these steps, you’ll have your printer set up and ready to use. If you encounter any issues, troubleshooting steps like checking connections, updating drivers, and running the built-in troubleshooter can help resolve common problems.
Once your printer is successfully installed, you can print a contact sheet of photos in Windows 11 to preview and organize multiple images on a single page. It’s a great way to confirm your printer’s performance right after setup.
FAQ
If your printer is not showing up, try reconnecting it or using the “The printer that I want isn’t listed” option to manually add it. Check that it’s turned on and connected to the same network.
Yes, you can install a printer using a USB cable. Just ensure that the cable is securely connected between your printer and PC. Windows should detect the printer and install it automatically.
If your printer requires a special driver, you can download it directly from the manufacturer’s website. Once downloaded, run the installer and follow the on-screen instructions to complete the installation.
To update your printer drivers, go to the printer manufacturer’s website and search for your printer model. Download the latest drivers and install them. You can also use Device Manager to search for updates automatically.
Read our disclosure page to find out how can you help Windows Report sustain the editorial team. Read more


Improve this guide


User forum
0 messages