INVALID_AFFINITY_SET: How to Fix The 0x3 Bug Check
First, restart your computer in safe mode
6 min. read
Updated on
Read our disclosure page to find out how can you help Windows Report sustain the editorial team. Read more
Key notes
- To fix the INVALID_AFFINITY_SET error on Windows 11, block the automatic restart option, reinstall the missing drivers, or run SFC, DISM, and chkdsk scans.
- Keep reading to learn the detailed steps.

If you have encountered the INVALID_AFFINITY_SET blue screen error on your Windows computer, then this guide can help!
We will explore the probable causes and offer WR experts tested solutions to get rid of this BSoD error in no time.
What causes the INVALID_AFFINITY_SET error?
- Corrupted system files or drivers.
- Hardware interference or malware infection.
- Overheating or power supply issues.
How do I fix the INVALID_AFFINITY_SET on Windows 11?
Before proceeding with any steps for the INVALID_AFFINITY_SET on Windows 11, go through the following preliminary checks:
- Unplug the external hardware except the keyboard & mouse, then restart your computer.
- Verify if you have a stable internet connection and clean the junk files using the DiskCleanup button.
- Run a malware scan using a reliable antivirus tool.
1. Run the Windows Memory Diagnostic tool
First, we need to restart the computer in safe mode using the Windows Recovery environment; for that, follow these steps:
- Restart your computer, and when you see the manufacturer logo, press & hold the Power button for about 5-7 seconds to turn off your PC.
- Press the Power button to turn on your computer.
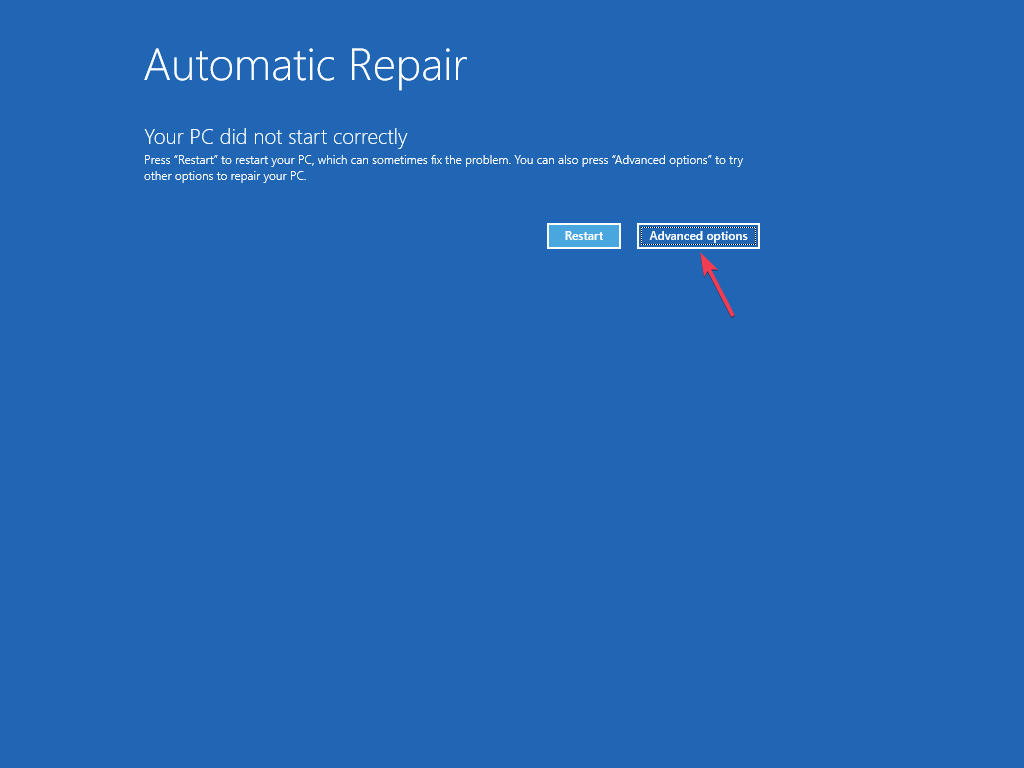
- When your computer restarts, as you see the manufacturer’s logo, press & hold the Power button again to restart. Repeat the steps twice until you see Windows Preparing Automatic Repair.
- Click Advanced options.
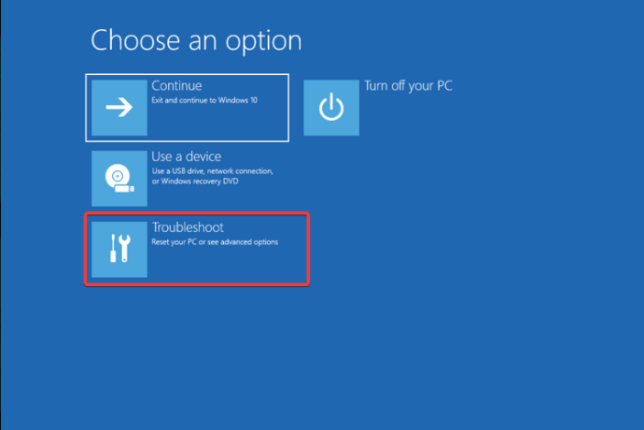
- On the Choose an option screen, select Troubleshoot.
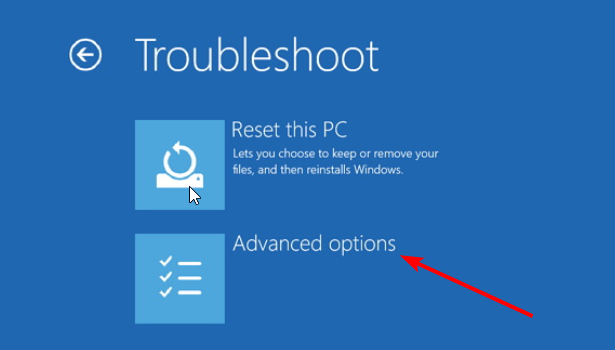
- Next, choose Advanced options.
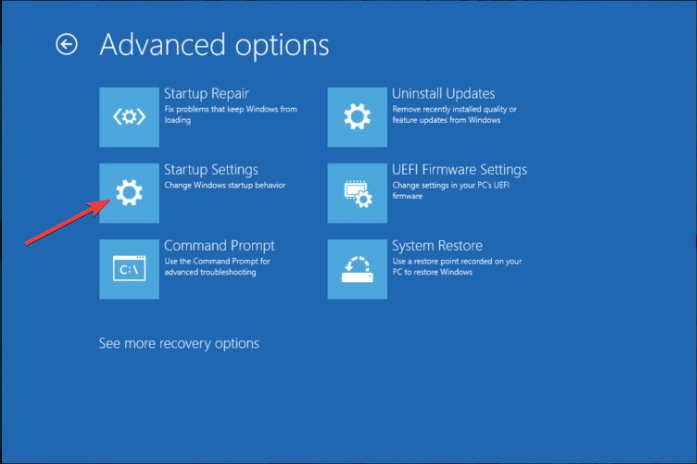
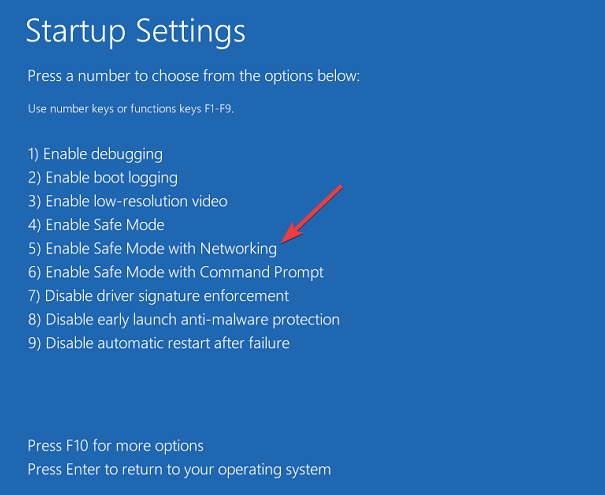
- On the Advanced options screen, select Startup Settings.
- Now, select Enable Safe Mode with Networking by pressing F5 and click Restart.
Your computer will restart in safe mode, then follow these steps to run the diagnostic check:
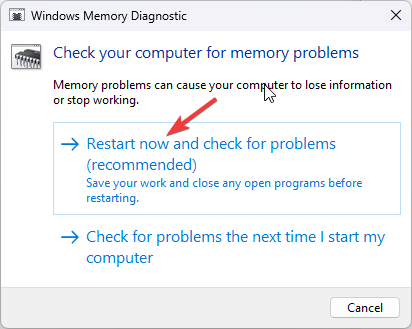
- Press the Windows key, type windows memory diagnostic in the search box, and click Open.
- Select Restart now and check for problems (recommended).
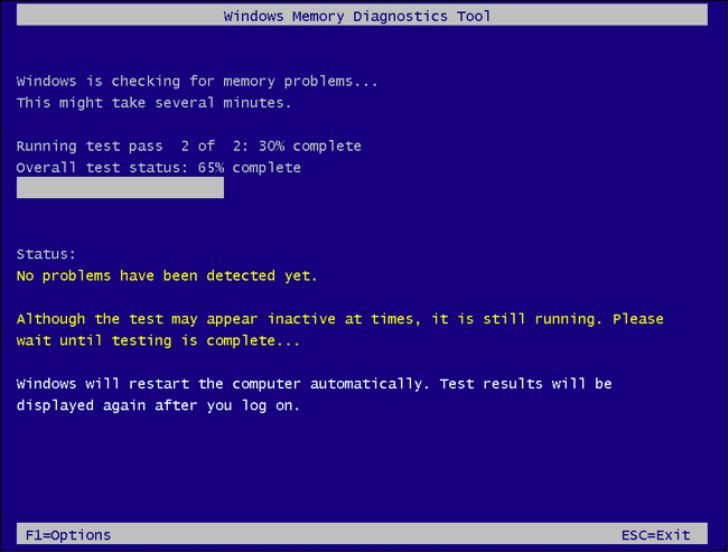
- Your computer will reboot, and the diagnostic tool will run the test.
Once the computer restarts, you need to log in, and the results of the scan will appear on the screen. If you can’t see the test results, you can open Event Viewer to check the details.
In case the test comes with an error, there is a problem with memory modules, try reseating the RAM & remove dust & debris, then run the diagnostic check again. If the scan results come up with errors, you might have to replace one or more modules.
Running a diagnostic scan can also help you fix issues like the BSoD error 0x00000154; read this guide to learn about other solutions.
2. Block automatic restart
- First, restart your computer in safe mode using the steps mentioned in Solution 1.
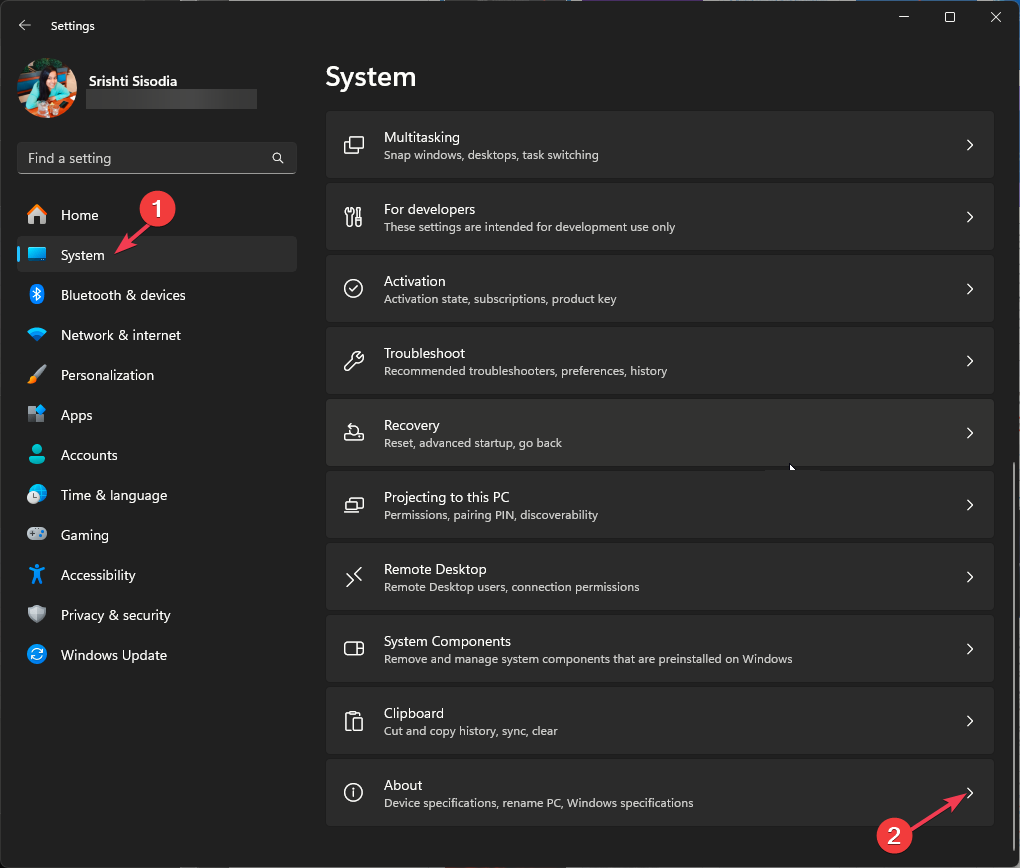
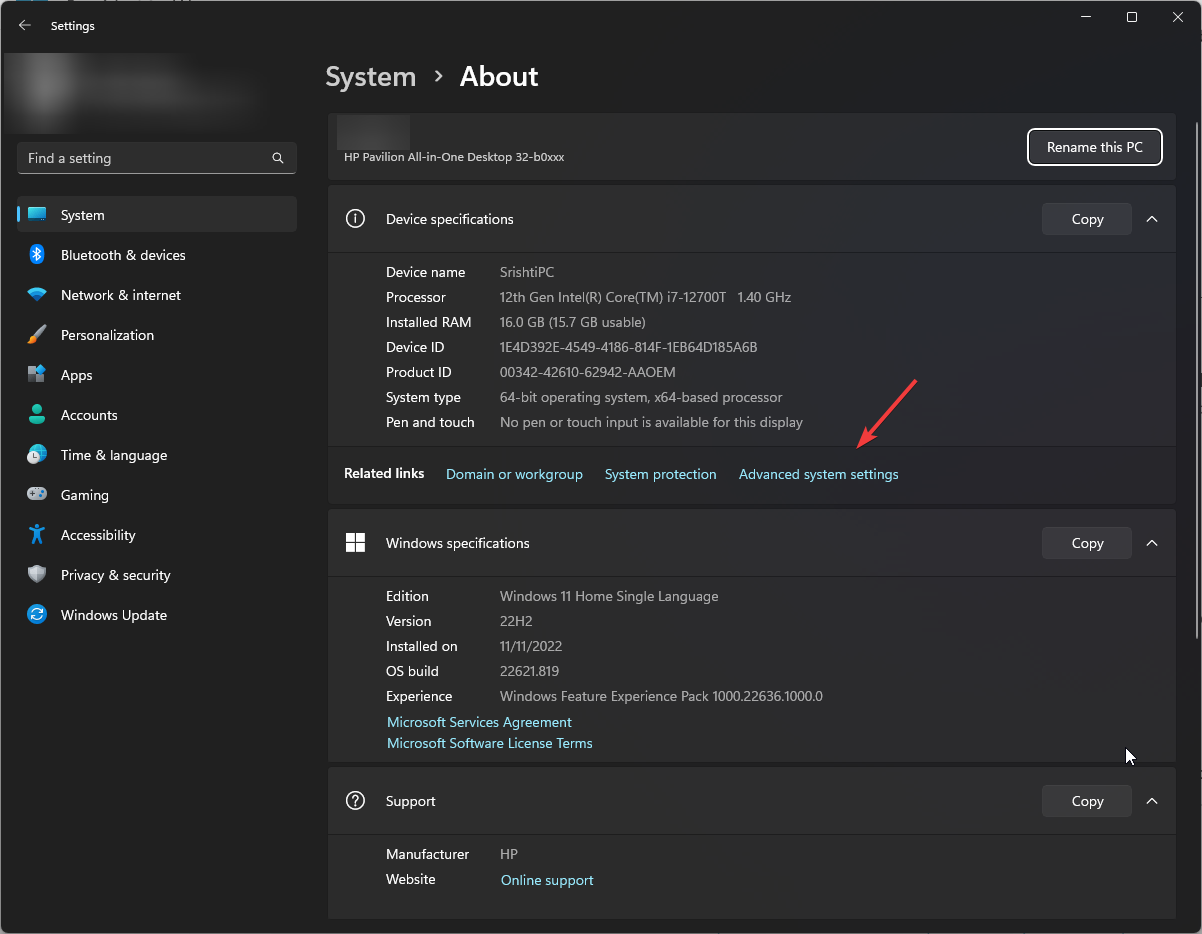
- Press Windows + I to open the Settings app.
- Go to System, then click About.
- Select Advanced system settings.
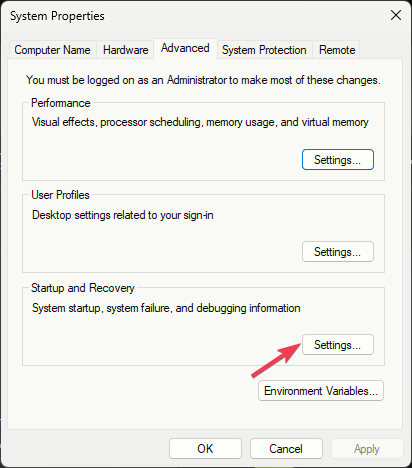
- On the Advanced tab, under the Startup and Recovery option, click the Settings button.
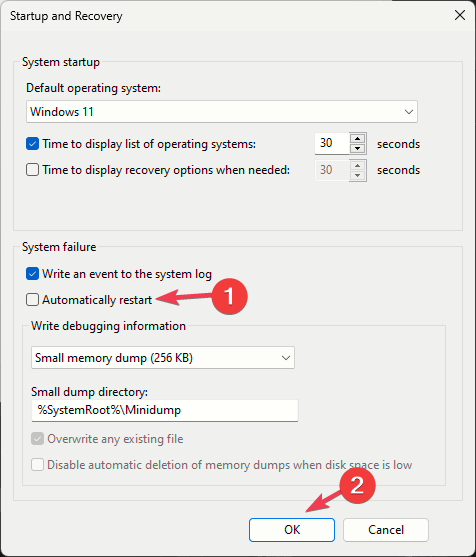
- Locate System failure, remove a checkmark next to Automatically restart, click Apply, then OK.
3. Use SFC & DISM scans
If you are stuck on the BSOD screen, follow these steps to open the Command Prompt and run the commands:
- Restart your computer, and when you see the manufacturer logo, press & hold the Power button for about 5-7 seconds to turn off your PC.
- Press the Power button to turn on your computer.
- Repeat the steps twice until you see Windows Preparing Automatic Repair, then click the Advanced options.
- On the Choose an option screen, select Troubleshoot.
- Next, choose Advanced options.
- Select Command Prompt from the Advanced options window.
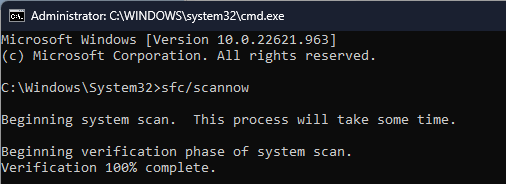
- Type the following command to repair the damaged system files and press Enter:
sfc /scannow - Copy & paste the following command to restore your Windows image and hit Enter:
Dism /Online /Cleanup-Image /RestoreHealth - Reboot your computer to let the changes take effect.
If this process seems overwhelming, you can always rely on specialized software because it can proceed with this task automatically.
4. Run the chkdsk command
- Open the Command Prompt window using the steps from 1-6 mentioned in Solution 3.
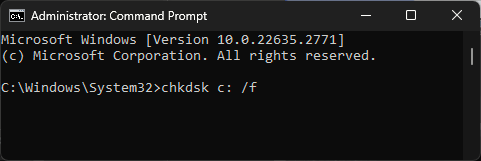
- Copy & paste the following command to check and repair the file system issues on the system drive of a Windows computer, then hit Enter:
chkdsk c: /f - Close the Command Prompt window, then restart your PC.
5. Uninstall the Windows updates
- First, restart your computer in safe mode using the steps mentioned in Solution 1.
- Press Windows + I to open Settings.
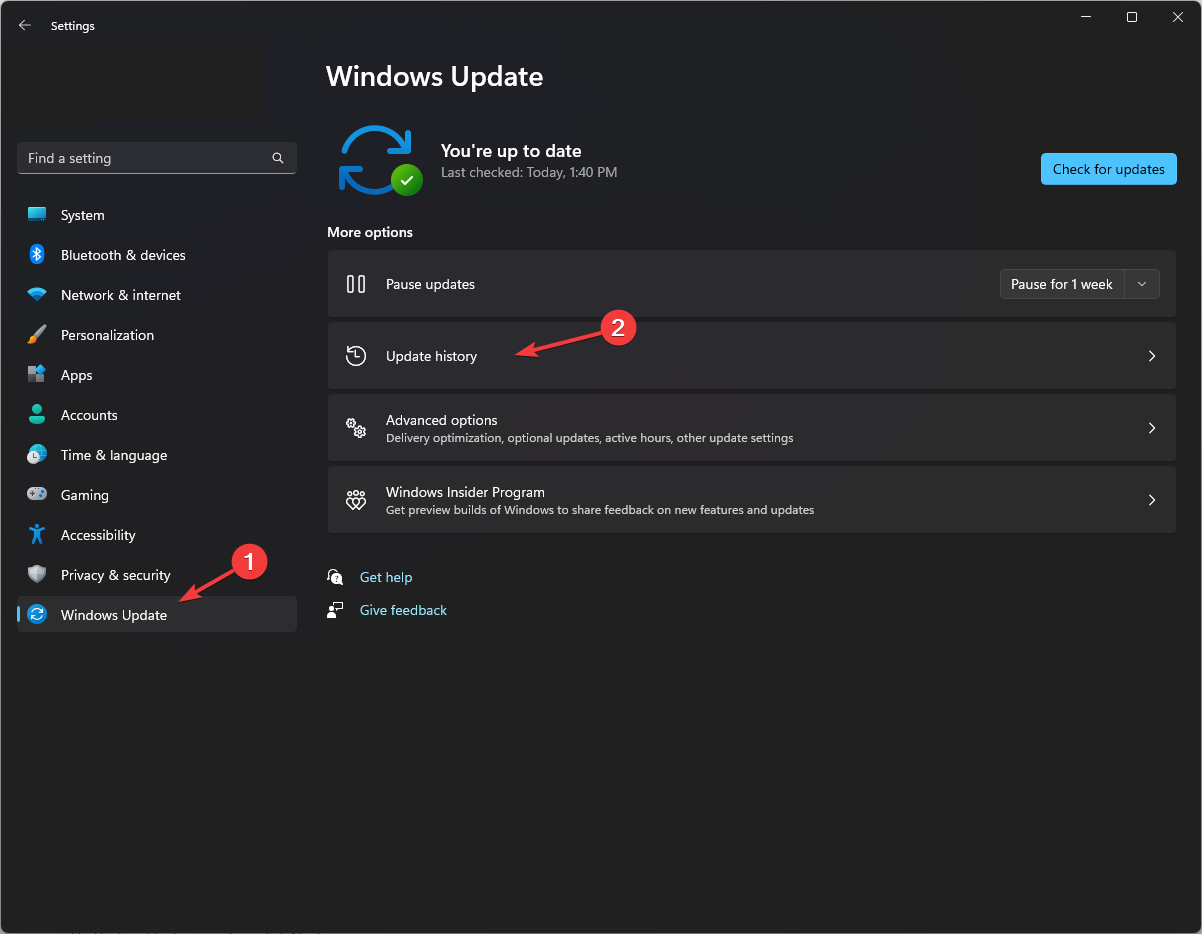
- Go to Windows Update, then select Update history.
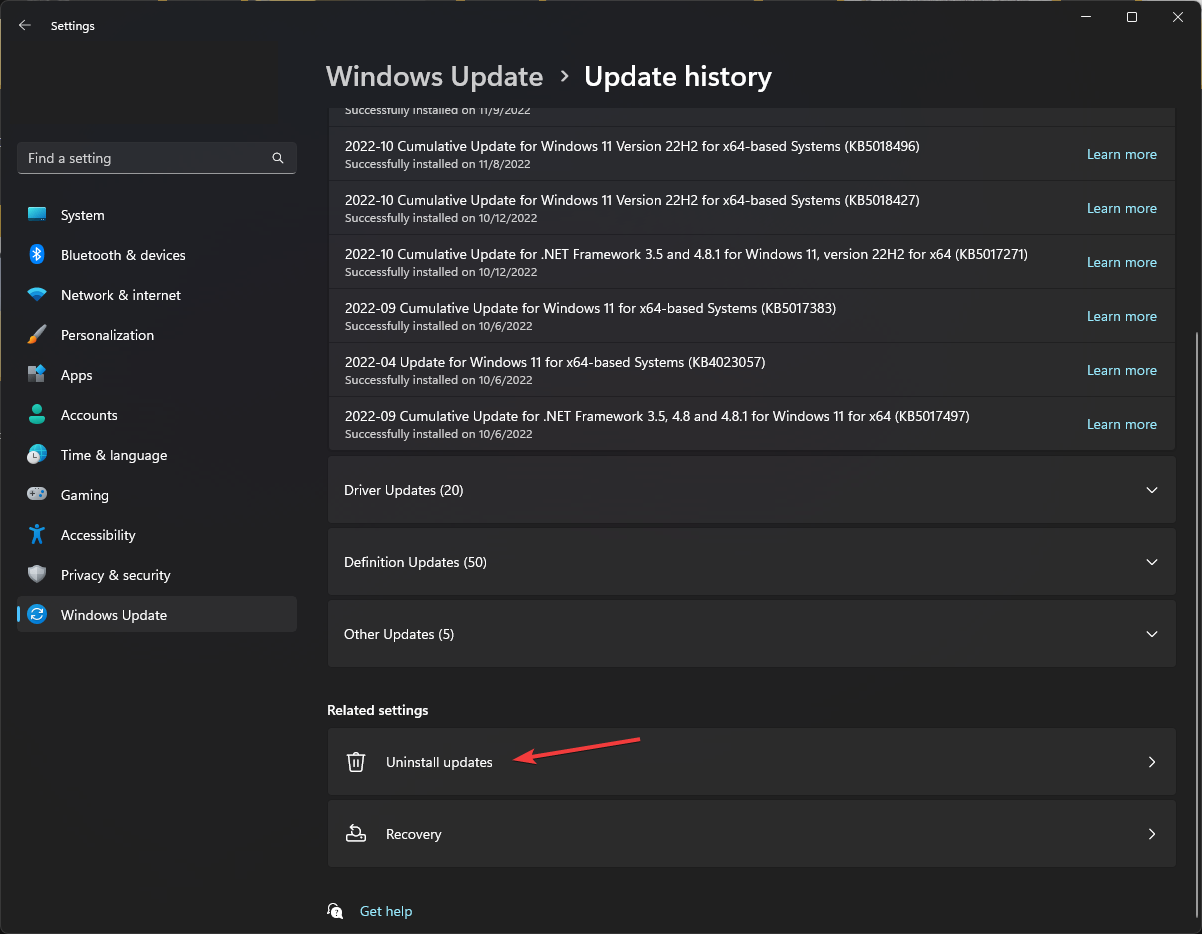
- Under the Related settings section, select Uninstall updates.
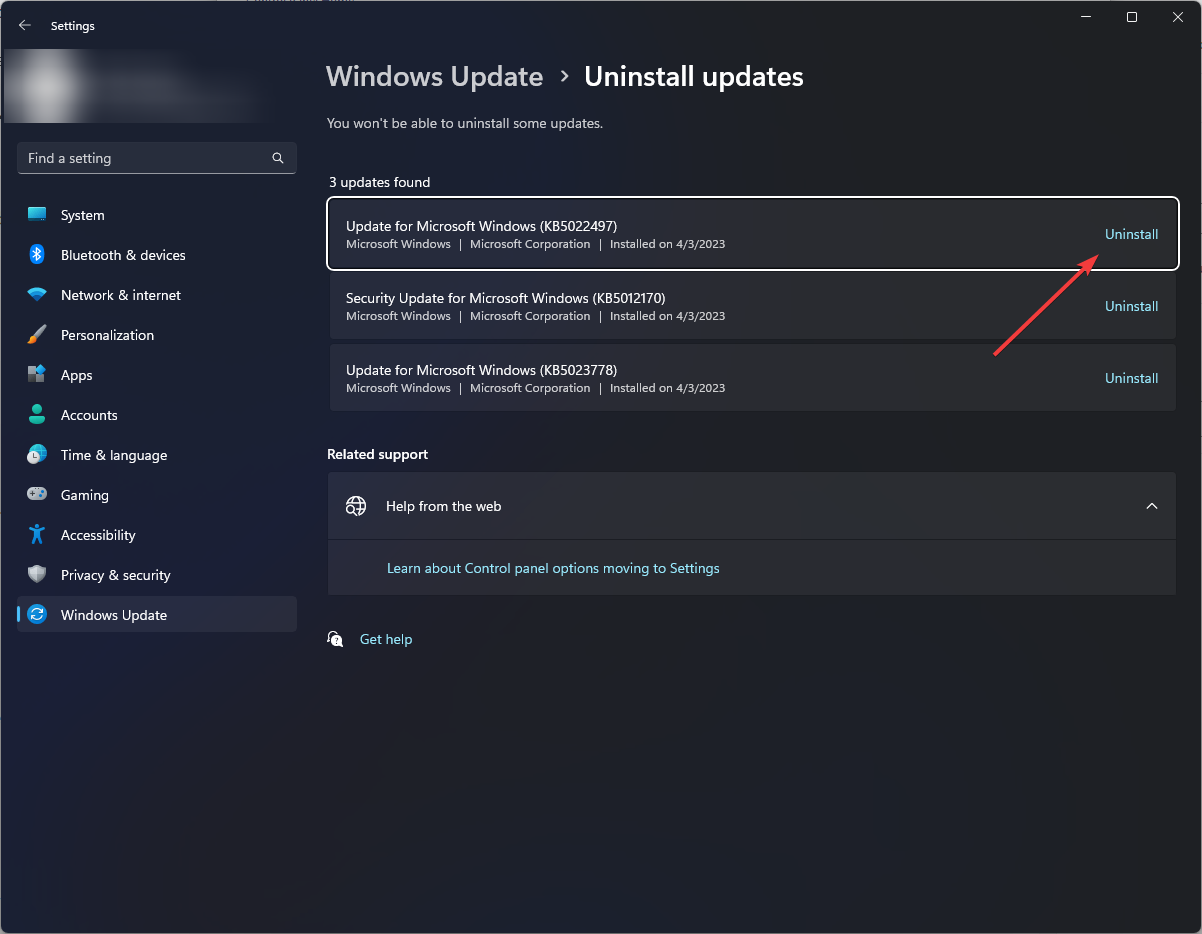
- Go to the latest update, and click Uninstall.
If the problem appears after installing new Windows updates, uninstalling the updates can straighten things out.
Moreover, it can also help you fix other BSoD errors like 0x00000078 BSOD in Windows 11; read this guide to learn about other solutions.
6. Update/reinstall your drivers
- First, restart your computer in safe mode using the steps mentioned in Solution 1.
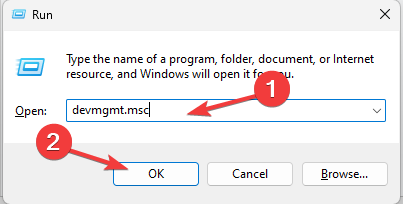
- Press Windows + R to open the Run window.
- Type devmgmt.msc and click OK to open the Device Manager app.
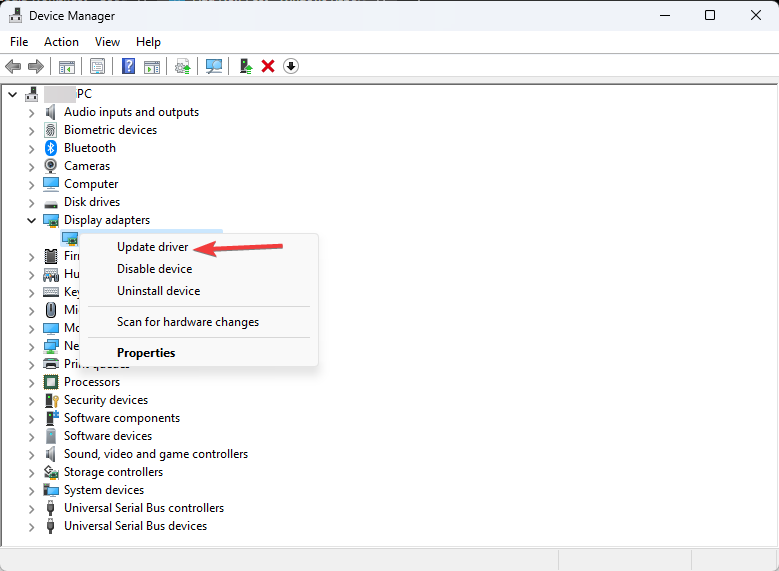
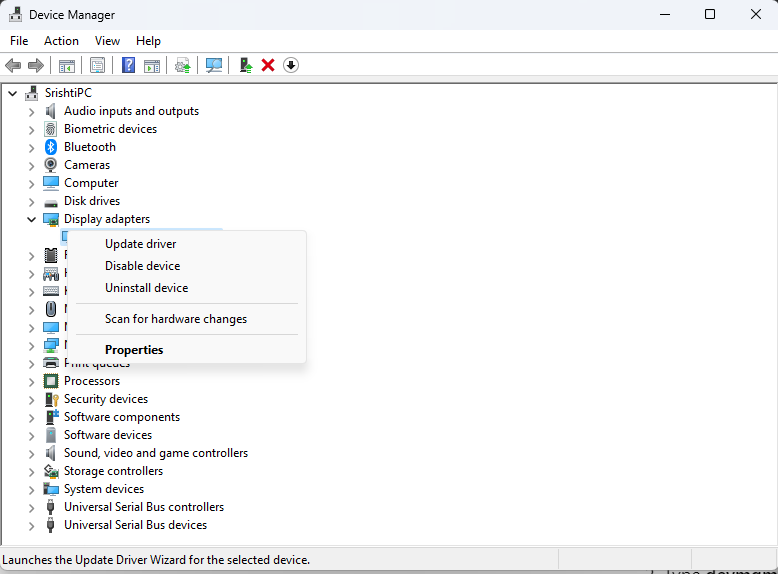
- Look for a yellow triangle with an exclamation mark next to drivers or the categories listed, right-click it, and choose Update driver.
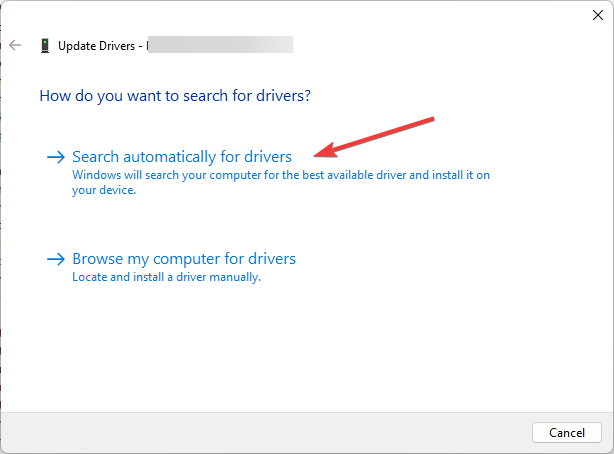
- Select the Search automatically for drivers option.
- Follow the on-screen instructions to complete.
In case there is no update available, follow these steps to reinstall the driver:
- Go to the driver with a yellow triangle with an exclamation mark, right-click it, and select Uninstall driver.
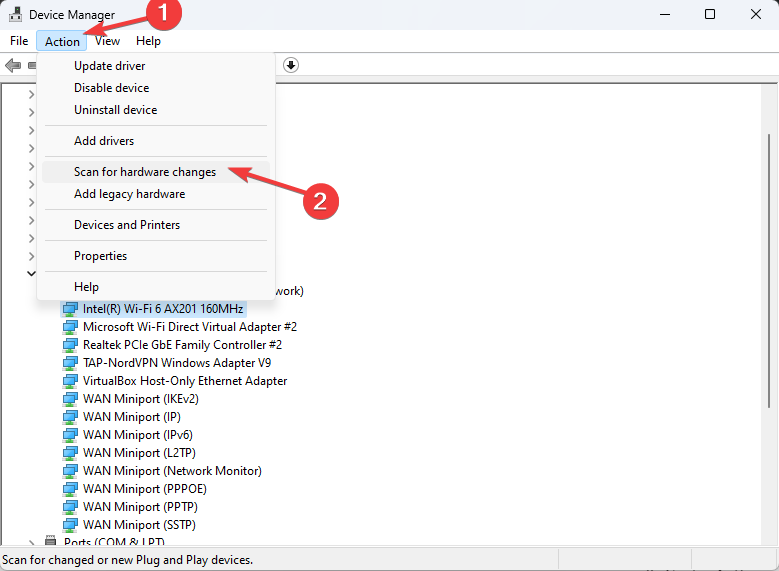
- Once the driver is uninstalled, go to Action, then select Scan for hardware changes to reinstall it.
- Restart your computer to confirm the changes.
7. Perform a system restore
- Restart your computer, and when you see the manufacturer logo, press & hold the Power button for about 5-7 seconds to turn off your PC.
- Press the Power button to reboot your PC.
- Repeat the steps twice until you see Windows Preparing Automatic Repair, then click the Advanced options.
- On the Choose an option screen, select Troubleshoot.
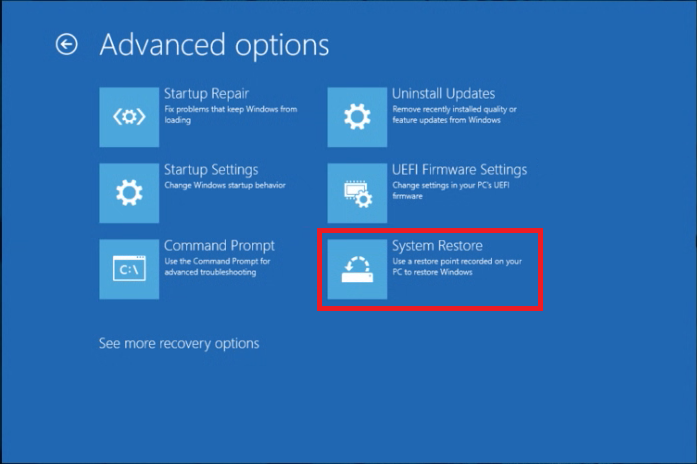
- Next, choose Advanced options.
- Select System Restore from the Advanced options window.
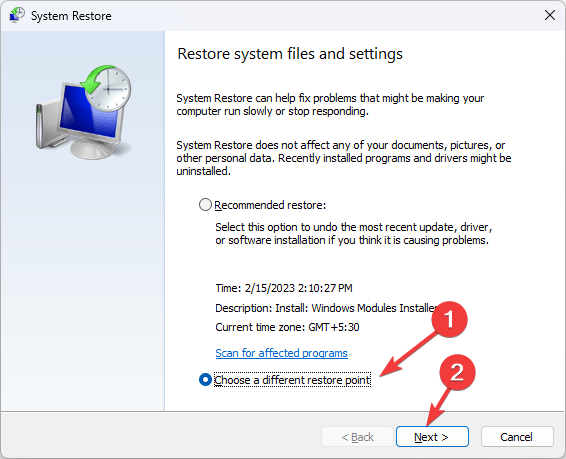
- Select Choose a different restore point and click Next.
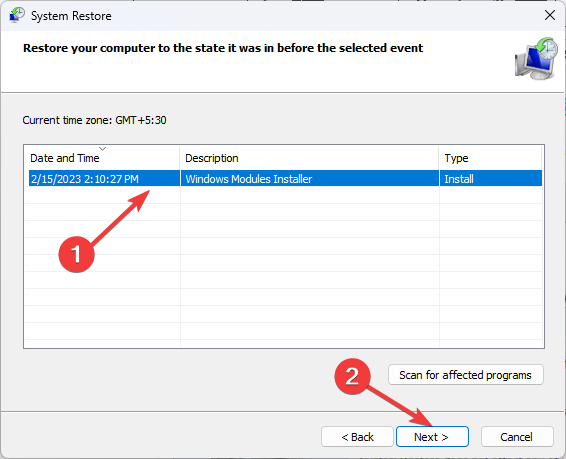
- Choose the selected restore point and click Next.
- Click Finish.
Your computer will restart and restore it to the selected version. If the System Restore didn’t complete successfully, it could be due to driver issues; read this guide to learn more.
If nothing worked for you, you might want to reset your computer to fix all the system inconsistencies once and for all.
To conclude, to fix the INVALID_AFFINITY_SET BSoD error on Windows 11, update your Windows to the latest version, ensure there are no outdated drivers, and run an SFC scan to repair corrupted files.
To learn more about the BSoD errors, and causes to prevent it from interrupting your computing experience, read this guide.
Did we miss a step that helped you to fix this BSoD error? Don’t hesitate to mention it in the comments section below. We will happily add it to the list.




User forum
0 messages