How to Unzip Files & Folders on Mac Terminal [Quick & Easy]
Take a closer look at these confirmed procedures
3 min. read
Updated on
Read our disclosure page to find out how can you help Windows Report sustain the editorial team. Read more
Key notes
- Using the Mac Terminal app to perform actions can be very efficient if you know what you're doing.
- If you're not sure what you want to use, this guide also offers a very easy and intuitive software solution.
- For more useful information on this topic, don't hesitate to check out our Mac issues webpage.
- To explore some other useful guides, explore our thorough Mac section.

In this day and age, being as efficient as possible when using your Mac has become paramount.
In the case in which you’re proficient with using the Terminal application, any task can be a few commands away, including unzipping files and folders.
If you’re not very familiar with this Mac application, what you need to know is that it offers text-based access to your OS (similar to the Command Prompt on Windows).
In today’s guide we will discuss the most efficient way to use Terminal to achieve the result mentioned above, so make sure to read through the article entirely.
How can I unzip files and folders in the Terminal?
1. Move the file/folder to your desktop
To ensure quick access to your files while using Terminal on your Mac, it is recommended that you move the file/folder to your desktop for easy access.
If you prefer to keep the file or folder in another location, this is not a problem, as skipping this step will not interfere in any way with your Terminal commands. Feel free to start from the next step if that is the case.
2. Use a 3rd party software
If you’re not sure how to use the Terminal app on your Mac and want to avoid the possibility of causing any harm to your system, then we recommend that you use the powerful WinZip to unzip your files easily.
WinZip has some amazing features to offer and can help you unzip files easily. Besides the seamless integration with iCloud Drive, Dropbox, Google Drive, it also works perfectly with ZIP, ZIPX, RAR, LHA, 7Z, JAR, and WAR formats.
This user-friendly app offers quick processing of your files/folders, no matter their size, and some say that it might be even more efficient than using the Terminal app (even if you’re experienced with it).
3. Open Terminal and set the unzip location
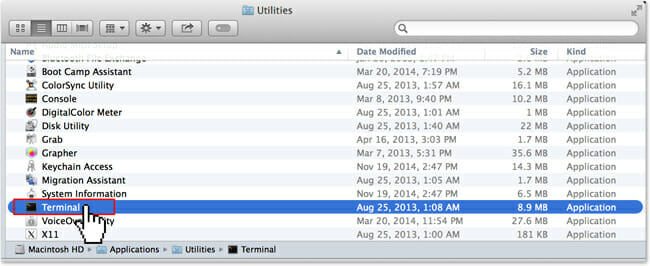
- Open your Applications folder.
- Click the Utilities folder to open it.
- Choose the Terminal option.
- Use the following Change Directory (cd) command to set the location in which you want to unzip your file/folder:
cd ./Desktop
Note: Feel free to modify the /Desktop entry from the command above to any location that you choose on your hard drive.
3. Invoke the unzip command inside Terminal
Type the following command into Terminal to initiate the unzip process: unzip file.zip
Note: The file.zip needs to be replaced by the name of the file or folder you want to unzip.
The command mentioned above will unzip your file/folder to the desktop location you previously set.
If you want to change this location you can type the following command and run it: unzip file.zip - d ~/another/folder
Note: As in the previous case, the file.zip needs to be the name of your zip file, and the another/folder entry will be the path to the folder you want to use.
As you can see, it is not that hard to unzip files and folders on your Mac OS by using the Terminal, but it can be even easier, and safer to use the WinZip application.
You may also want to learn what to do if you get a ZSH permission denied error in the Mac Terminal.
No matter which of the options you choose to use, don’t hesitate to share your experience with us by using the comment section below.




User forum
0 messages