Create Better Subtitles Faster with Matesub Software
The friendly interface makes editing your subtitle a child’s play
![]() 7 min. read
7 min. read
![]() Updated on
Updated on
Share this article
Improve this guide
Read our disclosure page to find out how can you help Windows Report sustain the editorial team. Read more
Key notes
- If you need to create subtitles for a video, Matesub will help you do that in just a couple of minutes.
- The software recognizes the speech, then translates it into text in many available languages.
- Whether you're a beginner or a professional, its cloud-based interface is simple and straightforward to use.
Whether you’re into the subtitling business or just want to create a nice surprise for your family, Matesub subtitle software is here to help you.
Thanks to its built-in AI technology and a powerful WYSIWYG editor you will be able to create higher-quality subtitles a lot faster.
So, if you need to create subtitles faster and more conveniently, we’ve tested Matesub for you and we’re sharing its best features along with our experience with the software.
How can Matesub help me?
Matesub software is a cloud-based tool that transforms the work of setting up the subtitles on a video into a fast and pleasurable experience.
That’s mostly because it shortens the process significantly by using speech recognition to transcribe the audio into text.
And not only that but it also places the text on the timeline exactly where the words are spoken.
All this is doubled by a very friendly interface that makes editing your subtitle a child’s play.
What are Matesub’s best features?
1. Automatic transcription and translation
The most important feature of Matesub is its speech recognition feature that automatically transforms the audio into text.
After you upload the video, you can specify the audio language and the language of the finished subtitle.
So, not only it identifies the audio speech in no less than 28 languages but then, it also translates it into 65 available languages.
It does a great job on the most used languages and, providing translation suggestions, helps people focus on the creative part of the work, letting the machine take care of the most time-consuming tasks required by the rest of the process.
However, it gives you an awesome head start and you can always edit the subtitles after the tool processes them.
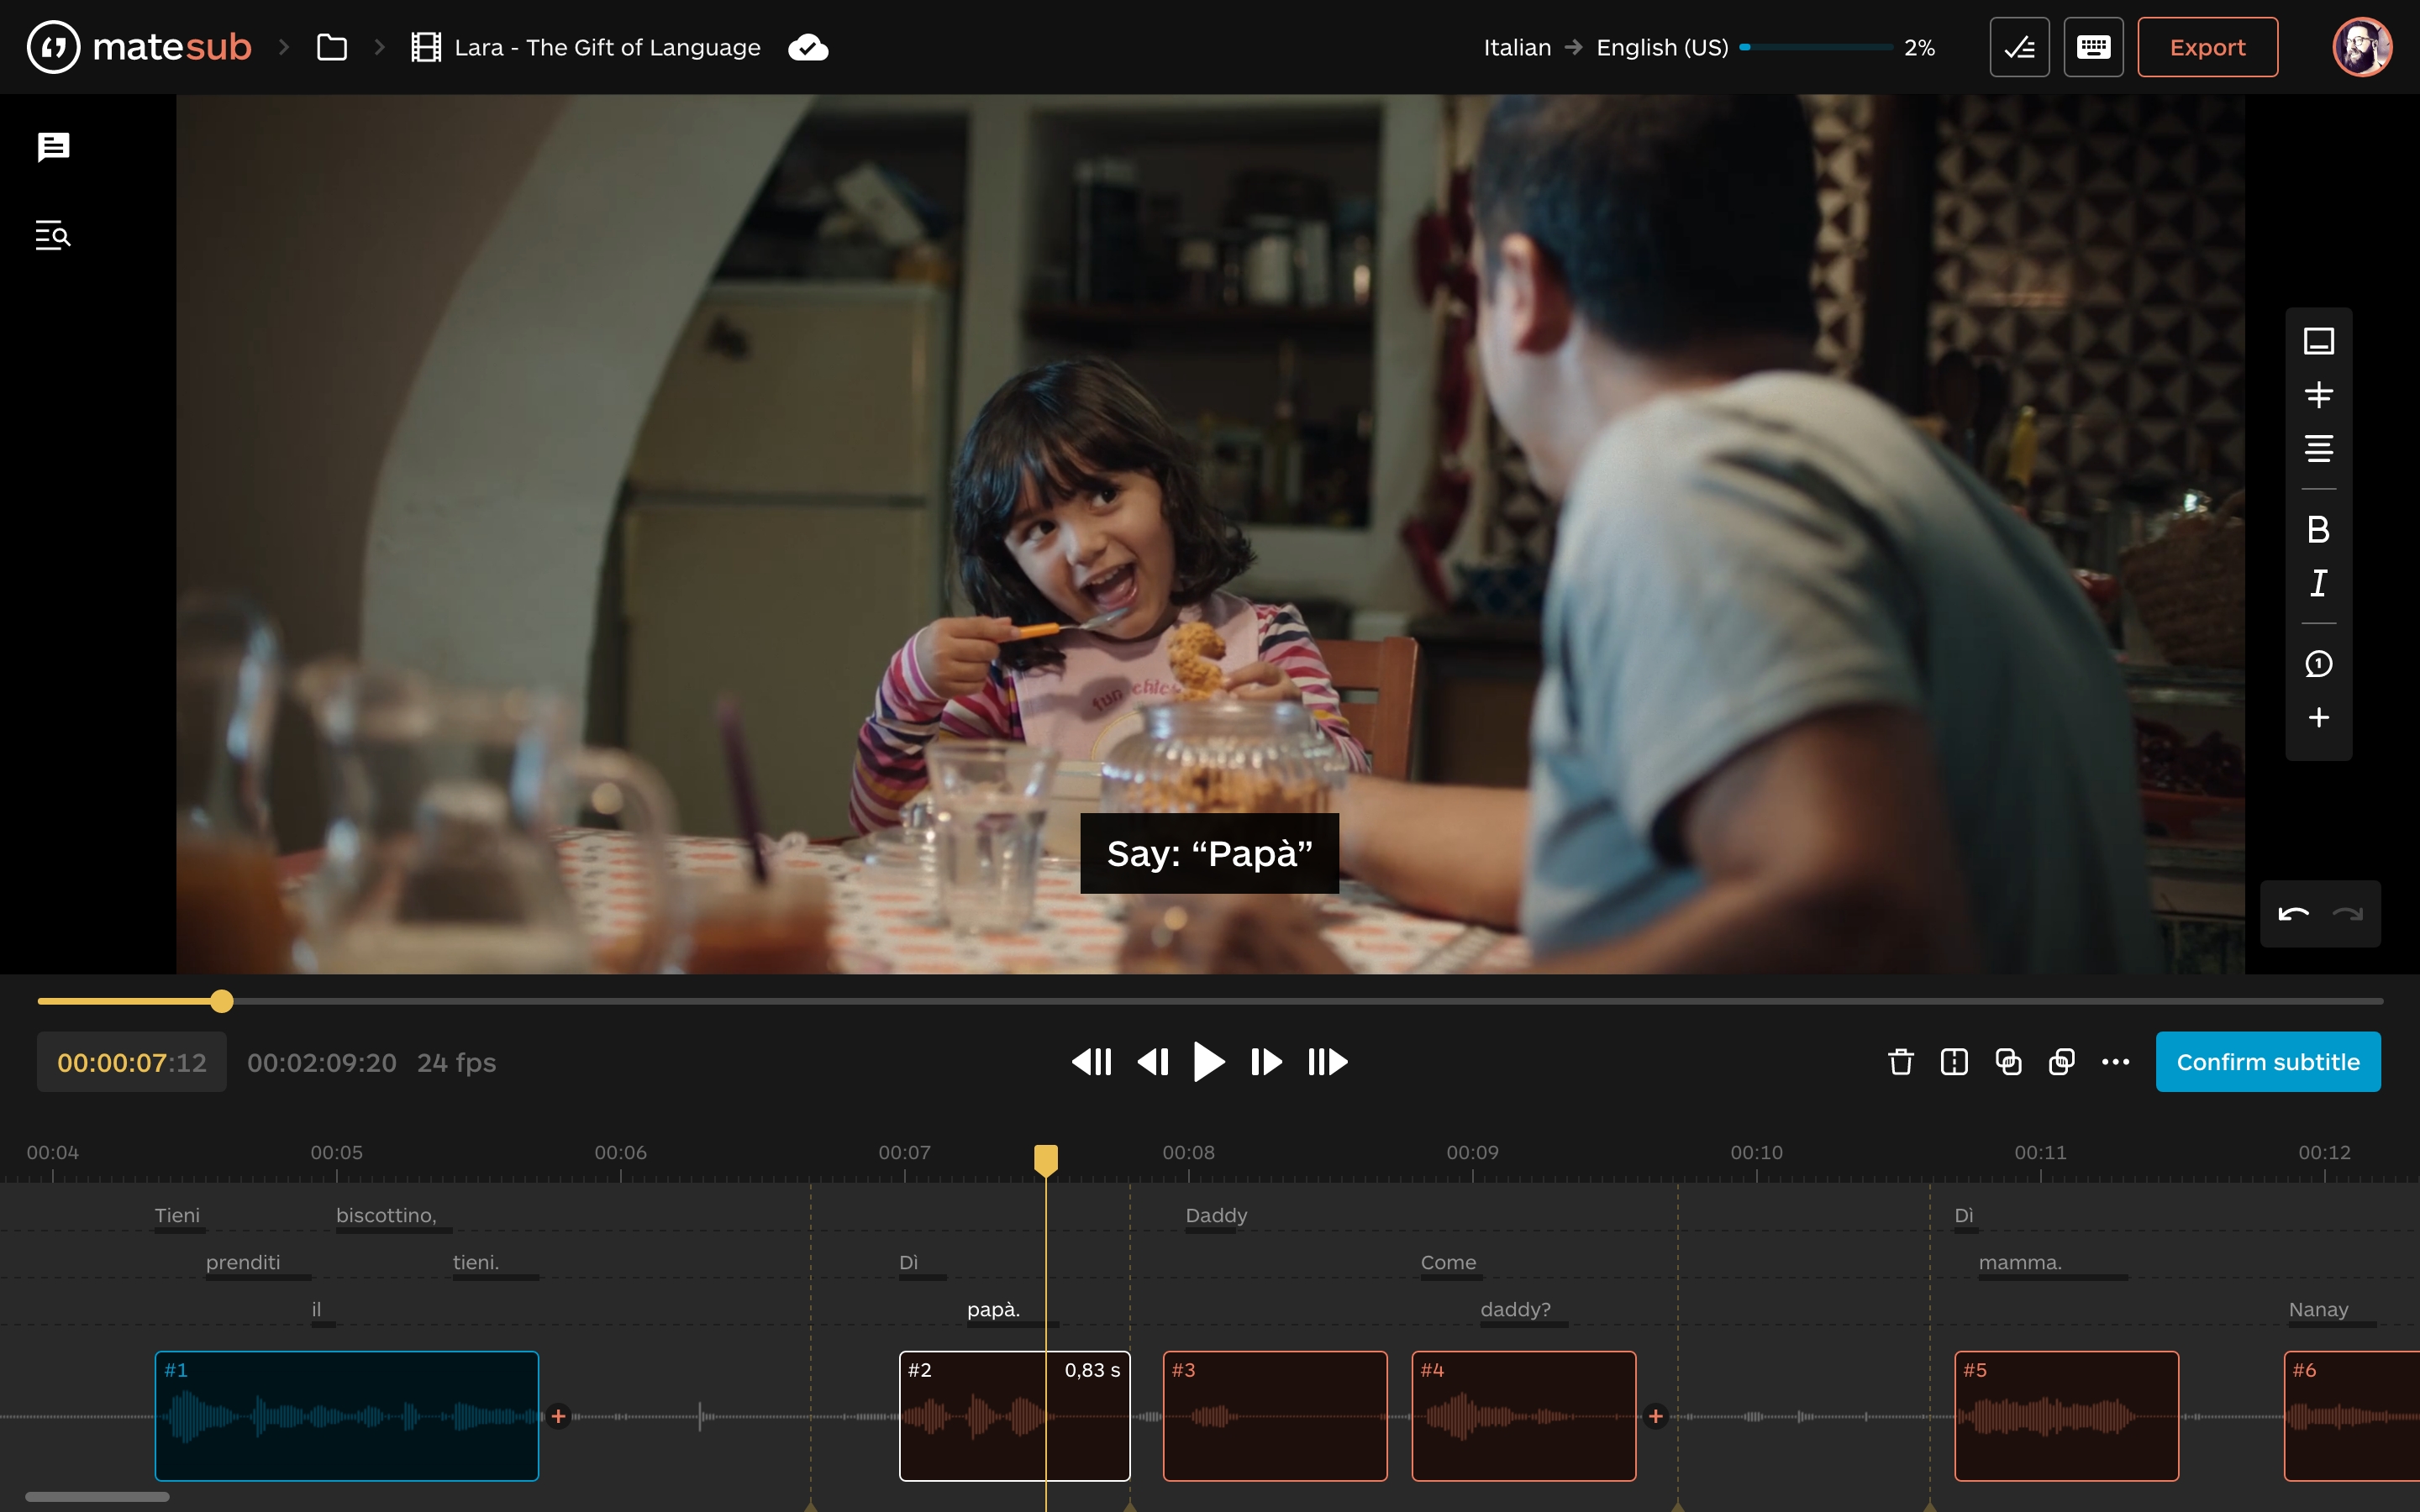
2. Auto-spotting

After Matesub analyzes the video and translates the audio, you can edit the subtitles and make the final touches.
However, you will have a big surprise there because transcripts are placed precisely on the timeline, so you can see exactly when each word is spoken.
Although we chose a music video for our test the software performed extremely well on getting the words and placing them in the right spots.
3. Create your own guidelines
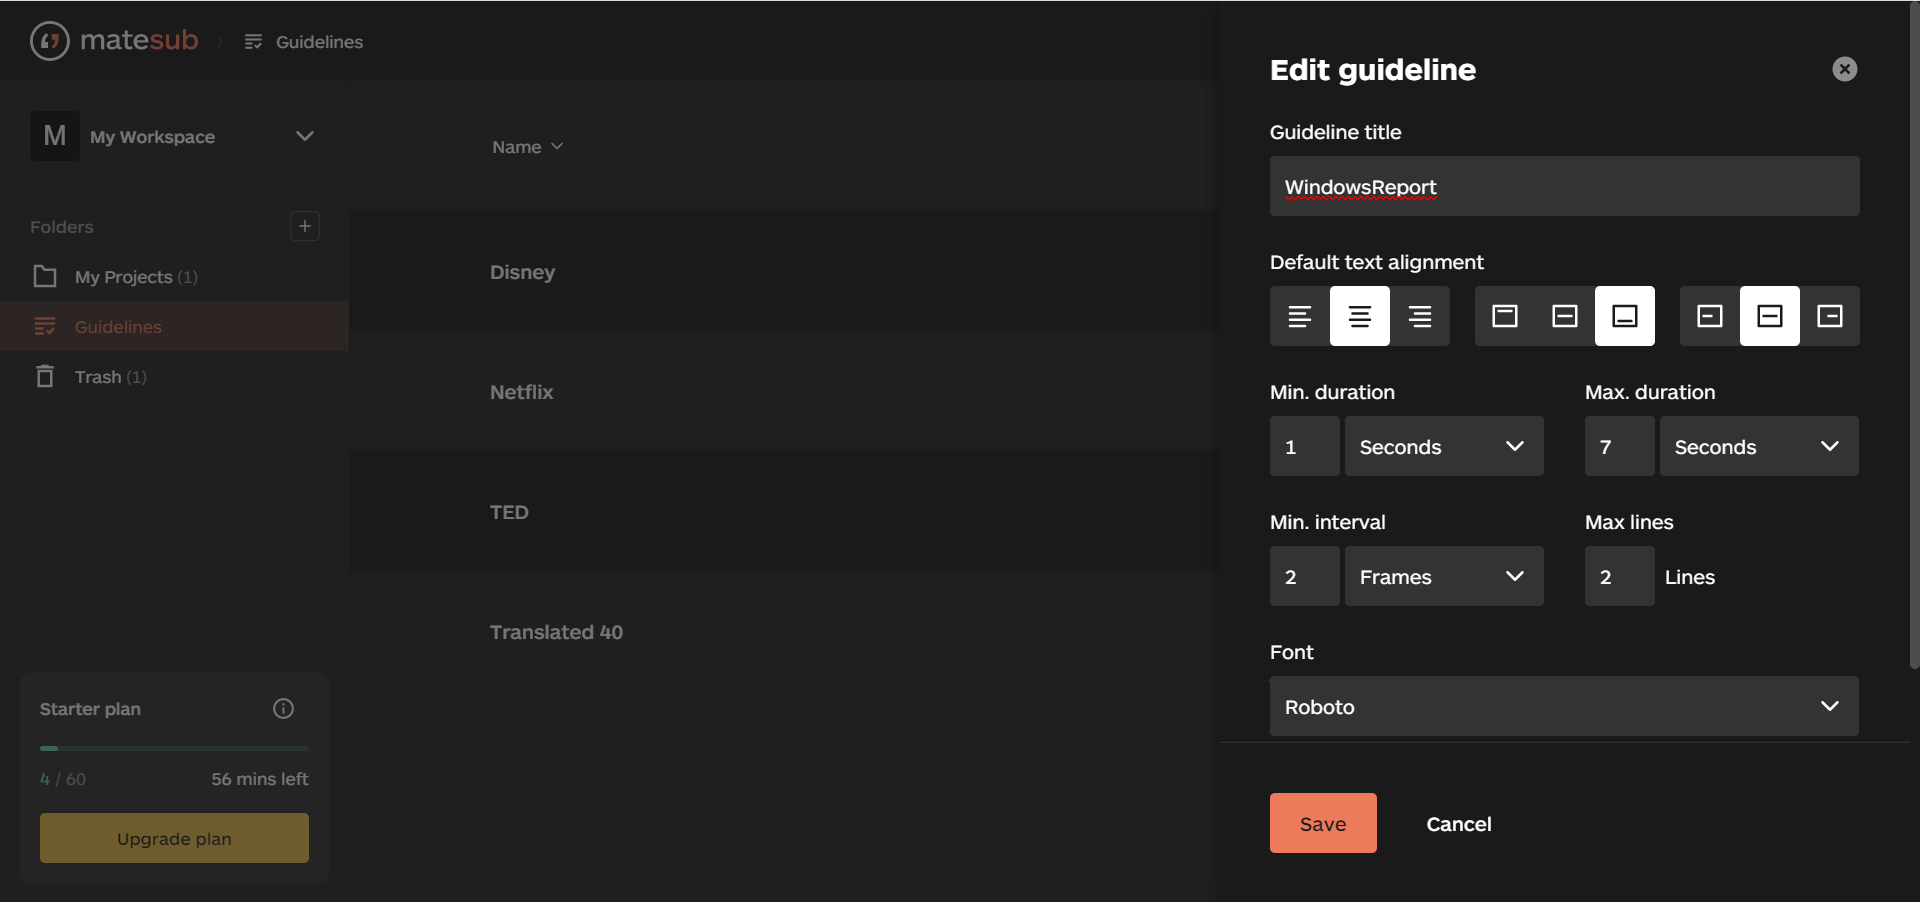
Matesub already has a few guidelines on how to create the subtitles automatically. You can follow Disney, Netflix, and TED’s default ones but you can also make your own.
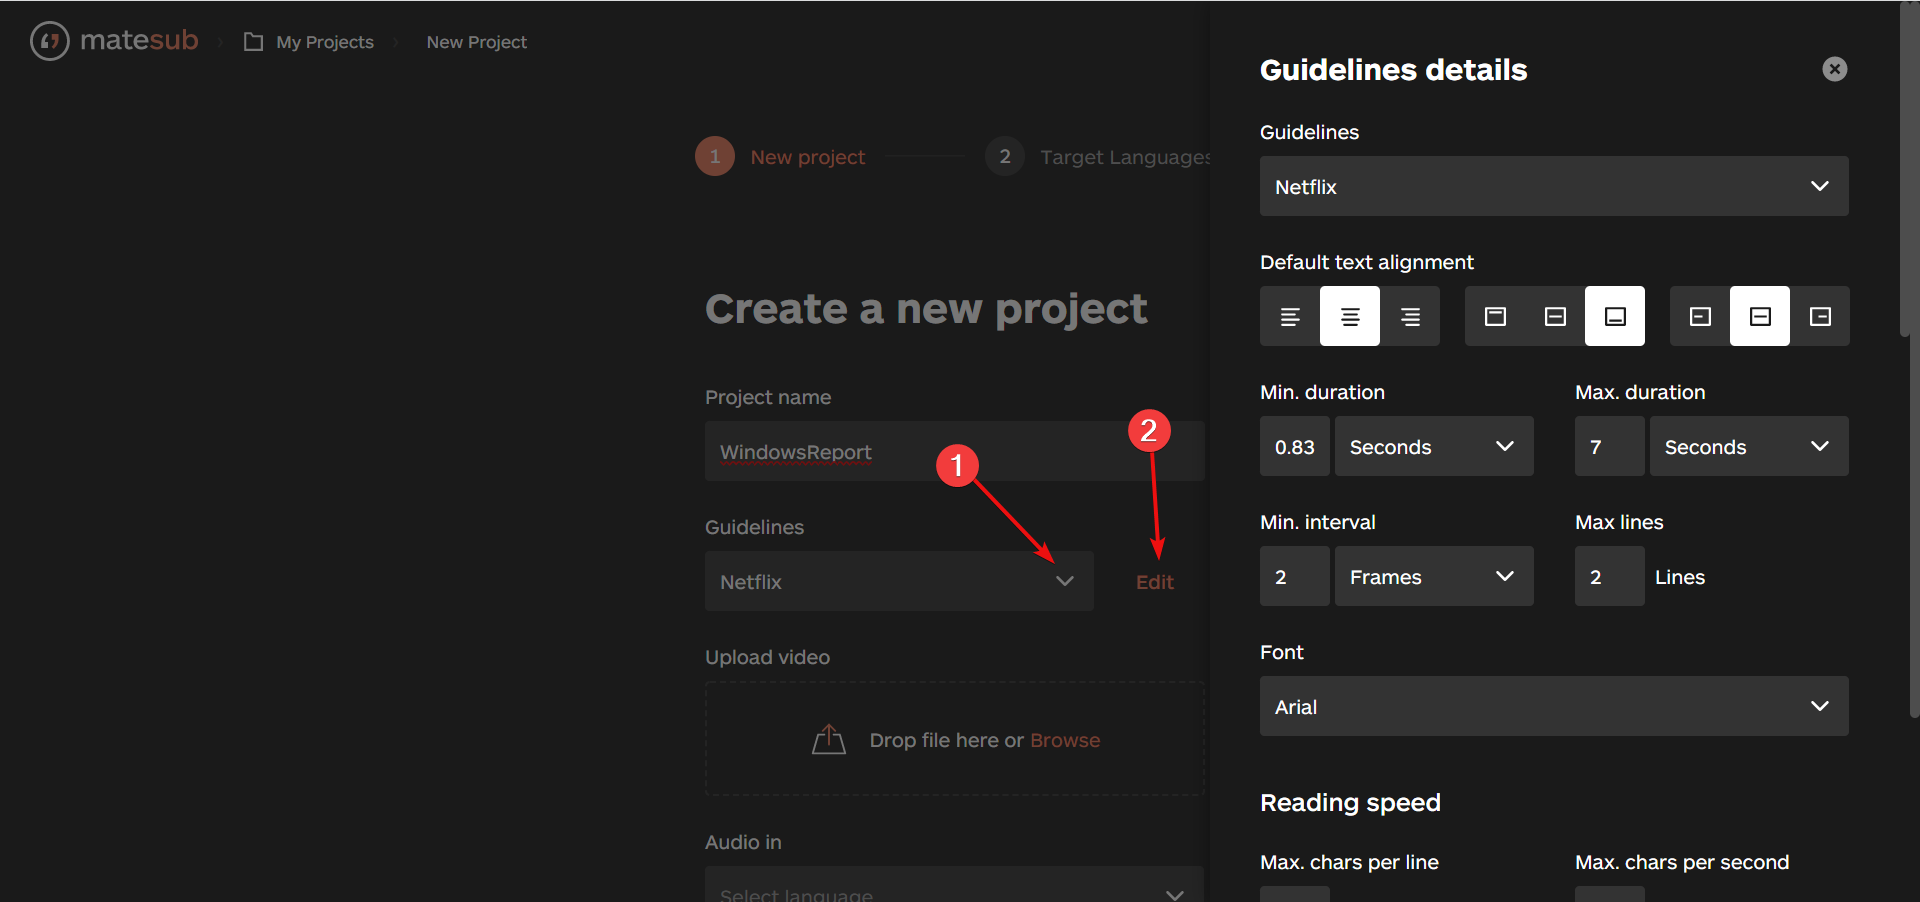
Set up the text alignment, how much the text stays on the screen, the maximum number of lines on a subtitle and the minimum interval between two subtitles, the font, and a lot more.
And when you finish customizing your personal guidelines the way you want, just hit the Save button to use them for your next project.
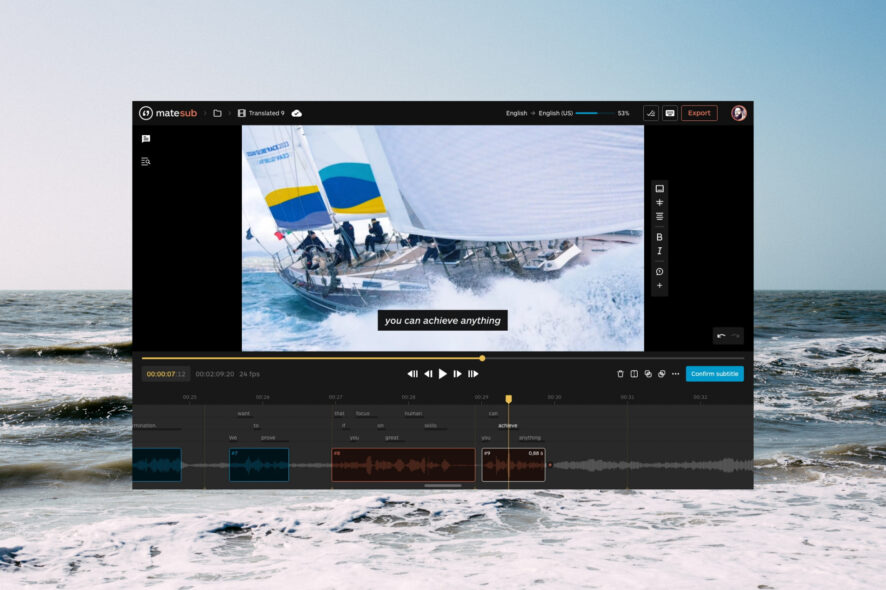
4. Intuitive WYSIWYG editor
This software comes with a WYSIWYG editor and that’s an acronym for what you see is what you get.
That means that you edit the subtitles exactly as they appear on the screen. The editor is so simple to use and so intuitive that it seems pointless to explain it.
All the subtitles are placed chronologically on the left panel and just by clicking on them gets you exactly on its timeframe.
Then, just select the subtitle on the preview screen and make the changes using your keyboard.
How can I create subtitles quickly using Matesub?
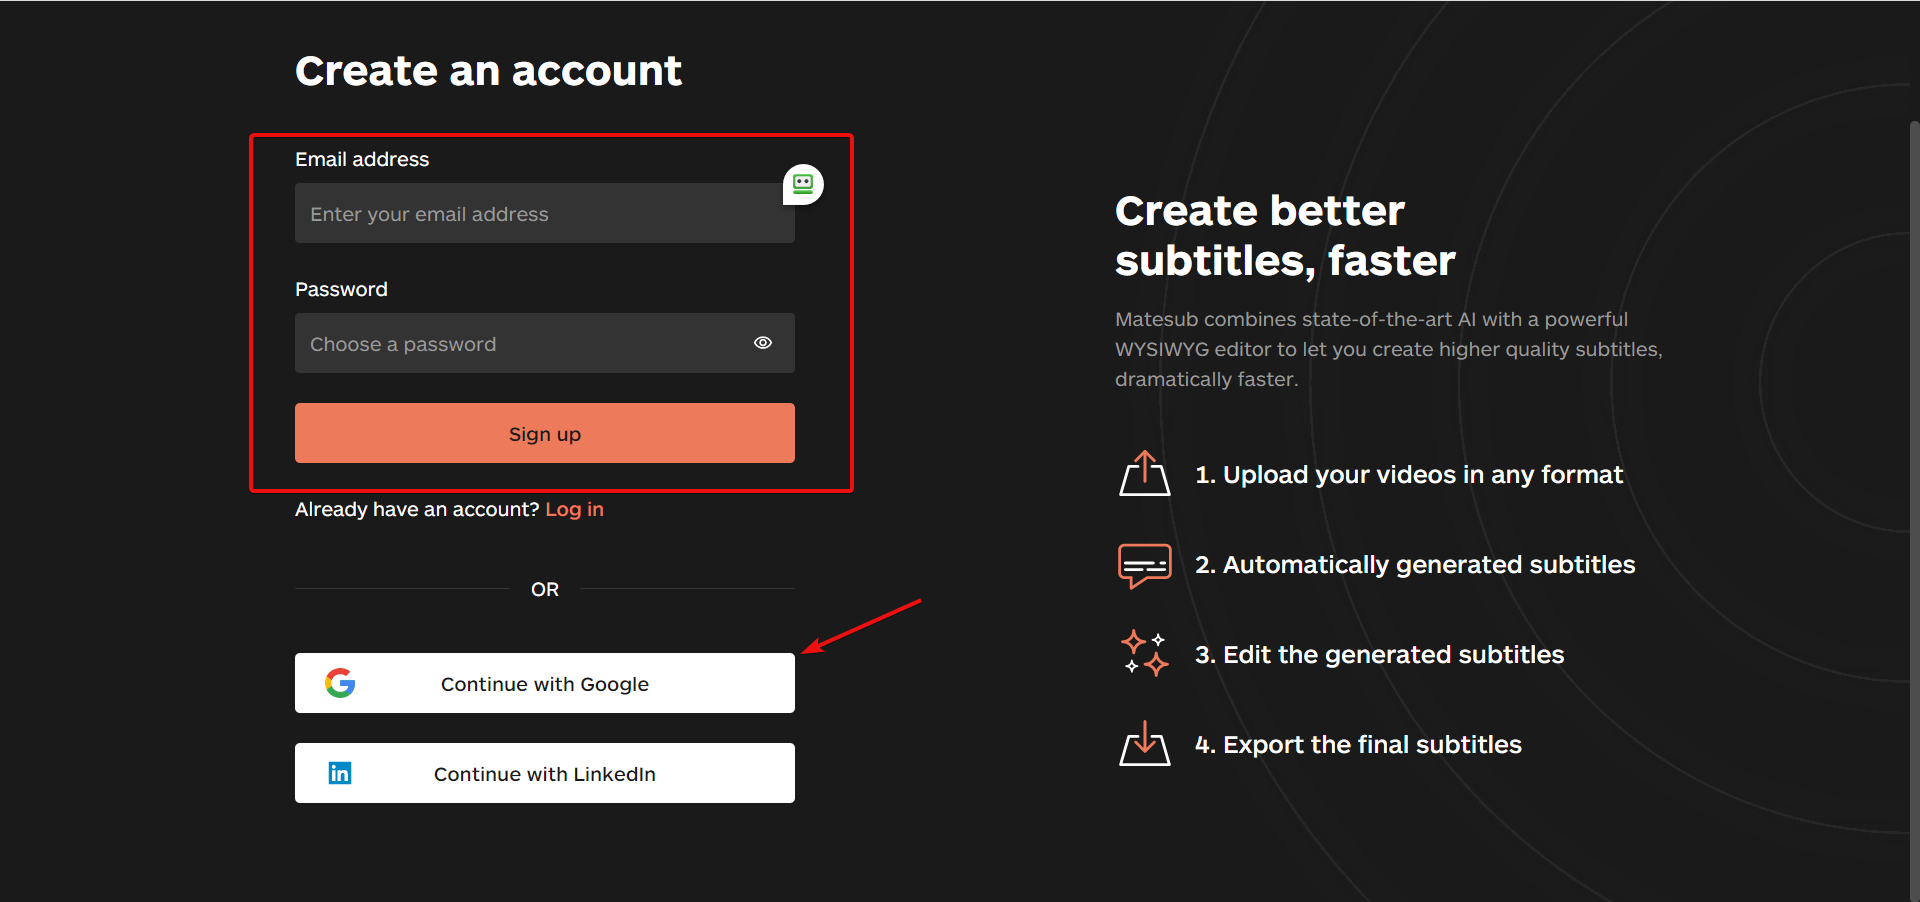
- Visit the Matesub website and click on the Try Matesub for free button.

- Now, you can either enter your email and password to create an account or use the Google or LinkedIn account.
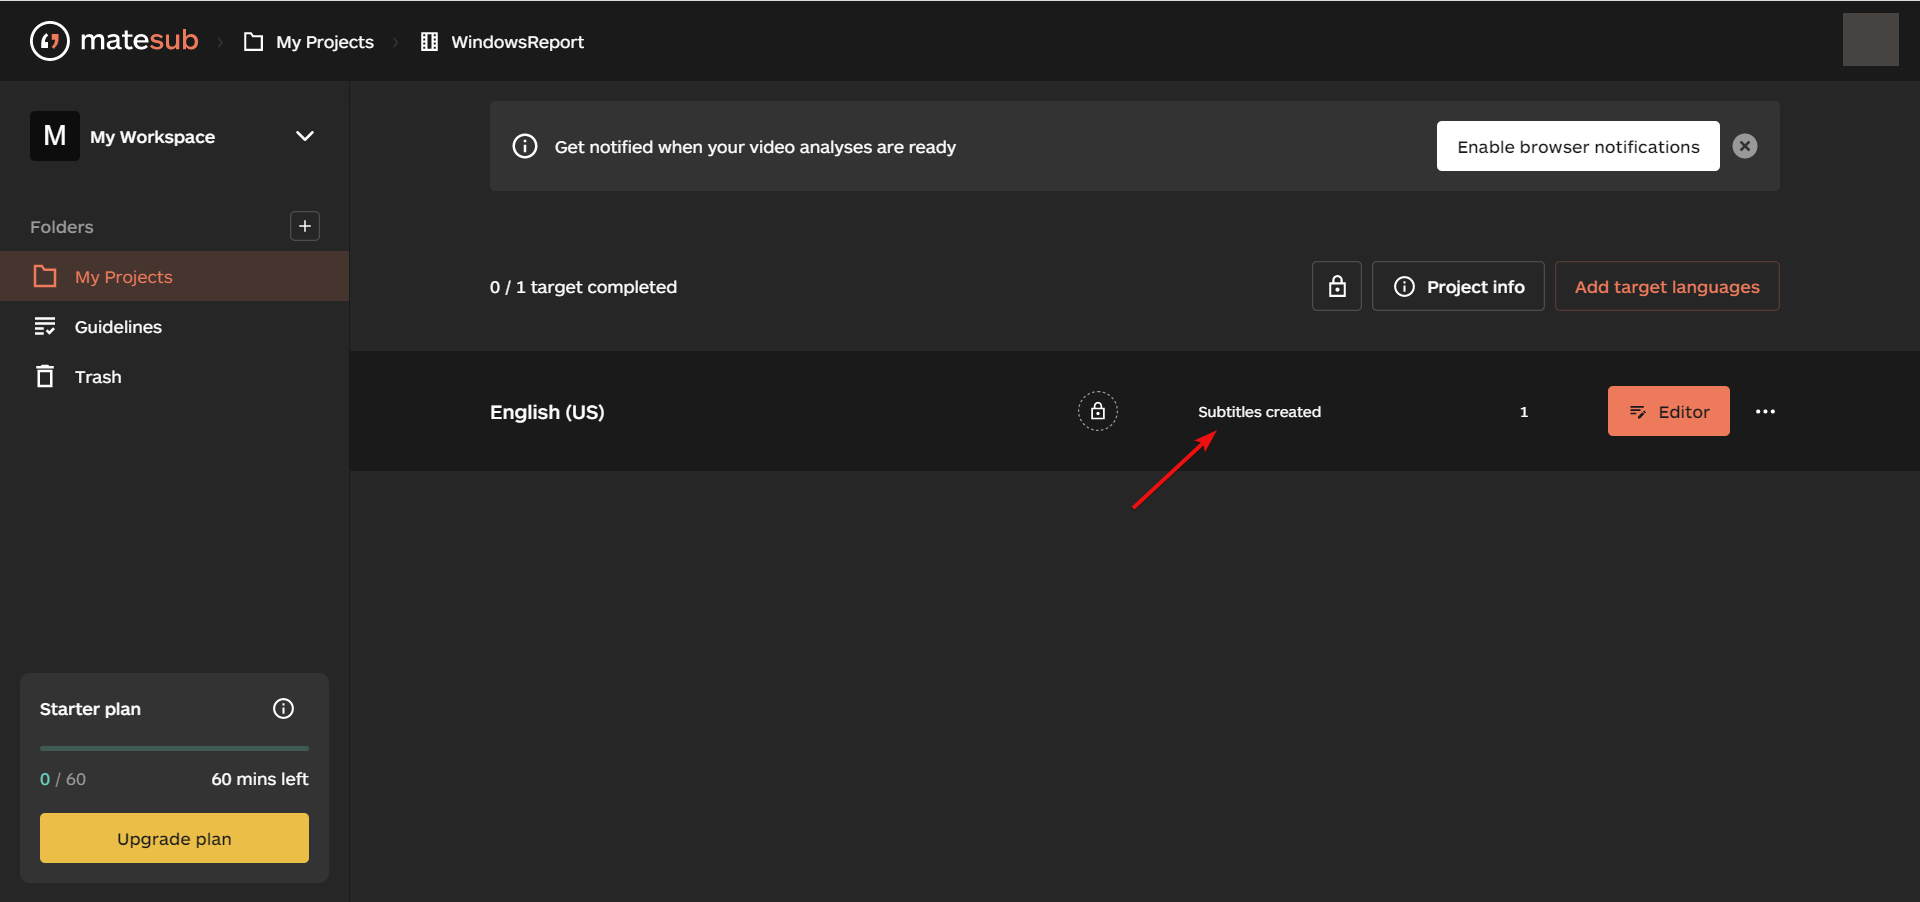
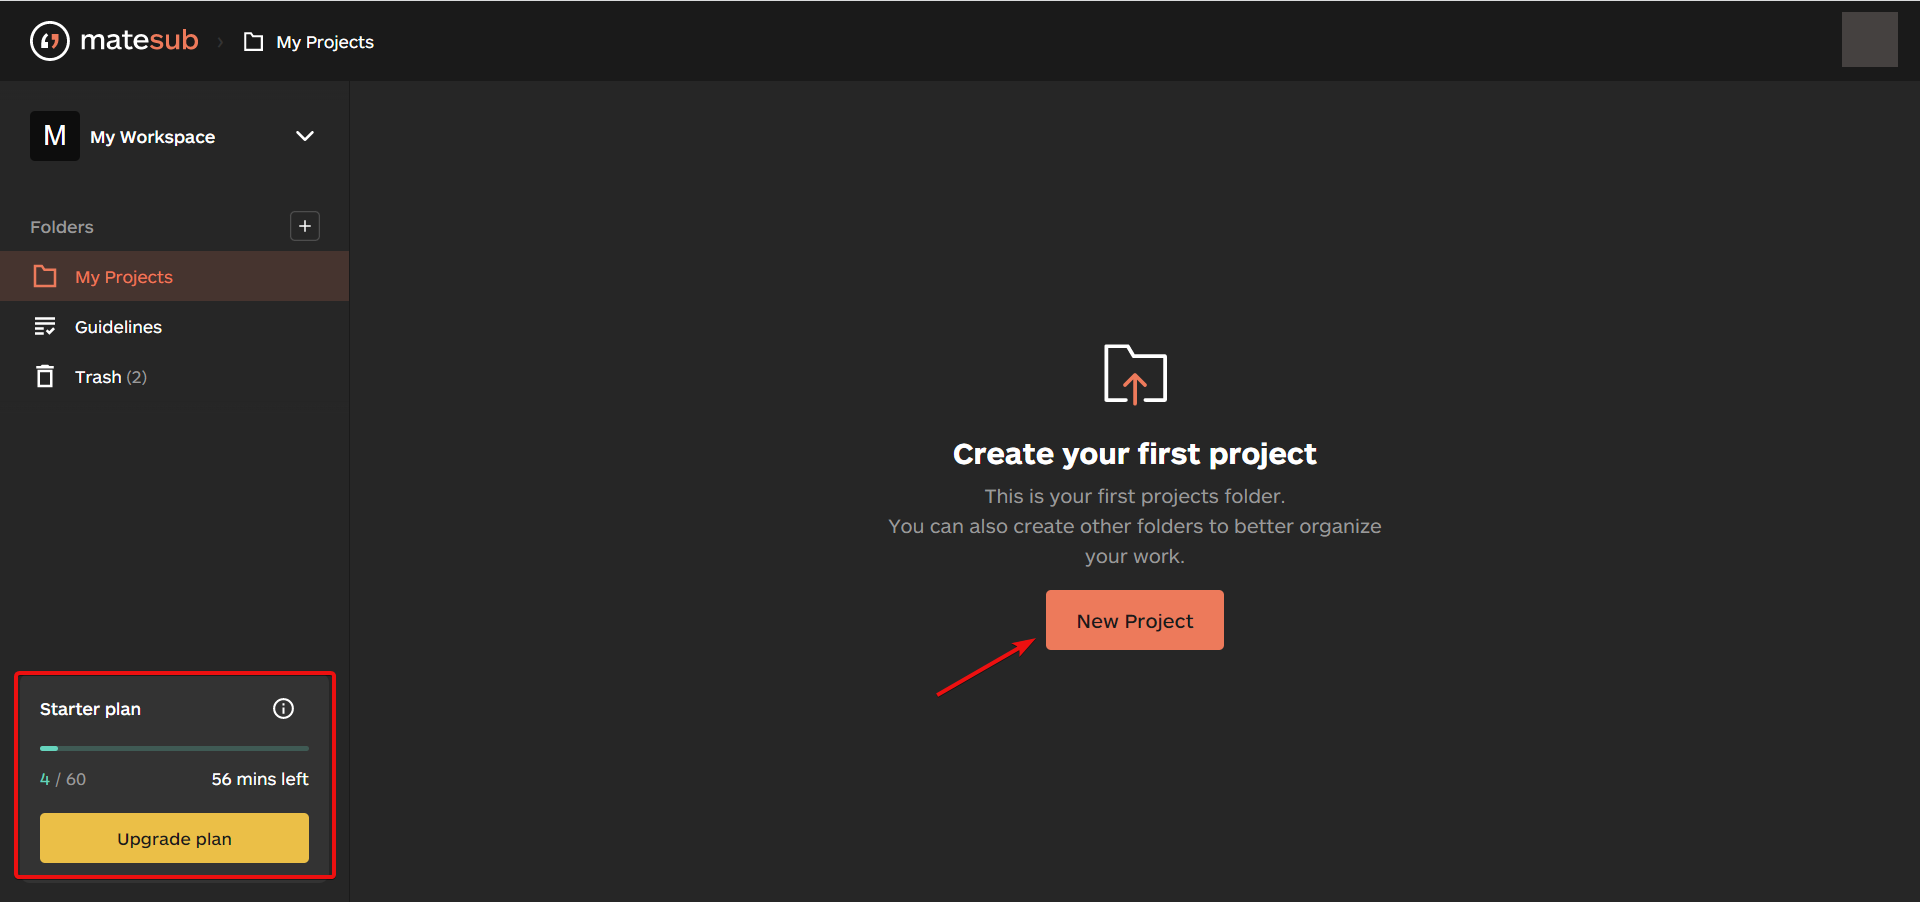
- To start off, click the New Project button. You will probably notice that you have 60 minutes available per month in the free Starter plan.
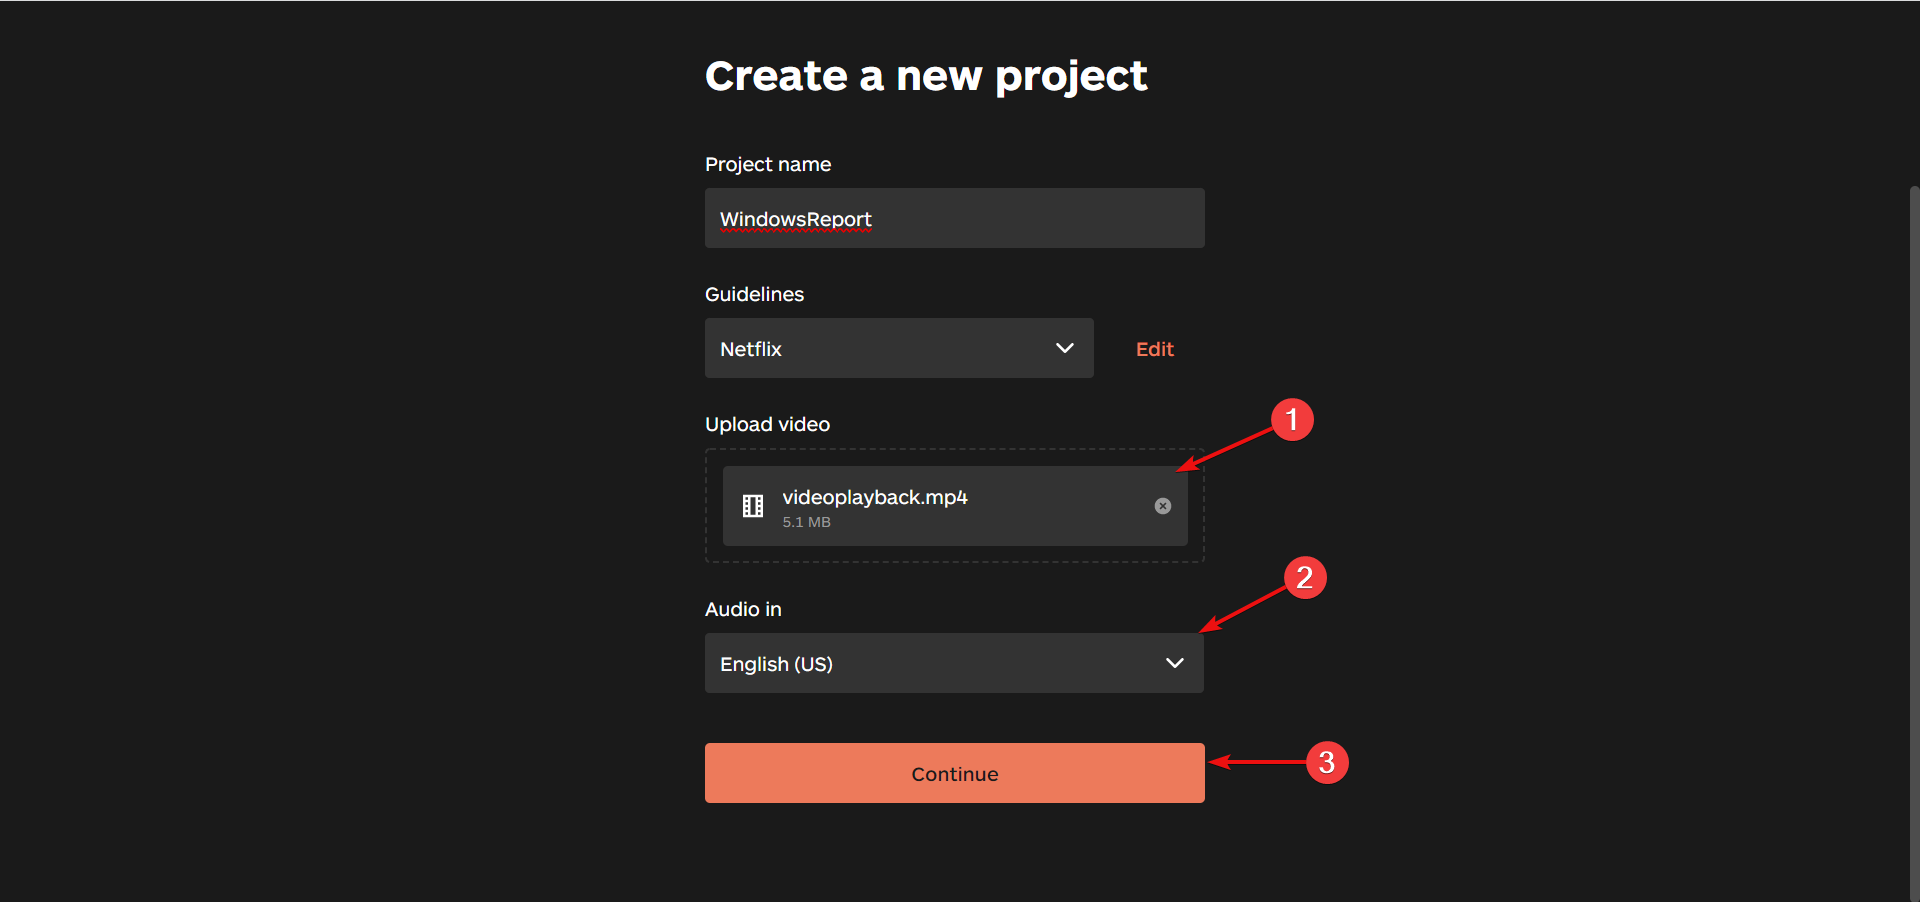
- In the next window, enter the name of your project, then select the guidelines from the drop-down menu, or the existing one with your preferences.
- Going down the list, you need to upload your video (just drag-and-drop it), select the audio language, and click the Continue button.
- In the next window, you can either generate the subtitles or choose an existing subtitles file, then select the language for the translation and click on Create at the end.
- Now, Matesub will analyze your video and generate the subtitles, and as you can see, you are able to create subtitles in more languages at the same time.
- After the process is done, you will see an entry for each language and you can hit the Edit button to make your adjustments.
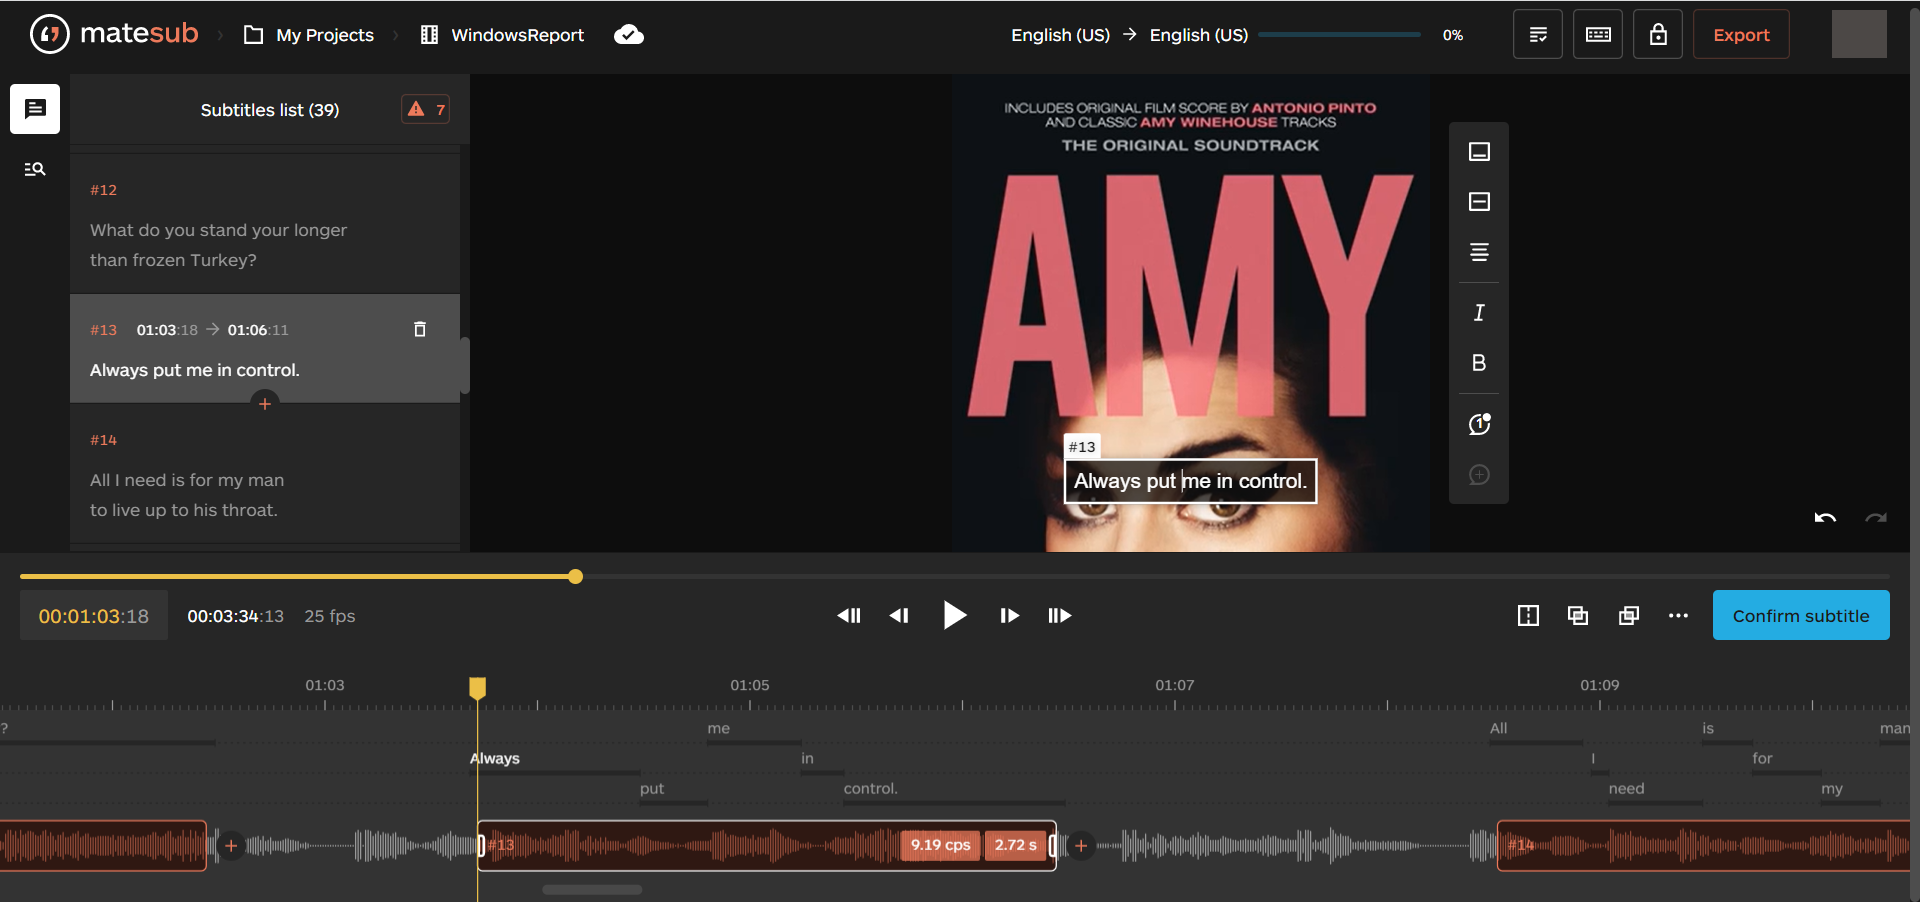
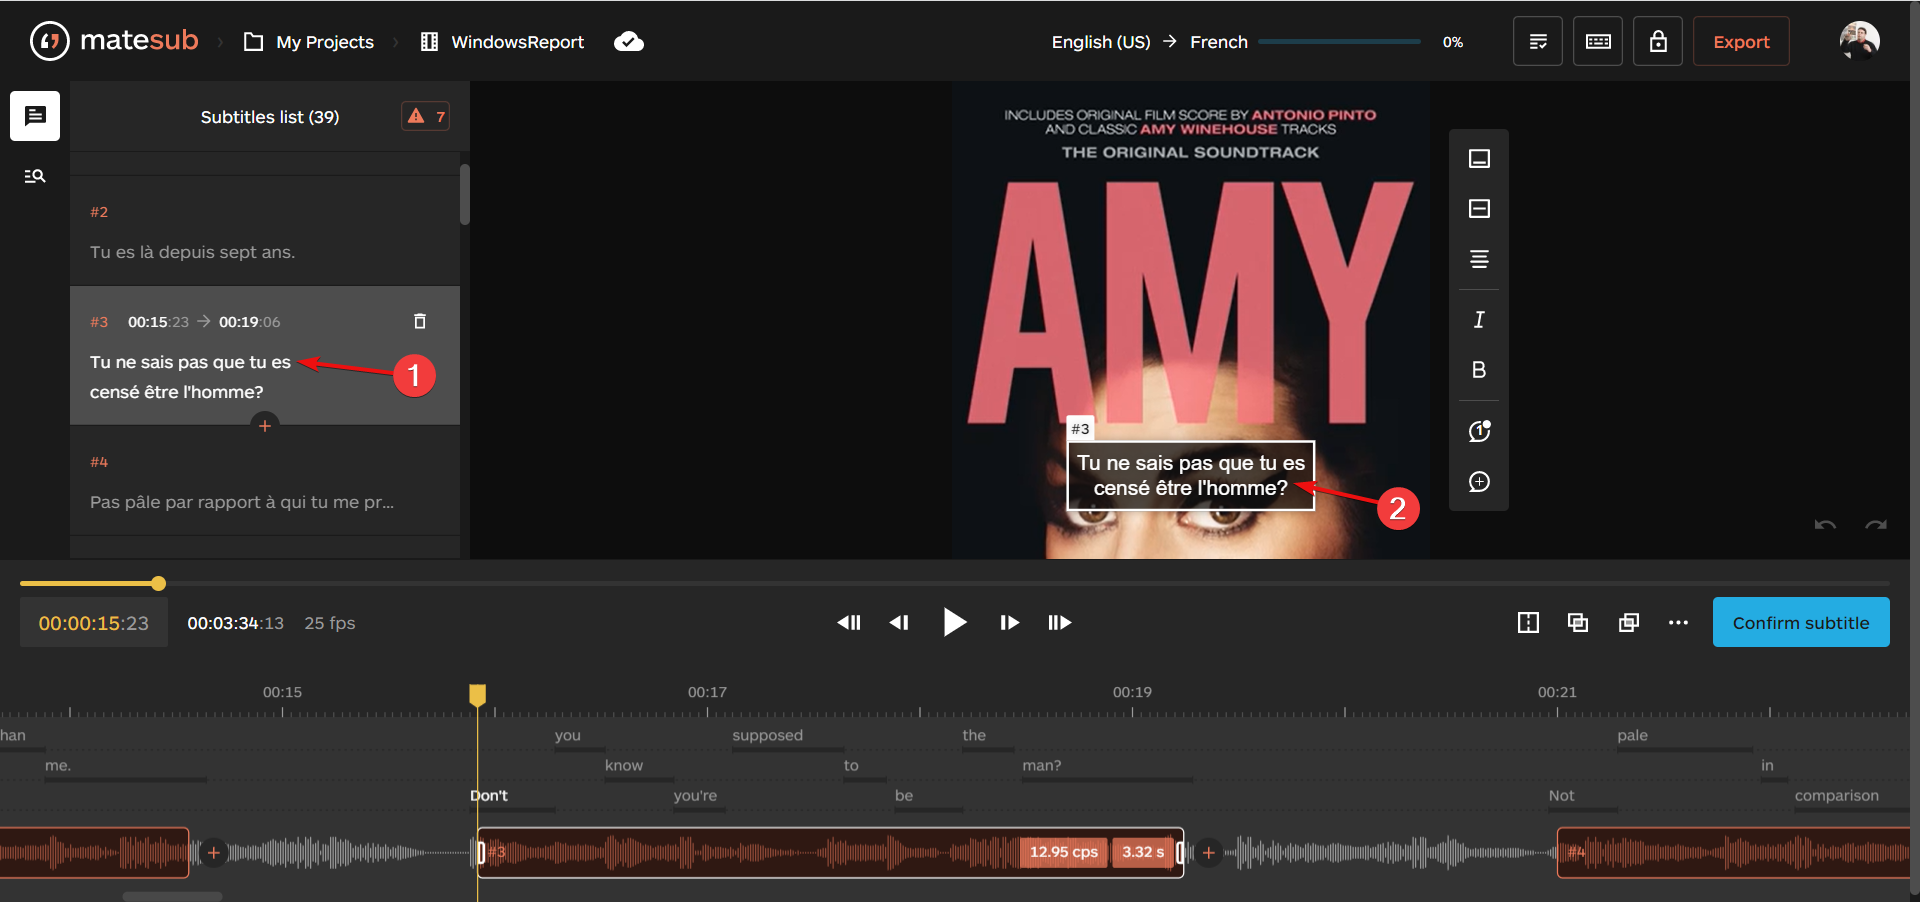
- To edit a subtitle, just go through the subtitles list on the left pane, and you will immediately see it on the preview video, exactly as you will see it on the finished video. Just clicking on it will allow you to edit the text.
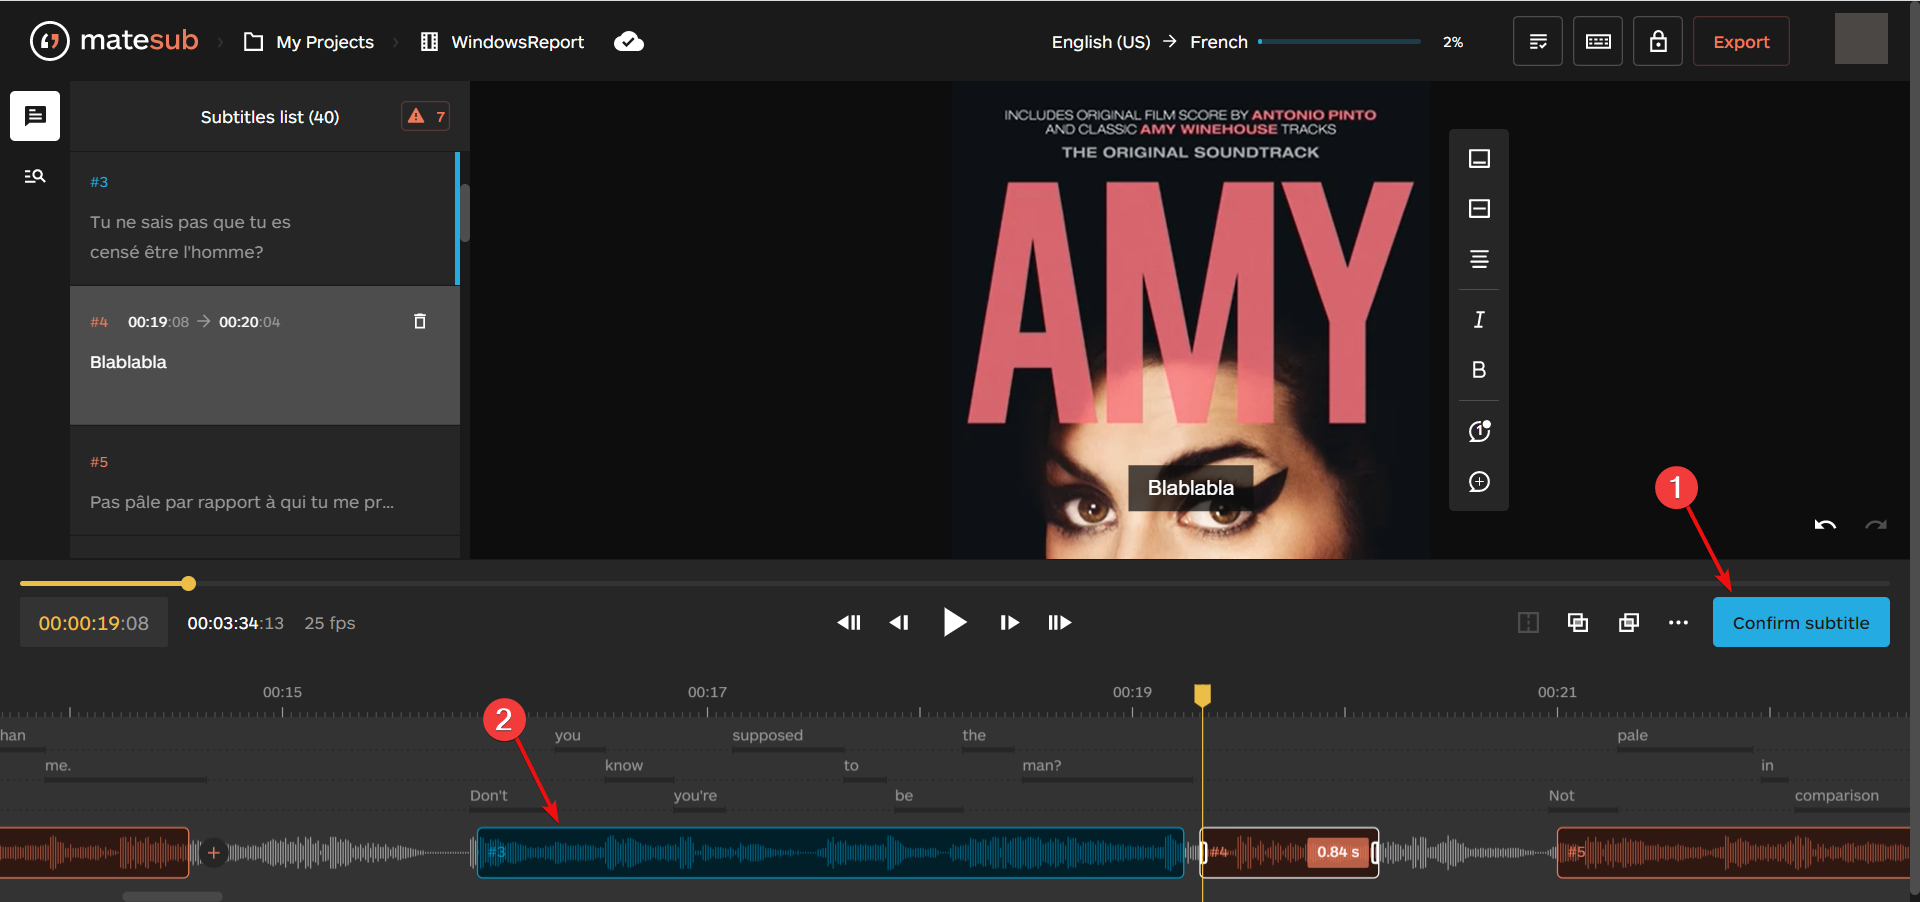
- Of course, you may change the text alignment and style from the toolbar on the right, and adjust the placement of each word and duration from the timeline below with pinpoint accuracy.
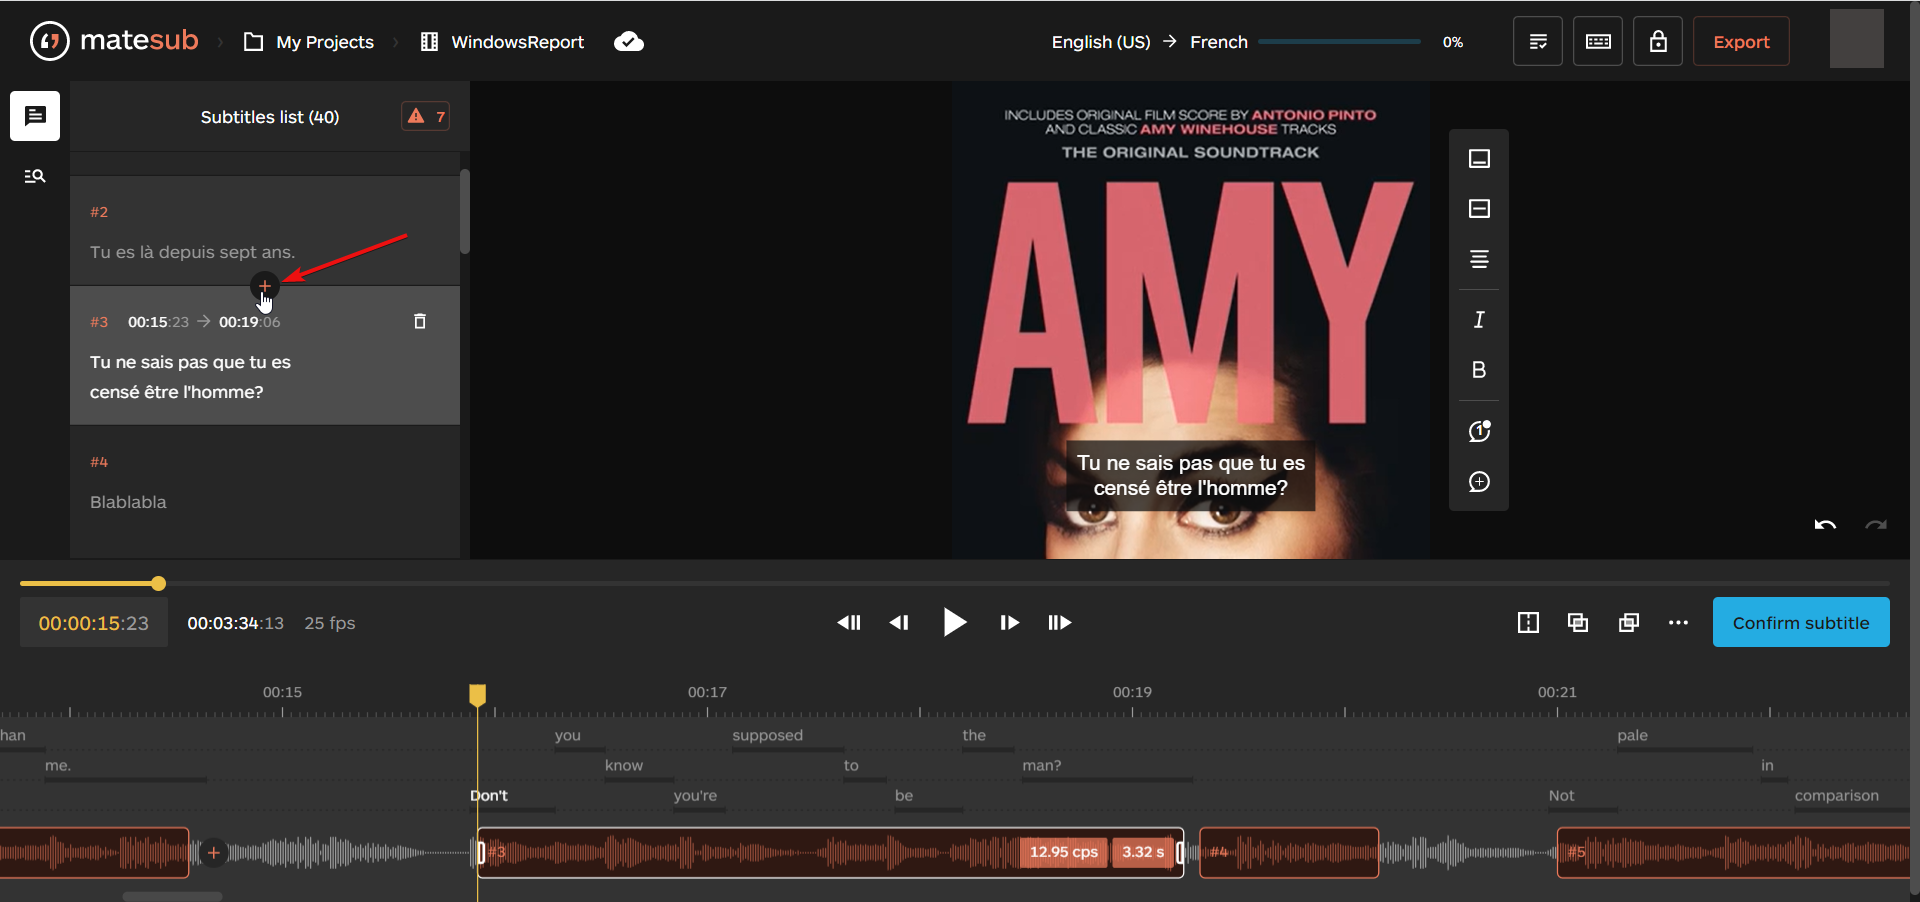
- At any point, if you want to add a new subtitle, just hit the + sign on the list of subtitles to do so.
- To make your work even easier, after you’re happy with a subtitle, you can hit the Confirm subtitle button. That will highlight the subtitle so you can see that you’ve reviewed it.
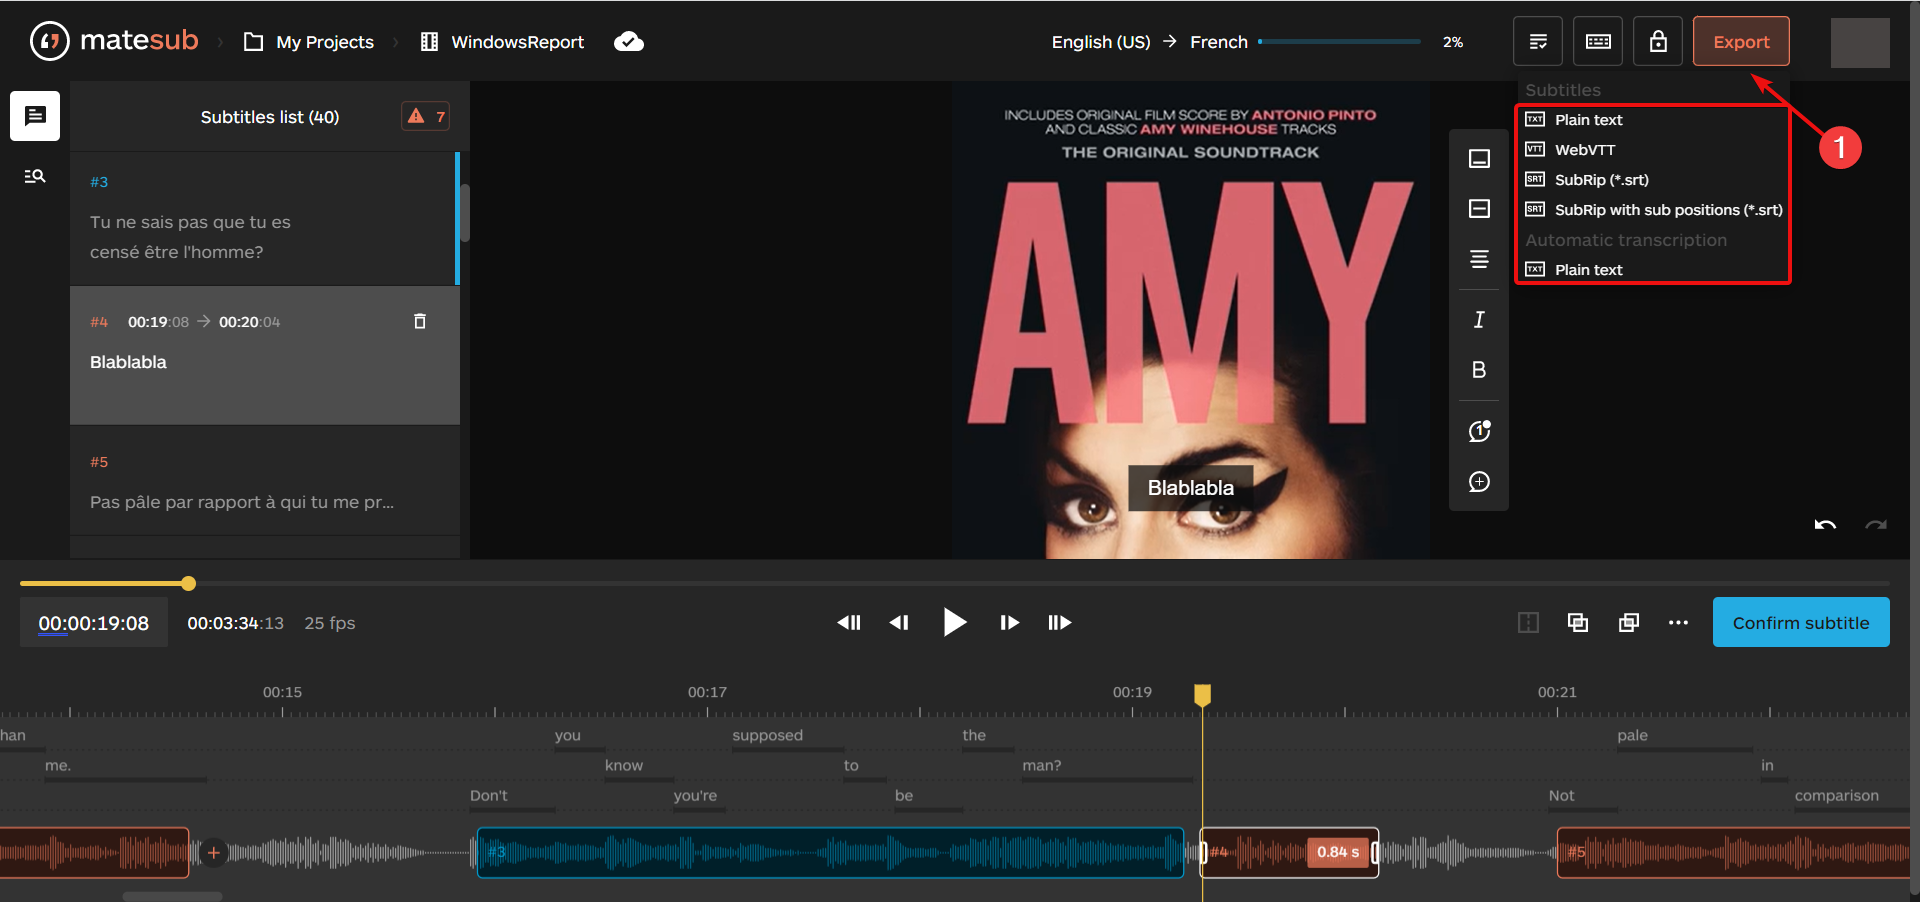
- Whenever you feel you’re done, click the Export button to save your finished work in plain text, WebVTT, SubRip or SubRip with position formats.


That’s how easy it is to create a subtitles file from scratch with Matesub. And although the many steps we included probably made things seem complicated, they definitely aren’t.
However, we explained the basics of how to use this tool. You can go a lot further in editing your subtitles.
For instance, you can search and replace any words within your subtitles, merge one subtitle with the next, and use many other features.
What are the Matesub available subscription plans?
We have just highlighted the best features and tested Matesub under the free Starter plan that offers 60 minutes of processing per month.
If you upgrade to the Individual plan, you will get 1800 minutes of uploads per month. That’s a pretty good quota if you’re a professional freelancer.
Finally, the Enterprise plan is dedicated to companies and professionals and it has a customizable upload allowance.
However, upgrading to this plan will also allow you to share projects with your collaborators which can be a huge advantage.
- Pros
- Simple and comprehensive user interface
- Automatic transcription and translation
- Top of the line AI speech recognition technology
- WYSIWYG editor
- Places the text exactly where the words are spoken
- Accurate timeline editing
- Cons
- Only 60 minutes of upload for the free version
Final notes
As you’ve probably noticed, the built-in AI technology does more than 80% of the subtitling work for you. Although, no AI is perfect at recognizing all the words in a recording.
And then, Matesub’s editor offers all the tools you need to get the job done at a professional level.
All that with a software that you don’t even need to install on your computer. All your work is available in your cloud dashboard, on any device you want to work on.
The interface is so friendly and simple to use that it doesn’t need any guidelines whatsoever.
We’ve been impressed by how quickly we were able to go from a music video to create a full subtitle for it in just a couple of minutes.
You should also take a look at our list with the best subtitle editing software for Windows and compare it with other tools.
Have you tried Matsub? Share your thoughts and experience in the comments section below.


User forum
0 messages