Microsoft Outlook: Best Ways to Organize Emails
7 min. read
Published on
Read our disclosure page to find out how can you help Windows Report sustain the editorial team. Read more
Organizing your Microsoft Outlook emails can help you get rid of clutter, reclaim storage space and enhance your productivity.
How do I organize my Outlook email to be more productive?
1. Create folders in Outlook
1.1 Outlook app
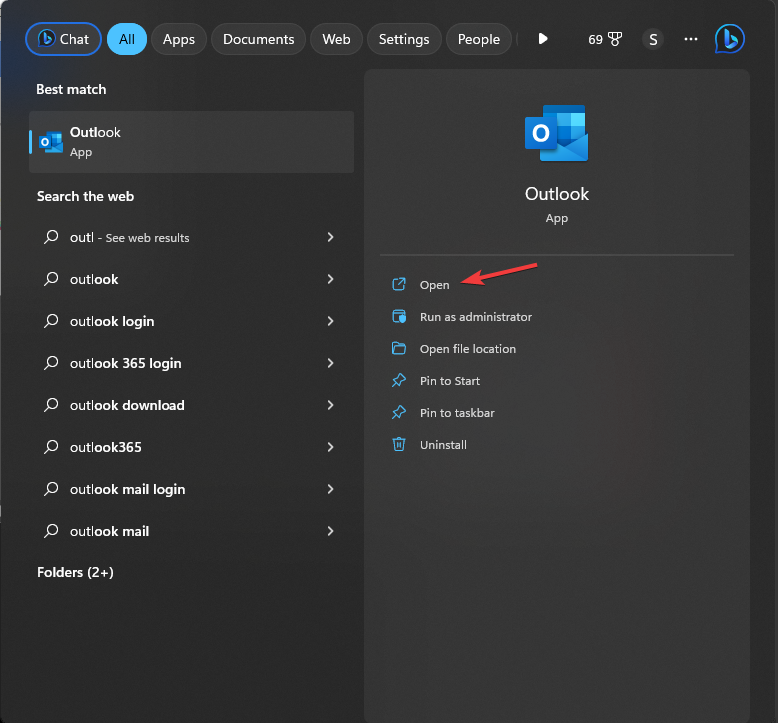
- Press the Windows key, type Outlook, and click Open.
- Go to the Folder tab, and click New Folder.
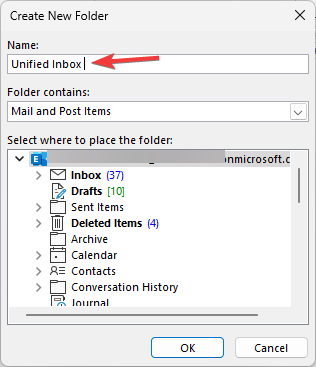
- Once the New Folder window appears, name it Unified Inbox and click OK.
1.2 Outlook for web
- Navigate to your browser and log in to Outlook for web.
- Expand your folder list and select Create new folder at the bottom, or right-click on your Inbox folder and select Create new folder.
- Type out your preferred name for your new folder and hit Enter.
You can organize your Outlook email by folders and subfolders to help you separate and prioritize emails. For instance, you can create personal folders, and financial statements and separate different client emails to avoid confusion.
This helps you find emails and any other information you may need faster especially when the search in Outlook is not working. If you create many folders, Outlook can collapse them making it easy to forget this section. To avoid this, you can always keep the folder section in Outlook expanded.
2. Move emails to folders
2.1 Manually move emails
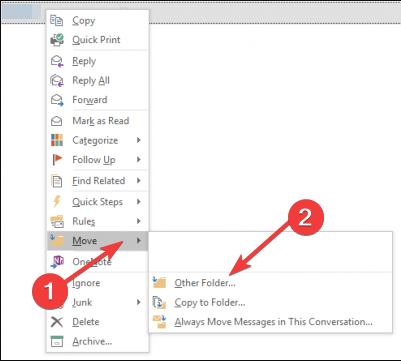
- Launch your Outlook mail, select an email and click on Move to then, search for the folder you just created.
- You can also drag the email to your select folder.
2.2 Automatically move emails to folders
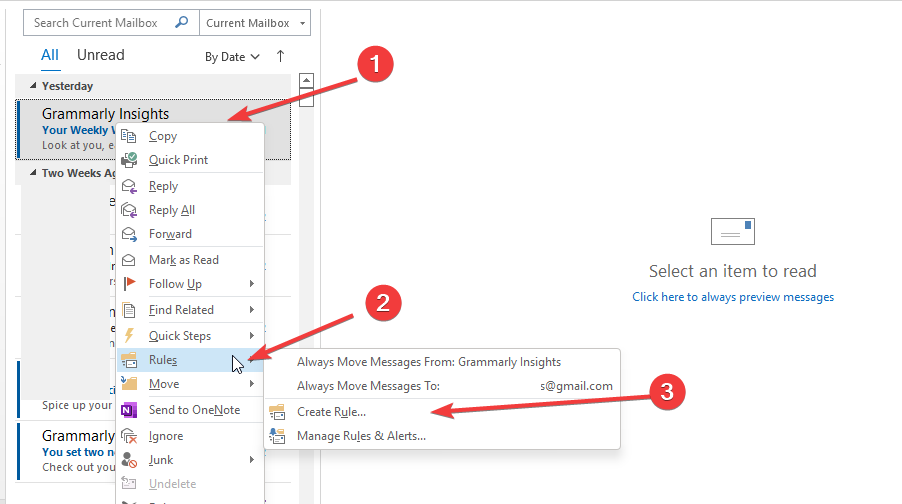
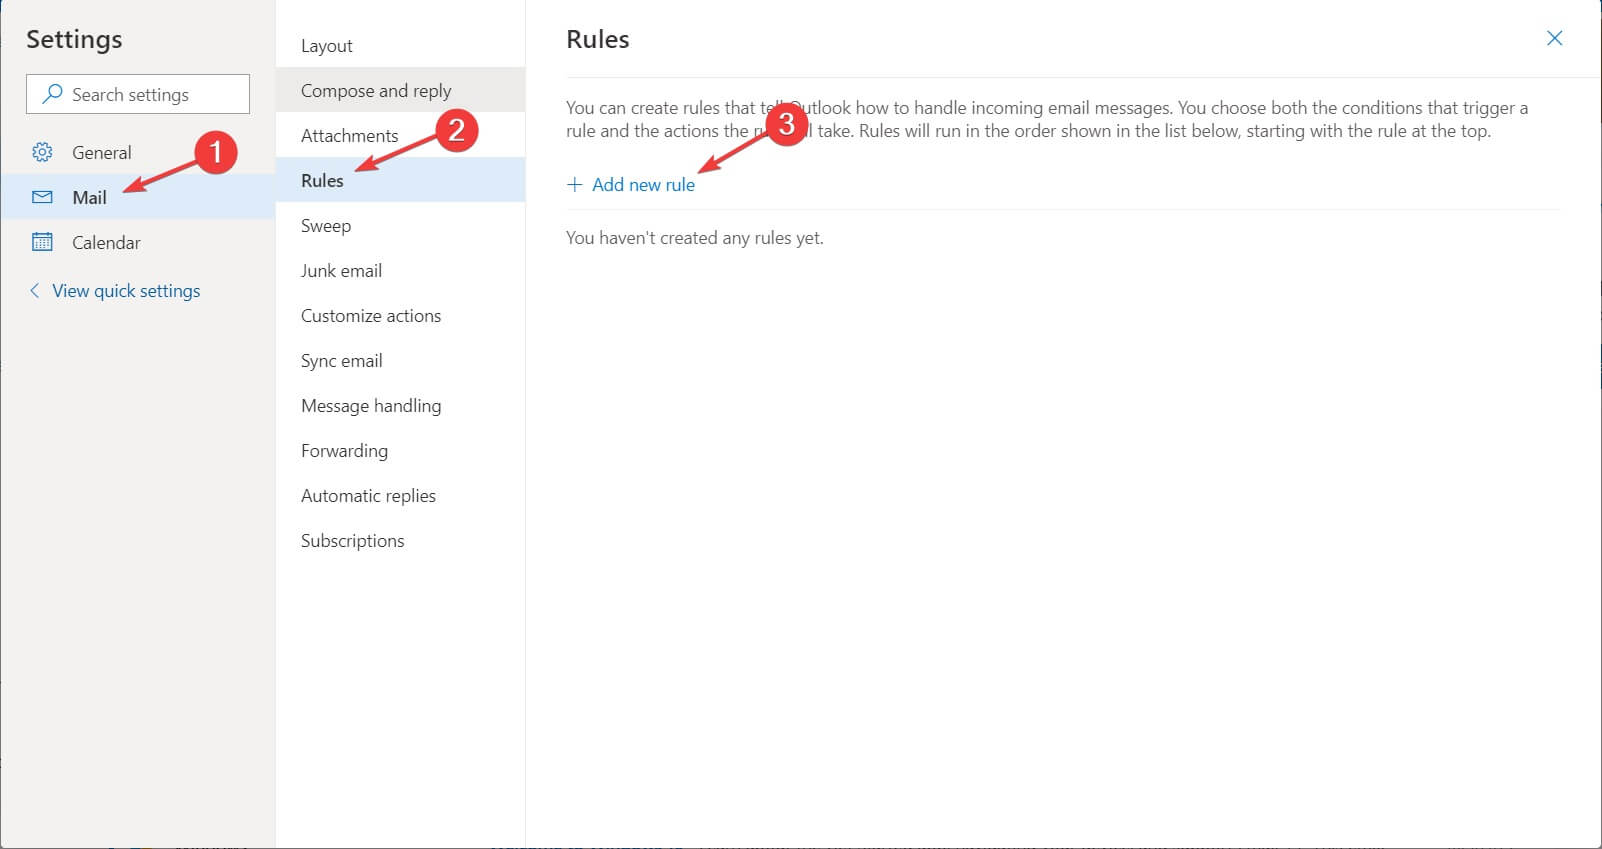
- Launch your Outlook mail, select an email, right-click on it and select Create rule.
- Click on Message and select Rules.
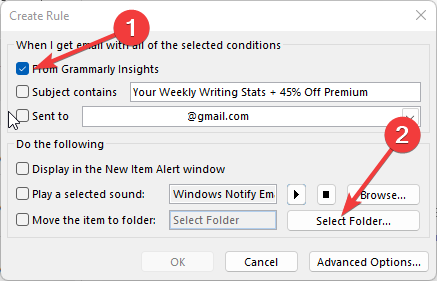
- Click on the From (sender) check box in the Create rule dialog box.
- Select the newly created folder and all messages from this particular sender will automatically go to this folder.
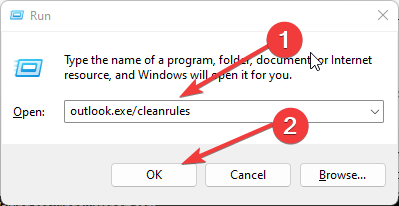
- If you’d like to create new rules, clear the old ones by pressing Windows + R to begin the Run prompt.
- Type in outlook.exe /cleanrules in the prompt and press Enter.
2.3. Arrange email folders alphabetically
3. Create Outlook categories
3.1 Desktop client
- Launch the Outlook desktop app.
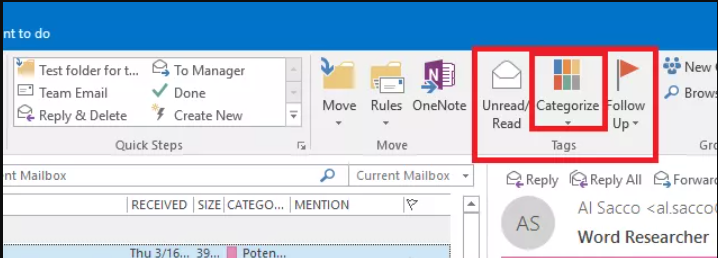
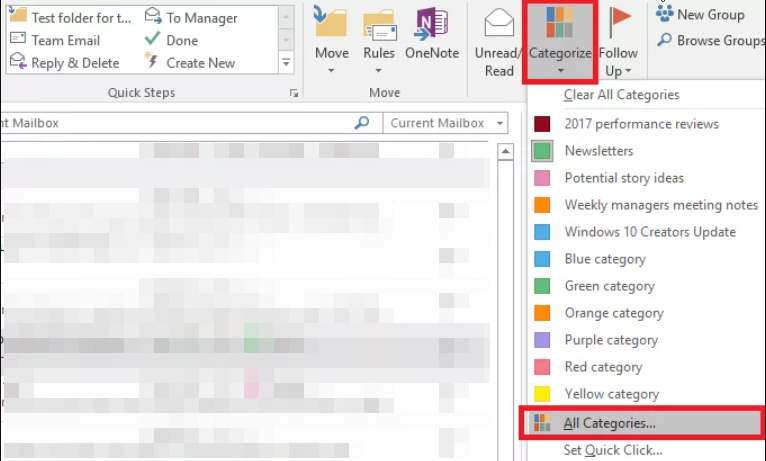
- In the Tags section click Categorize.
- From the drop-down list select All categories.
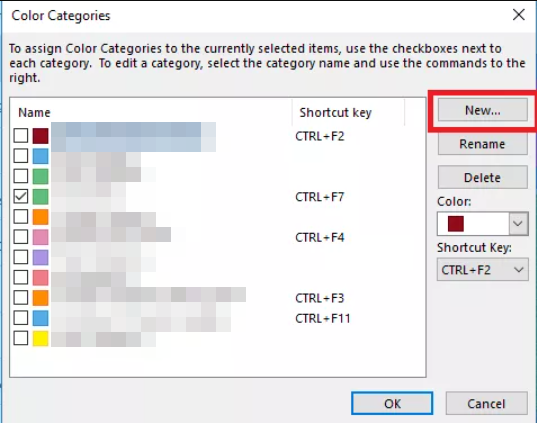
- Hit the New button in the Color Categories box.
- In the Add New Category box, name your category by typing it in the text field.
- Choose a custom color from the Color drop-down menu.
- Using the Shortcut Key, add a shortcut key for your category.
- Click OK to close the Add New Category box and again click OK to save your preferences.
3.2 Web app
- Visit the official Outlook login page.
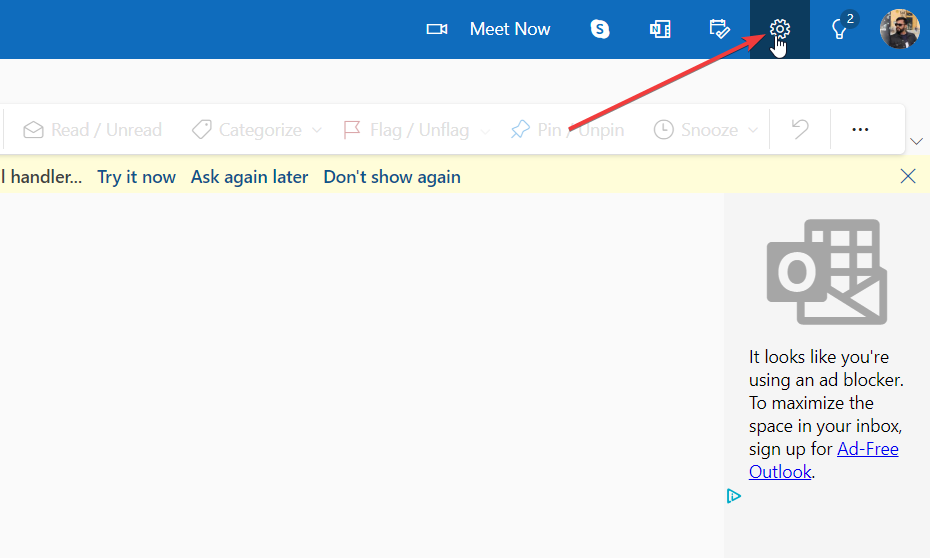
- Click on Settings.
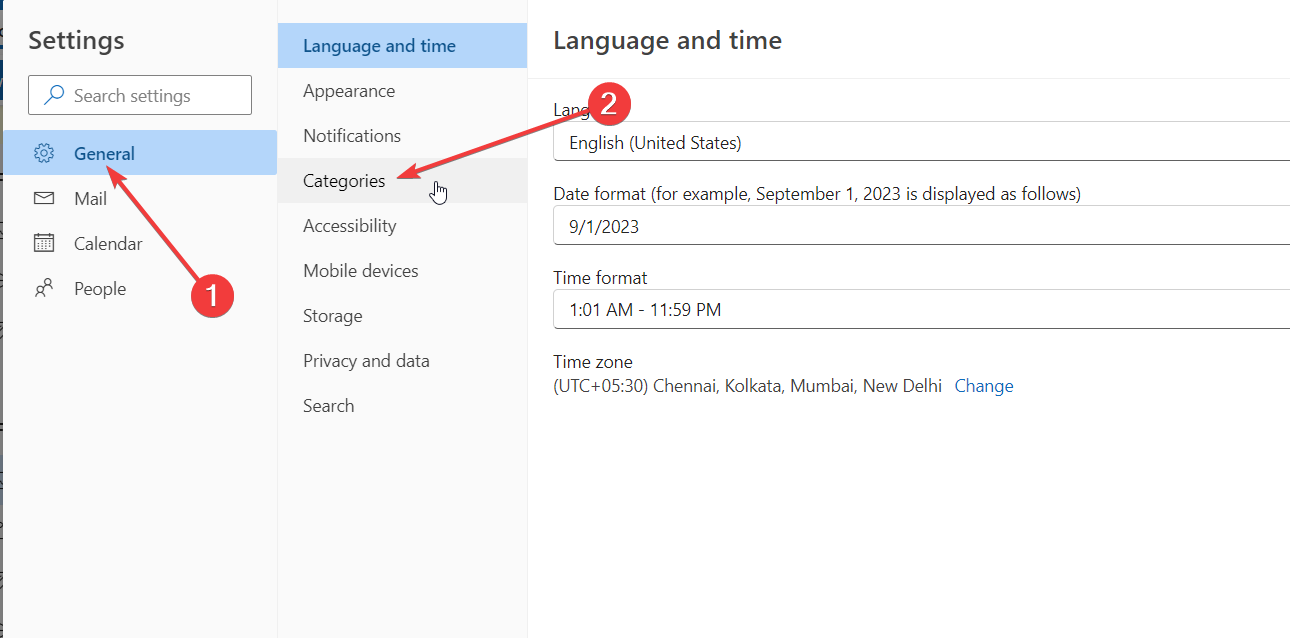
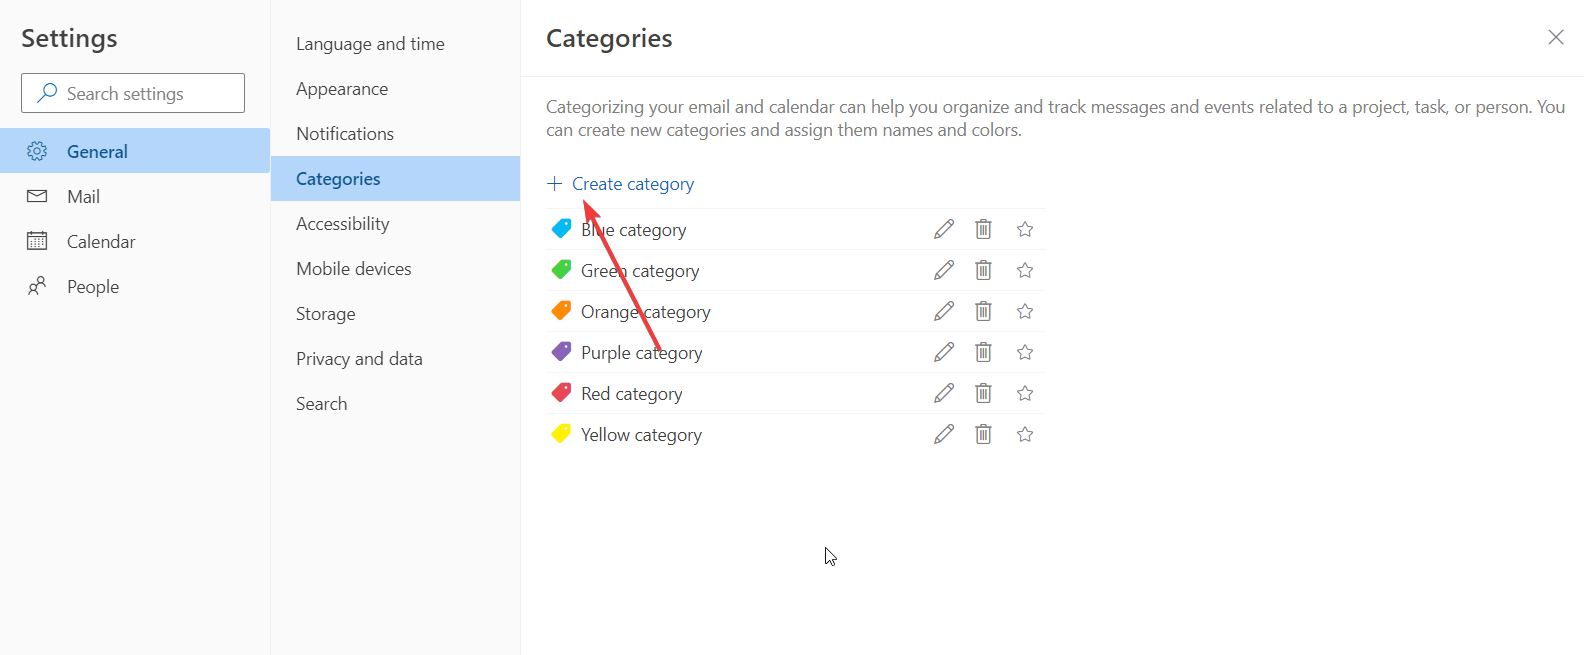
- Select General and then Categories.
- Press + Create Category at the top of the category list.
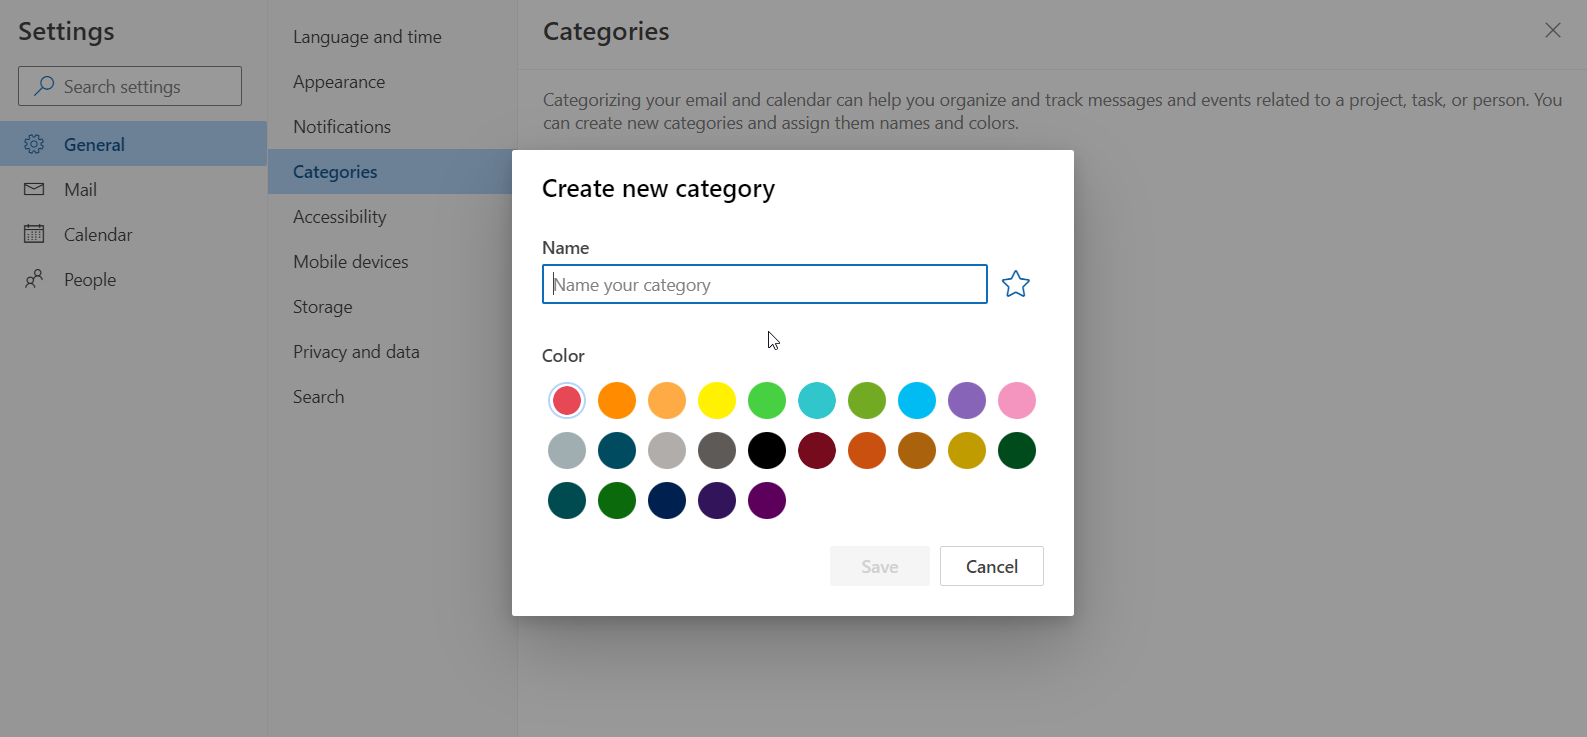
- Name the category, select a color for it, then click on Save.
3.3 Sort and filter messages by category
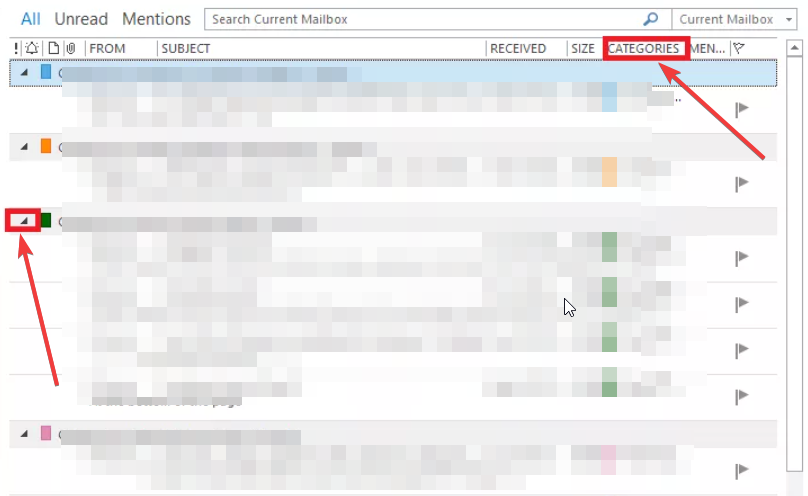
- After assigning a category to your emails, you can simply sort the messages by hitting the Categories column in the horizontal bar that appears above the Outlook messages.
- Under the Categories section, you can expand or close a certain category using the small triangle button in the Category header.
4. Create Automatic replies
- Open the Outlook app and go to File > Info > Manage Rules & Alerts.
- Navigate to the Email Rules tab, select your email account in the Apply changes to this folder field.
- Click on New Rule.
- Select Apply rule on messages I receive in the Start from a blank rule field.
- Check the Where my name is in the To box option and click Next.
- Select Reply using a specific template.
- In Step 2: Edit the rule description field, click on the specific template link.
- Set Look In to User Templates in File System.
- Select the template you created in the previous section and click Next.
- In Select exceptions list, check the except if it is an automatic reply check box.
- Enter the desired name for this rule and select Turn on this rule check box.
- Click Finish and OK and the automatic reply should be enabled.
An automatic reply comes in handy when you’re on vacation but don’t want to be responding to emails. This way, anyone who sends you a message doesn’t think you’re unprofessional for ignoring them.
5. Create tasks in Outlook
5.1 Set up tasks
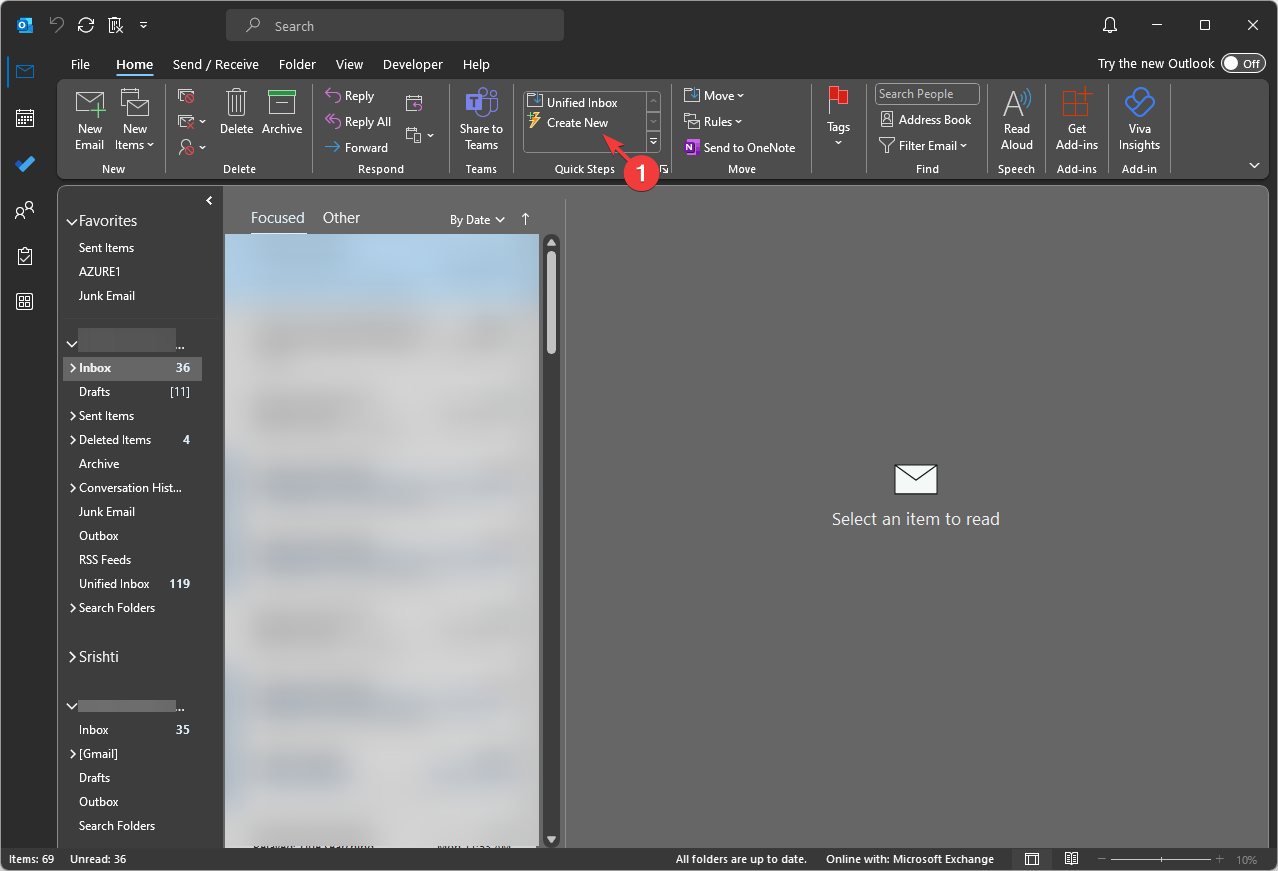
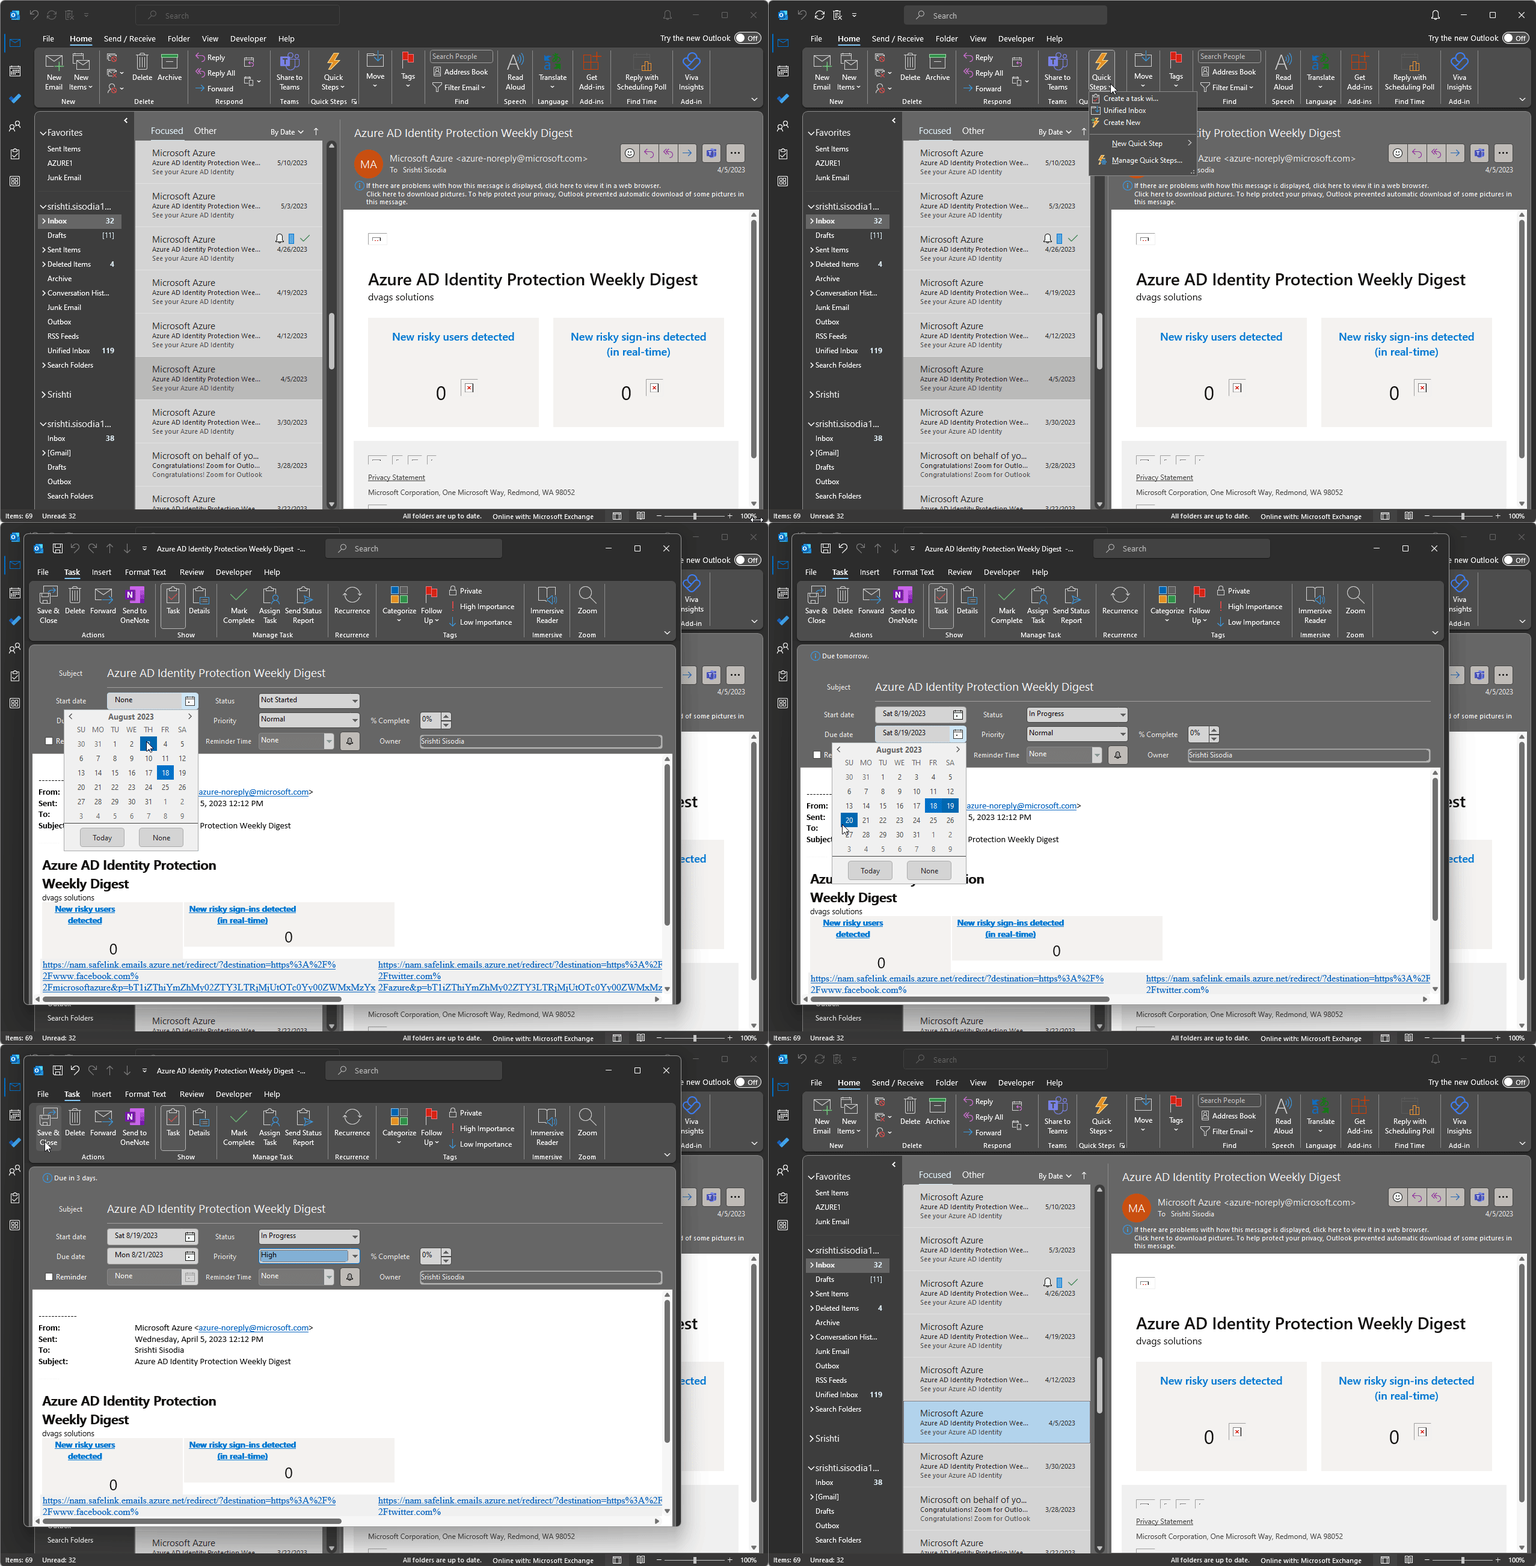
- On the Outlook main window, go to the Home tab and locate Quick Steps.
- Click Create New or locate New Quick Step, and choose Custom.
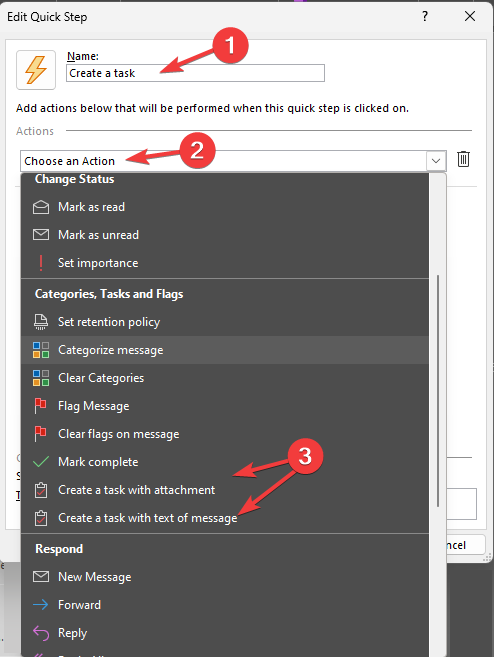
- On the Edit Quick Step window, enter a name for the Quick Step.
- Under Actions, for the Choose an Action drop-down menu, locate the Categories, Tasks, and Flags section, and click Create a task with attachment or Create a task with text of message.
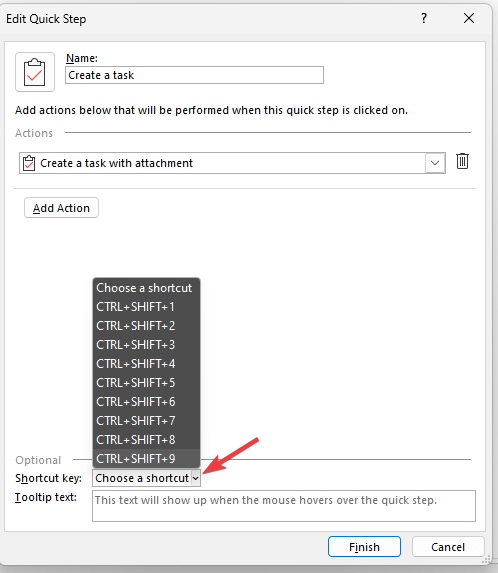
- Further, you can use the Shortcut key option to assign a shortcut key from the drop-down next to it.
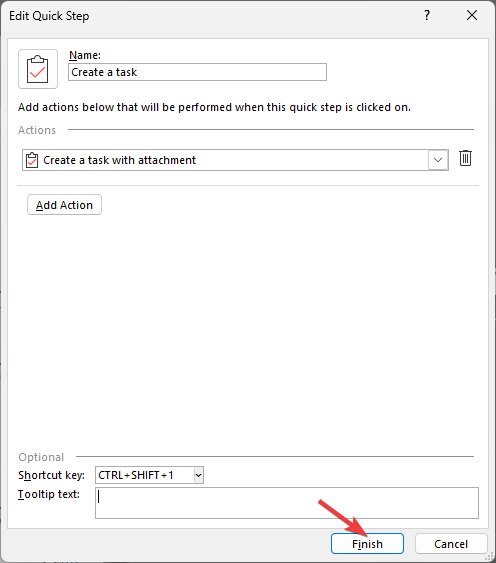
- Once everything is in place, click Finish to save the Quick Step.
- The Quick Step you created will now appear in the Quick Steps box. To access it, click the email in your Inbox, select the Quick Step you created, or press the Shortcut key if assigned.
- A new task window will open. Enter the required details, and click Save & Close.
5.2 Set up reminders
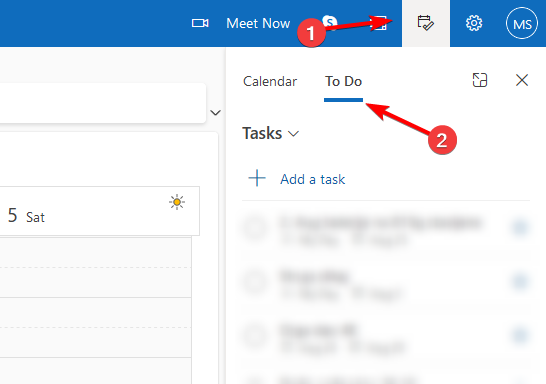
- Open Outlook, and click the To Do icon.
- Click on Remind me in the task information and select the desired time.
- Save the changes.
When you receive an email and it is supposed to be acted upon, you can create a task to help you remember and get back to it at a later time before the deadline. This allows you to better manage your tasks so that you never miss any due dates or important actions.
6. Schedule regular cleanups
- Launch Outlook.com on your preferred browser.
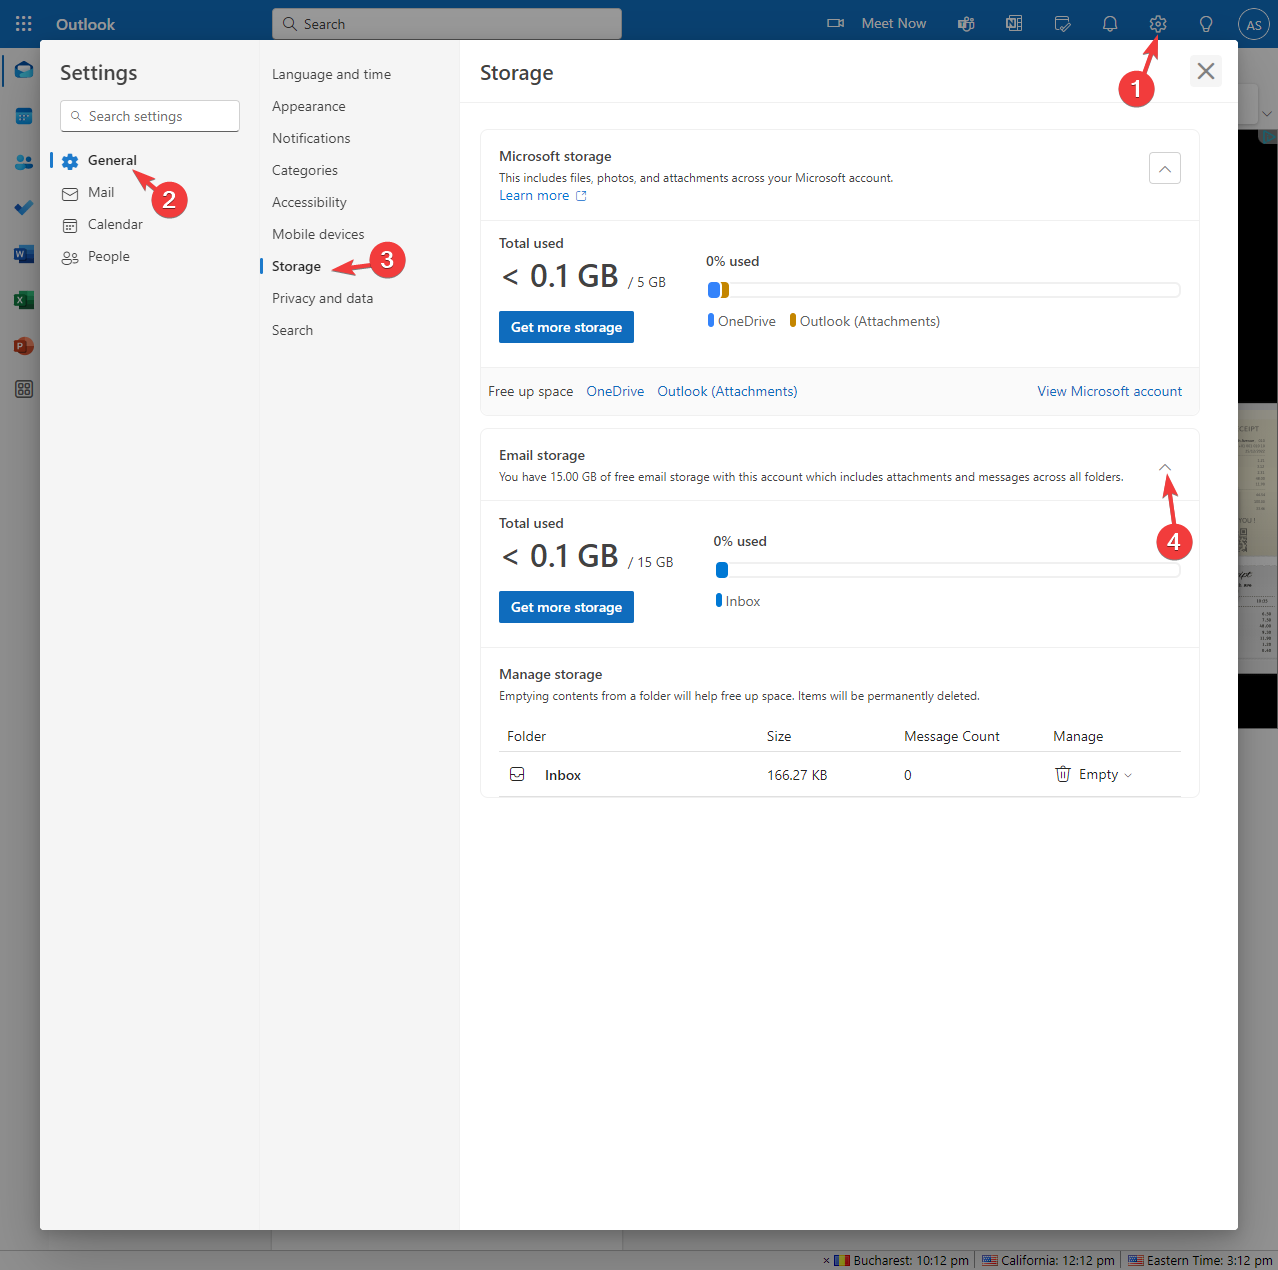
- Sign in with the Microsoft account, and select Settings from the top right corner.
- Go to General and then select Storage. If you use New Outlook for Windows, click Settings, go to Accounts, and choose Storage.
- You will see the breakdown of how much space each folder in your mailbox takes.
- Under Manage, you can choose the duration of each folder from 3 months to 6 months or 12 months.
- Click the Delete icon to remove the emails and free up space.
You can easily run out of storage space in Outlook and this can prevent you from receiving new messages. A recipient inbox full error message may keep appearing until you clean up your junk mail.
Aside from email organization, there are also some Outlook features you probably didn’t know existed and these can help boost your productivity. Further, we have over 70 command-line switches that will automate your tasks and help you get things done faster.
And that’s not all, we also have an Outlook keyboard shortcut cheat code to streamline your workflow. With these tips to help you stay organized, you can easily transform your inbox from overwhelming to efficient.
Do you have any other tips for managing your Outlook email and keeping it organized? If so, let us know in the comment section below.






User forum
0 messages