Minecraft Won't Install on Windows 11: 5 Easy Methods to Use
Get back to playing your game without too much hassle
4 min. read
Updated on
Read our disclosure page to find out how can you help Windows Report sustain the editorial team. Read more
Key notes
- If Minecraft is not installing on Windows 11, you need to start by rebooting your computer.
- Another option is to run the game installer in administrator mode.
- There is a way to play Minecraft for free, but it is a web version and lacks modern advantages.

Minecraft is a game we are all familiar with and have all played at some point in our lives. We don’t want to cease the tradition here. Thus we will show you what to do if Minecraft is not installing on Windows 11.
If you are unfamiliar with the term, it is the original survival game that pioneered the survival genre and has been a popular choice among players ever since its release in November 2011.
Exploration, crafting, building structures, fighting monsters, survival, and many other activities are available to you in this game, whether you play with friends or by yourself.
Whether trying to install Minecraft on your Windows 11 computer or re-download the game after updating your PC, you may have run into the Minecraft installer not working error.
That being the case, we will walk you through many strategies you may employ to quickly and effectively eliminate this error and enjoy the game again. But first, let’s see what the Minecraft Launcher’s role is. Follow along!
Why won’t my Minecraft download on Windows 11?
If it is impossible to download the game on Microsoft’s newest OS, it could be because of any of the following reasons:
- Insufficient system requirements – Minecraft requires a certain level of hardware and software specifications to run. If your device does not meet these minimum requirements, it may prevent the game from downloading.
- Corrupted download file – The installation may fail if the file gets corrupted during the process.
- Network connectivity problems – Slow internet speeds or a weak connection can cause Minecraft to stop downloading.
- Antivirus software – Sometimes, it can interfere with game downloads and prevent them from completing.
- Outdated Java version – Minecraft requires Java to run, and if you have an outdated version, it may prevent the game from downloading.
- More storage space – Minecraft requires a certain amount of storage on your hard drive. If your computer has enough space, the download may succeed.
- Windows 11 security settings – Windows 11 has strict security settings that can prevent downloads from untrusted sources. If the Minecraft download is not from a trusted source, it may be blocked by the system.
- Conflict with other software – If other software installed on your computer conflicts with the Minecraft download, it may prevent the download from completing.
What can I do if Minecraft is not installing on Windows 11?
Before trying any solutions explained below, we recommend you restart your computer. A simple reboot will force some troublesome processes to end and may fix the downloading and installing Minecraft issue.
1. Run in administrator mode
- Press Windows + S to then search Minecraft installer.
- Next, choose Run as administrator.
- That’s it! The installation process should be going smoothly now.
2. Use Task Manager
- Press CTRL + SHIFT + ESC to open Task Manager, then navigate to the Details tab.
- Now look for the Minecraft.exe process, click on it, and choose End task.
- Try rerunning the installer.
3. Allow Minecraft Installer through Firewall
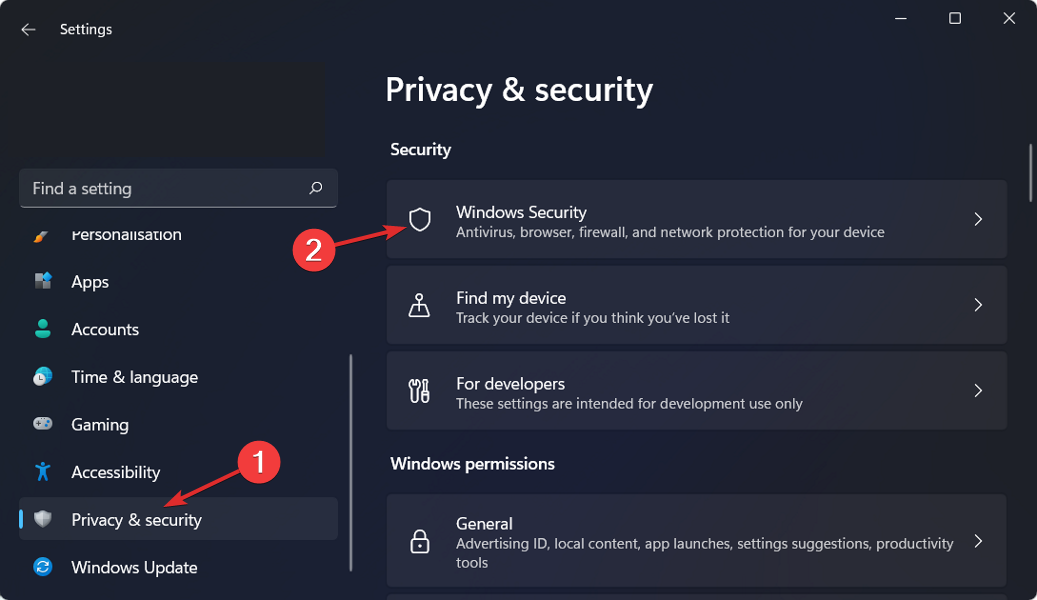
- Press the Windows key + I to open the Settings app, and click on Privacy & security from the left menu, followed by Windows Security from the right one.
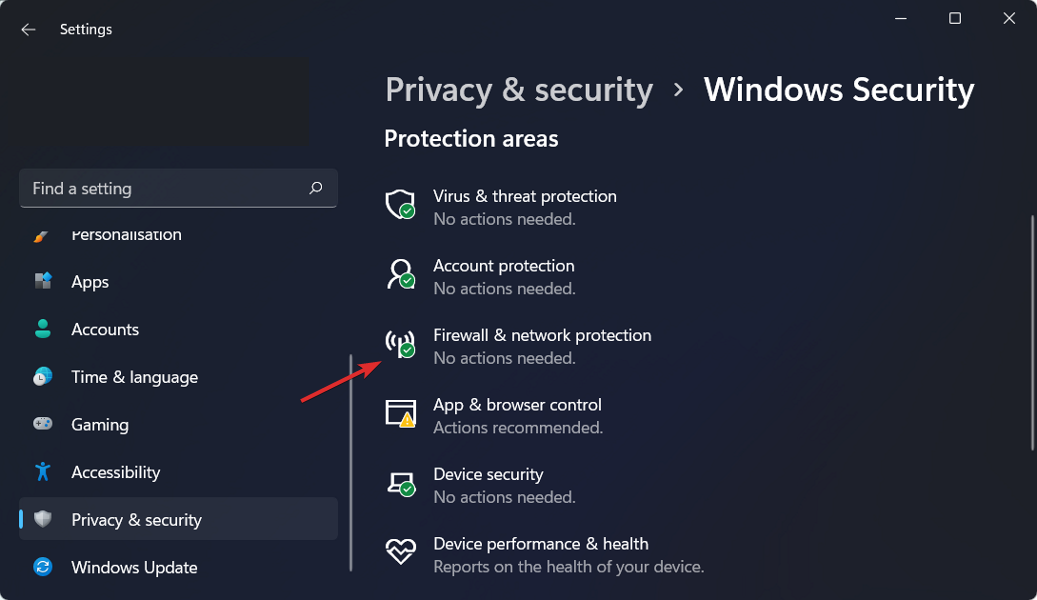
- Now click on Firewall & network protection.
- Look for the Allow an app through firewall option and click on it.
- If you see that Minecraft is not ticked, it means it doesn’t have access. Click on Change settings to give it access.
- Now check the box for Public and Private next to Minecraft and click OK.
Your firewall may be why Minecraft Java won’t install on a Windows 11 device.
4. Disable the antivirus
- Click on the expand arrow from your taskbar, then right-click on the antivirus icon. Now choose Avast shields control followed by Disable for 10 minutes.
- If you have other antivirus programs installed, you can disable the app temporarily by following the same steps as above or similar steps.
The likelihood that your antivirus application was the source of the problem is high if the problem no longer occurs. To secure your computer, you should consider using another antivirus product compatible with Windows 11.
Alternatively, we recommend using professional antivirus software such as ESET to protect your computer at all costs.
For more information and potential solutions, look at our post on Minecraft not working in Windows 11 and see how you can fix various issues in no time.
Alternatively, if you feel like you haven’t installed Minecraft as you should have, you can learn how to download and install Minecraft on Windows 11 by following the link attached.
Another essential step for gamers is updating their games, so you must check out how to update Minecraft.
Was this guide helpful? Don’t hesitate to tell us by leaving a comment in the section below. Thanks for reading!




User forum
0 messages