There's No Compatibility Tab in Windows 11: How to Fix This
A small, but important, tool in order to use older apps
Key notes
- A missing Compatibility Tab is an annoying problem to have because, without it, you will have a tough time configuring it to work on Windows 11.
- There are a couple of ways to fix this error but it does require a bit of technical know-how.
- For starters, you will need to use the Local Group Policy Editor, if you have it, then configure some settings so it doesn’t happen again.

Compatibility problems on Windows apps are rare, but they do happen like software not properly launching. Errors like these are caused by an app having some kind of compatibility issue.
Usually, you can go to an app’s compatibility tab and tweak some settings, but what if the tab is missing? Don’t fret because getting the tab back is possible using the right set of tools.
What causes the compatibility tab to go missing?
Before going into what you can do to bring the compatibility tab on Windows 11 apps, it’s recommended you learn what causes the problem in the place.
Because it’s worth noting the missing tab is not always the result of malware or anything malicious.
- The system administrator may have disabled the tab: This is to prevent other people on a network from messing with software. If this is happening to you, ask the admin for help.
- You have disabled the tab either purposely or accidentally: To fix this, you can either go back in the system files to reenable the tab or use the Compatibility Troubleshooter – assuming it works.
- A file may have gotten corrupted after a recent update: It’s recommended that you uninstall the update to revert your computer back to an earlier state.
- It may not be compatible with Windows 11: Installing older apps can cause a weird compatibility program with newer versions of Windows. Games like Fallout 3 are notorious for this.
There are only a handful of ways to restore the compatibility tab on your computer. It’s also worth mentioning that there aren’t any quick and easy ways to fix this problem either.
How can I bring back the compatibility tab on Windows 11?
There are a few pieces of advice that we would like to give you prior to fixing this problem. They will go a long way to help you and save you future headaches:
- Be careful of what you download. A fix for this problem has been circulating the internet, which involves downloading a file for Registry Editor. Those types of files tend to have malware.
- Prior to making any changes, you should create a System Restore point in case you make a mistake and things go wrong. This will restore your computer to an earlier form.
- Make sure you have admin permissions, or you contact the admin of your network so you can actually make changes. Without that level of control, you won’t be able to do these solutions.
1. Make older programs run properly
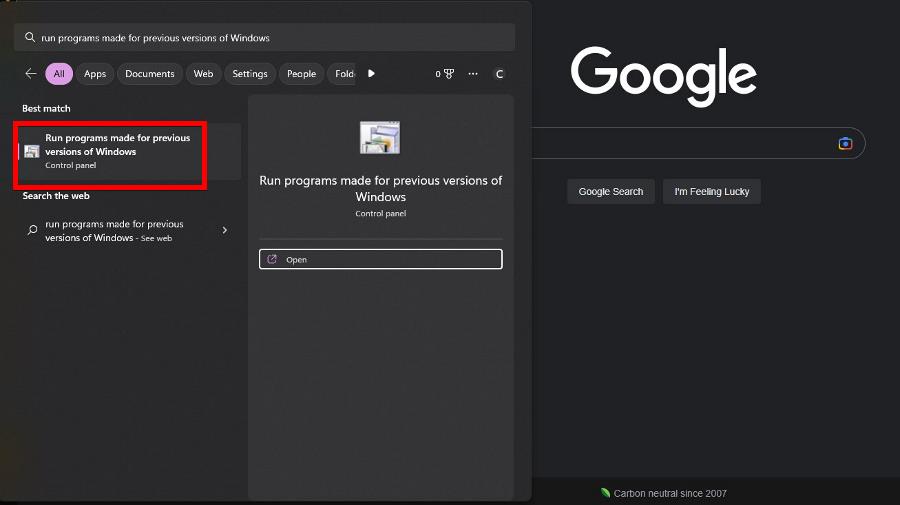
- In the Windows 11 Search bar, type in Run program made for previous versions of Windows. Select the entry that appears.
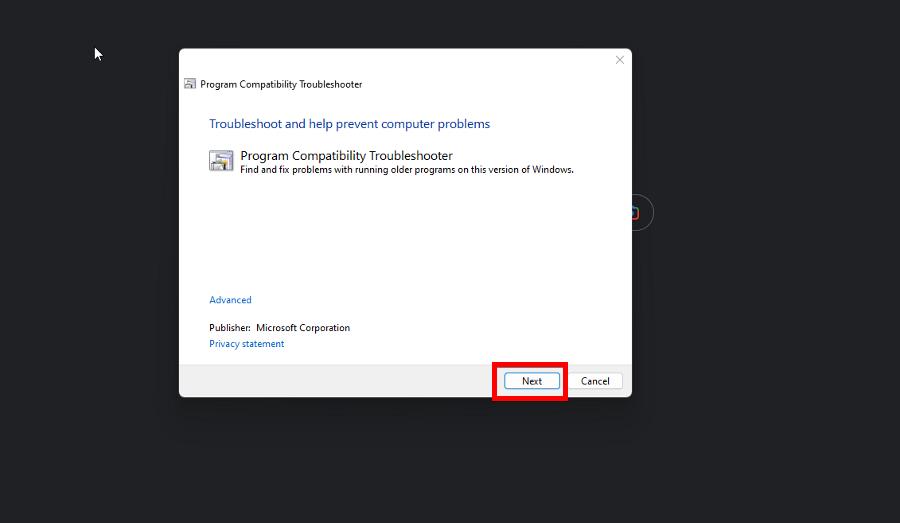
- Click Next in the window that appears.
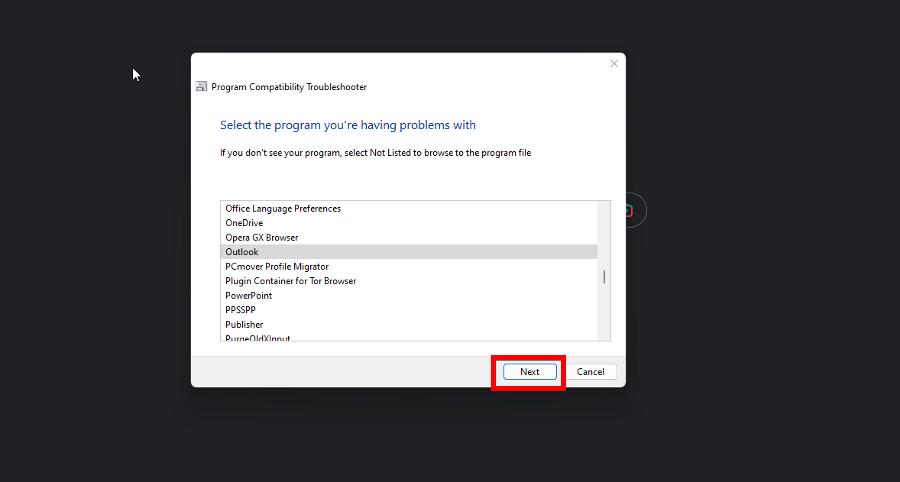
- After it finishes searching, select the problematic software, then click Next.
- Select Try recommended settings to test the app.
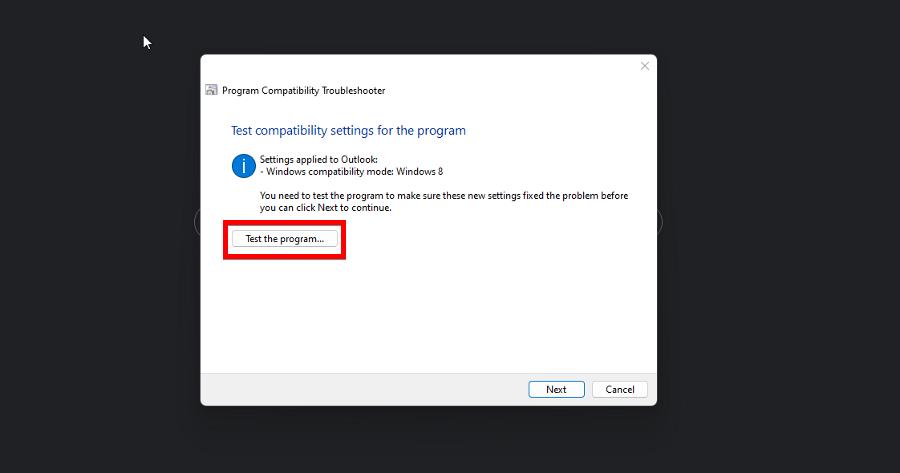
- On the following window, click Test the program. The app will appear under a configuration.
- See if it works properly under these settings, then click Next.
- If the app works correctly, select Yes, save these settings for this program. Otherwise, click one of the other two to go back to either try another configuration or report to Microsoft.
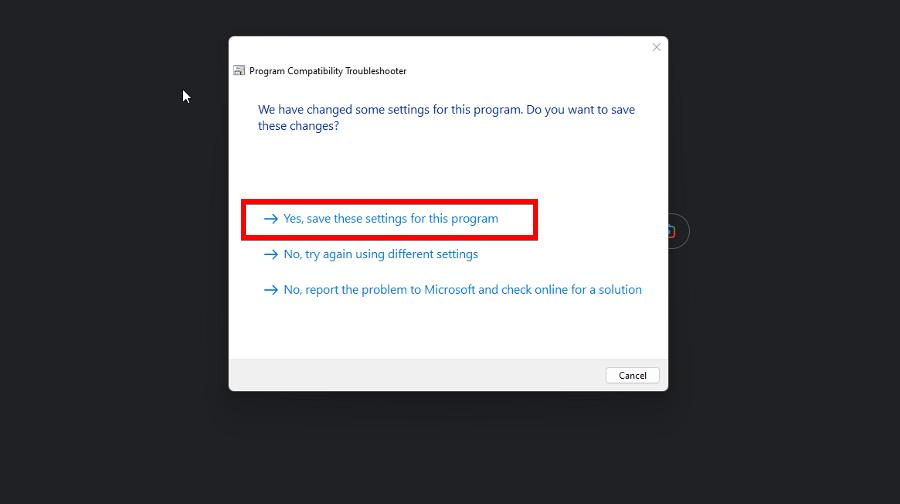
- Close the troubleshooter when it finishes.
2. Use Group Policy Editor
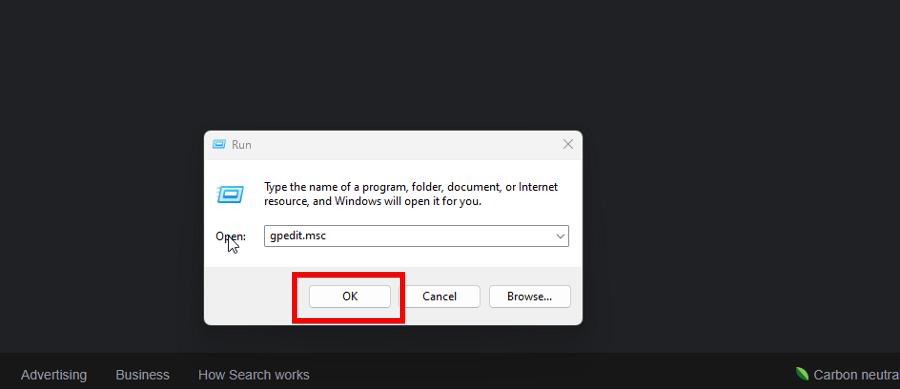
- Right-click the Windows logo in the bottom left corner and click Run.
- In the Run window, type in gpedit.msc and click OK.
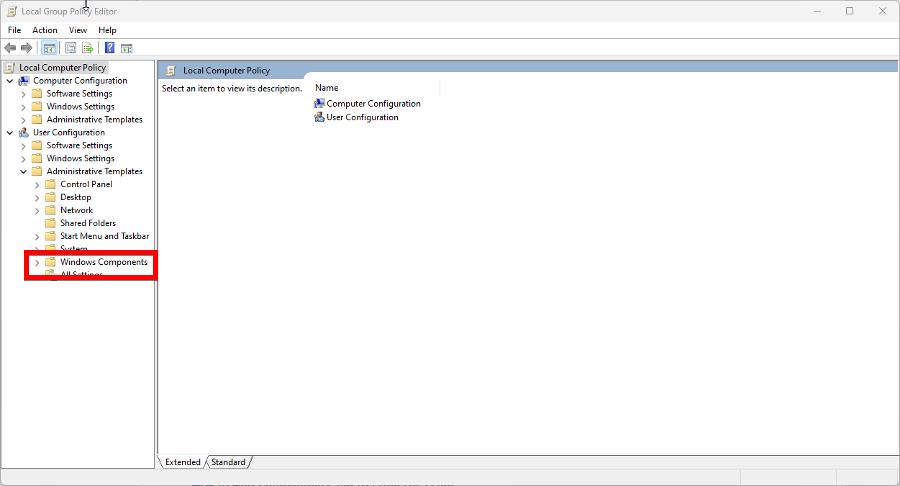
- Under User Configuration, expand Administrative Templates, then click Windows Components.
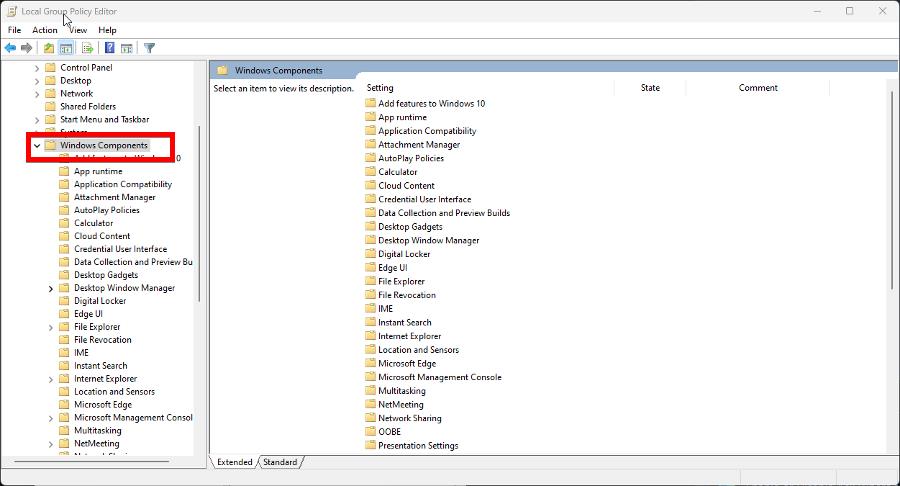
- Now search for Application Compatibility. Open that as well.
- Double-click Remove Program Compatibility Property Page to edit the policy (another policy will be used as an example, but the steps are still the same).
- Click the bubble next to Not Configured if the policy is enabled.
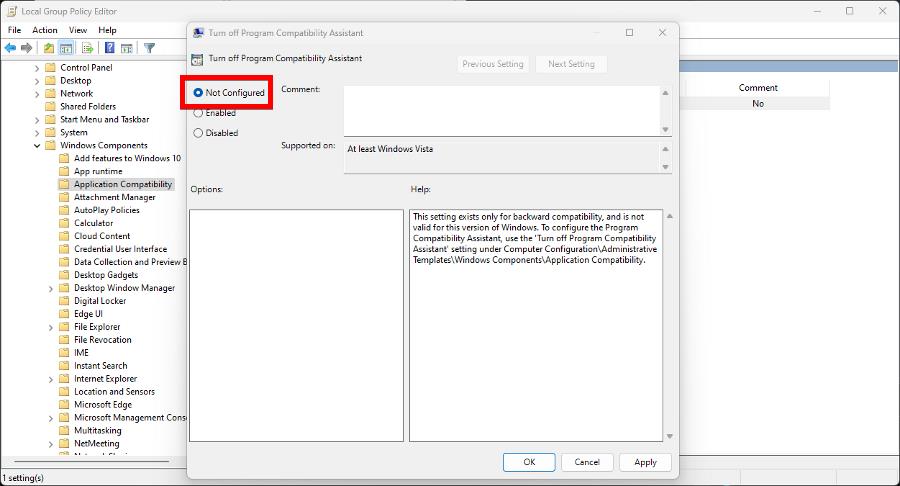
- Select Apply at the bottom of the window then OK.
This solution may be tricky to accomplish because the Local Group Policy Editor is not available on Windows 11 Home as it is exclusive to Windows 11 Pro.
However, it is undoubtedly possible to enable the tool on Windows 11 Home. Be aware it will require you to run a specific batch file to turn it on, which is a little complicated to do.
3. Run compatibility troubleshooter
- Right-click the problematic app and select Properties.
- Go to the Compatibility tab, then click Run compatibility troubleshooter.
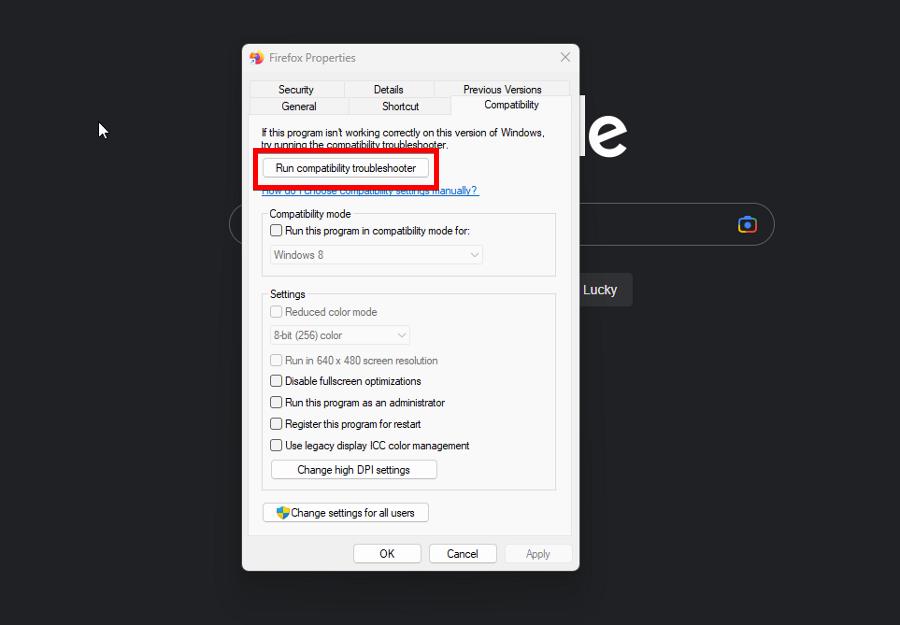
- Similarly to the previous solution, select Try recommended settings to have Windows 11 reconfigure the problematic app.
- Once you have settled on a configuration, go back to the Properties window.
- Under Compatibility mode, click the box next to Run this program in compatibility mode for and select the original operating system for the app.
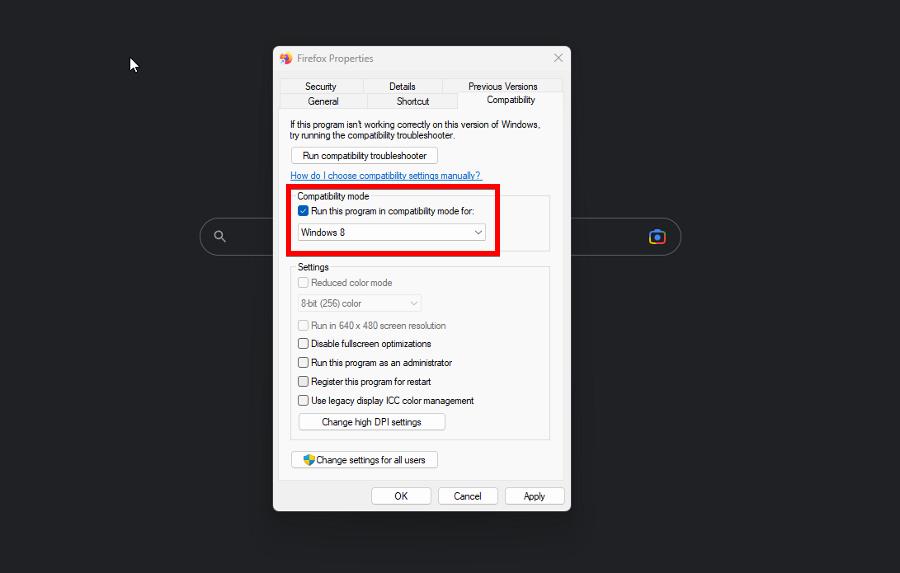
- Click Apply, then OK.
The purpose of this solution is to future-proof the compatibility error so that it doesn’t happen again; hopefully, anyway.
Alternatively, you can select the Troubleshooter Program option but there’s no real difference between the two. You’re ultimately doing the same thing with either choice.
For a complete walkthrough on adjusting these settings in Windows 11, see this compatibility mode guide.
Can I use the Local Group Policy Editor for other things?
Once you get the Local Group Policy Editor working on your Windows 11 computer, you can fix all kinds of issues. And it would behoove you to read up on them if they happen to you.
The software can be used to fix Windows 11 installing the same old Intel graphics drivers over and over. You can use the Policy Editor to disable automatic updates, for instance.
Additionally, you can also disable driver signature enforcement which is a security measure that only allows drivers signed by Microsoft to be installed.
This is useful when installing custom drivers for apps, but be aware that doing so can put your PC at risk of malware.
And lastly, if you find the Details tab missing in Windows 11, we have a dedicated set of solutions that will help.
Feel free to comment below if you have questions about other native Windows software. And please tell us if there’s a specific guide for any Windows 11 error you’d like to see.
Read our disclosure page to find out how can you help Windows Report sustain the editorial team. Read more


Improve this guide


User forum
0 messages