FIX: PIA no Internet access in Windows 10/11
Key notes
- Although PIA is a popular VPN, it doesn't mean that it doesn't have its share of issues.
- Sometimes, you may experience PIA connectivity problems on your Windows 10 PC.
- Unfortunately, a malfunctioning VPN can jeopardize your privacy and security.
- Check out our guide and learn how you can fix PIA's connectivity on Windows 10.


World-class 24/7 support with 82% for a 2 years plan and 2 months free
70% of our readers choose Private Internet Access
70% of our readers choose ExpressVPN
Amazing connection speed with 61% off and 4 months free for the 2-years plan.
Best security protocols with 83% off and 2 months free for a 2-year plan.
A VPN connection is meant to help the user protect his or her privacy while using the web or other services online, as well as providing security for sensitive data.
Connectivity issues thus can be brought about by a myriad of issues like the port being used by the application being restricted or blocked on your network.
PIA or Private Internet Access VPN is one of the most popular applications that provide security with its generous features list.
We are referring to P2P support, ad-blocking, malware blocking, multiple gateways, unlimited bandwidth, no traffic logging, and over 3200 servers in 46 countries across the world.
The VPN is easy to use and even set up, but sometimes with VPNs, you may have issues connecting to the Internet even when the VPN shows that it is connected.
When you get no Internet access while using the PIA VPN, try the solutions below to fix it.
How can I fix no Internet access while using PIA?
1. Reinstall Private Internet Access

- In the search box on the taskbar, type Control Panel and select it from the results.
- Go to Programs and Features.
- Search for PIA inside the programs list and select it.
- Press Uninstall.
- A pop-up window asking if you’re sure you want to uninstall this program should appear next. Click Yes.
- Follow the on-screen instructions to finish the removal process.
You’re most likely used to this Kape Technologies VPN service. So, take action by reinstalling PIA from the official site instead of imaging the worst scenario.
Then, reactivate it with your original license code. Once you’re successfully logged in, it should immediately connect to the VPN server closest to your current location.

Private Internet Access
No Internet access errors should prevent you from using Private Internet Access!2. Check your connection
To do this, disconnect from PIA VPN and try accessing without the application. If you manage to access it, connect the VPN again, and try the next solution.
If you can’t access the Internet with the VPN disconnected, then the problem is with your Internet connection. Restart your device and check your network settings.
3. Connect to a different server location
Since PIA has so many server locations, you can pick a different one and connect to it. Are you able to access the Internet with the new server location?
If so, this means there may be a temporary issue with the server location you were using before.
4. Flush your DNS
- Click Start and select All Apps.
- Select Accessories.
- Type CMD in the search box and then right-click Command Prompt and select Run as Administrator.
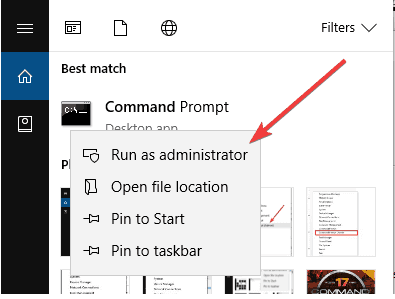
- Type ipconfig /flushdns and press enter. A confirmation saying Windows IP configuration successfully flushed the DNS Resolver Cache will display.
5. Change your VPN protocol
The VPN uses protocols so as to connect to a server, and some of the protocols include L2TP, PPTOP, OpenVPN TCP, and UDP.
Sometimes, the protocol may be blocked in some countries, so to resolve the internet access issue, select the protocols in order from OpenVPN TCP, L2TP, and then PPTP.
6. Change proxy settings
- Click Tools and select Internet Options.
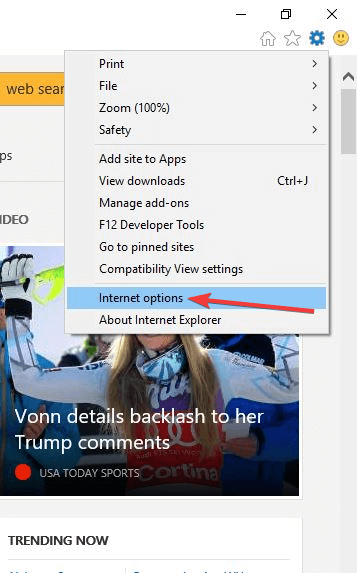
- In the Connections tab, click LAN settings.
- Uncheck all options except the automatically detect settings.
- Click OK and close your browser.
- Open your browser again and try connecting to the Internet.
7. Change the port being used by the VPN
- Right-click on the PIA VPN icon in the menu bar or system tray.
- Disconnect from the VPN.
- Right-click on the icon again and click Settings.
- Click Advanced.
- Set the connection type to UDP.
- Change remote port to 1194.
- Click Save and reconnect.
- If the issue persists, disconnect from the VPN and change the remote port to 8080 and reconnect. If it still doesn’t help, change to 9201, or 53 and Save then reconnect and try again.
- If you still don’t manage, go back to Advanced settings.
- Disconnect the VPN and change the connection type to TCP.
- Change remote port to Auto then click Save and reconnect.
- If the issue persists, change remote port to 443, then Save and reconnect.
- If you still cannot access the Internet, change the remote port to 110, or 80, or enter 53 in the local port box and try the settings again.
8. Check DNS settings
- Click Start.
- Search for View network connections.
- Right-click your WiFi adapter.
- Select Properties.
- Select Internet Protocol Version 4.
- Select Properties.
- Change the preferred DNS address to 8.8.8.8 and the alternate to 8.8.4.4.

- Reboot your computer and try accessing the Internet again.
If you’re using a VPN like Private Internet Access, you can easily change PIA SOCKS5 proxy settings.
Let us know if you found a working solution from this list by leaving a comment in the section below.
Read our disclosure page to find out how can you help Windows Report sustain the editorial team. Read more


Improve this guide


User forum
0 messages