How to Enable and Use ReadyBoost on Windows 10
ReadyBoost is useful only if Windows 10 is installed on a HDD
![]() 4 min. read
4 min. read
![]() Published on
Published on
Share this article
Improve this guide
Read our disclosure page to find out how can you help Windows Report sustain the editorial team. Read more
Boosting your Windows 10 performance can be a game-changer, but only if your system is running from a HDD. ReadyBoost is a nifty feature that allows you to use a USB drive or SD card to speed up your system. If your system is installed on an SSD, ReadyBoost will make no difference. So, if ReadyBoost is not showing, that’s normal in this case.
How do I enable ReadyBoost in Windows 10?
1. Setting up ReadyBoost with a USB Drive
- Plug your USB flash drive into one of the USB ports on your computer.
- Click on the yellow folder icon on the taskbar to open File Explorer or press Win + E.
- Under This PC in the left sidebar, locate your USB drive under the Devices and drives section.
- Right-click on the USB drive icon and select Properties from the context menu.
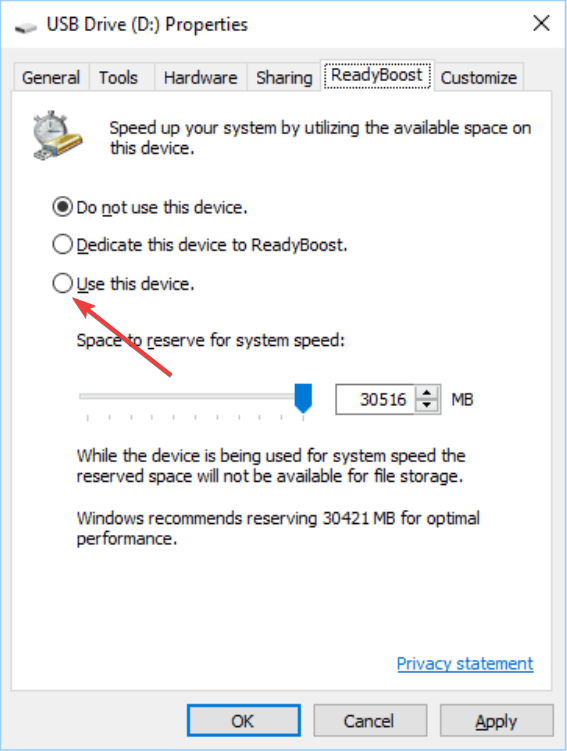
- Navigate to the ReadyBoost tab.
- Windows will test the device to ensure it is compatible with ReadyBoost. Wait for this process to complete.
- Select the option Use this device.

- Use the slider to allocate the amount of space you wish to reserve for ReadyBoost. You can leave it at the default or adjust as needed.
- Click Apply and OK to confirm your settings.
This will speed up your system by allowing frequently accessed data to be stored on the USB drive, which is faster to access than the hard drive.
2. Setting up ReadyBoost with an SD card
- Place the SD card into your computer’s SD card slot.
- Press Win + E to open File Explorer.
- Locate the SD card drive, right-click on it and select Properties.
- Go to the ReadyBoost tab and wait for Windows to test the device for ReadyBoost compatibility.
- Choose Use this device from the options.
- Use the slider to set the amount of space to reserve for ReadyBoost.
- Click OK and then Apply to finalize the changes.
Using an SD card for ReadyBoost is especially convenient for laptops with a built-in card slot, as it can be left in the slot permanently.
3. Troubleshooting ReadyBoost compatibility issues
- Ensure your USB drive or SD card has at least 1GB of free space and does not exceed 32GB.
- Format to NTFS:
- Open File Explorer by pressing Win + E.
- Right-click on the USB drive or SD card and select Format.
- Choose NTFS from the File System dropdown menu and click Start.
- Make sure the SuperFetch (SysMain) service is running:
- Press Win + R to open the Run dialog box, type services.msc and hit Enter.
- Find SysMain or SuperFetch in the list and ensure it is set to Automatic and running.
- Delete external drive folders (if ReadyBoost is still not working):
- Press Win + R, type regedit, and hit Enter.
- Navigate to HKEY_LOCAL_MACHINE\SYSTEM\CurrentControlSet\Services\EMDMgmt
- Delete all the folders within the EMDMgmt key.
- Restart your computer and try enabling ReadyBoost again.
These troubleshooting steps ensure your device meets the criteria to be used with ReadyBoost, allowing you to utilize its full potential.
How do I disable ReadyBoost?
- Press Win + E to open File Explorer.
- Under This PC in the left sidebar, find the drive you’re using for ReadyBoost.
- Right-click on the ReadyBoost drive and select Properties.
- Go to the ReadyBoost tab in the Properties window.
- Select the option Do not use this device.
- Click OK and then Apply to free up the reserved space on your USB drive or SD card.
Disabling ReadyBoost will free up the reserved space on your device, allowing you to use it for other storage needs.
Why is the ReadyBoost tab not showing in Properties?
Well, the answer is pretty simple: because you’re using an SSD and not a HDD. The ReadyBoost feature takes advantage of the flash memory of your USB drive or SD card to boot up Window faster. However, if your system is installed on an SSD, ReadyBoost will not make any difference because your system is already booting from a fast storage device.
These solutions cover the most common steps for configuring and troubleshooting ReadyBoost in Windows 10, helping improve system performance by leveraging external storage devices for faster data access. To keep your system running smoothly, regularly check for Windows updates and ensure your external devices are in good condition.
You might also be interested in how to use ReadyBoost on Windows 11, although there is nothing different.
For more questions or suggestions, hit the comments section below and let us know about them.


User forum
0 messages