Realtek Audio Not Working on Windows 11? Here's What to do
Explore tested solutions to solve Realtek HD Audio Driver errors
6 min. read
Updated on
Read our disclosure page to find out how can you help Windows Report sustain the editorial team. Read more
Key notes
- The Realtek HD Audio Driver can stop working properly if it isn’t updated regularly.
- After updating the driver, make sure to restart the Audio service.
- Another solution is to reinstall the Realtek driver altogether.

The Realtek HD Audio Driver is one of the most common pieces of software for changing and tweaking audio settings on your PC. However, there are some difficulties that might cause Windows 11’s Realtek audio driver to stop functioning properly.
A variety of factors might contribute to Realtek HD Audio Driver issues. The majority of the challenges may be addressed by taking the steps outlined in this guide. Keep up with us!
Is Realtek audio driver compatible with Windows 11?
Realtek HD Audio Driver is the most user-friendly audio driver software that enhances sound quality and provides Dolby or Surround sound support via a sound card.
This driver is completely compatible with Windows 11, and this is not the cause of different issues with the driver. Here are the most common causes:
- Outdated drivers – Driver updates go hand in hand with OS ones. Thus, if your OS will update but your drivers won’t, it might cause miscommunications across your device. In this case, it is advised to update your Realtek audio driver.
- Enhancement audio settings – There are multiple audio enhancement software and settings that may cause issues with the driver. Thus, we will show you below how to disable them.
- Corrupted drivers – Corrupted drivers are another reason which causes your OS to unsuccessfully communicate with your driver. By reinstalling the driver or installing another one, you will be able to fix this issue.
- Wrong port connections – Make sure that you connect the audio cable to the right port and not the one for an audio input, which is usually pink.
How do I fix my Realtek audio driver in Windows 11?
Before moving on to more complex troubleshooting solutions, make sure to do the following:
- Check the audio output, unplug and reconnect the device, then connect it to another system to test its functionality.
- Remove any third-party antivirus software and opt for a better one that’s optimized for Windows 11 and won’t interfere with your audio.
1. Check the audio output
- Click on the Volume icon in the Taskbar. Alternatively, you can press Windows + A to launch it.
- In the Quick Menu, click on the carrot arrow icon next to the volume level.
- It will prompt you with a list of audio devices connected to the system. Select the desired device.
If selecting the desired device did not resolve the audio issue, it is possible that other system faults, for which we have provided alternative solutions, were the source of the problem.
2. Restart the Audio service
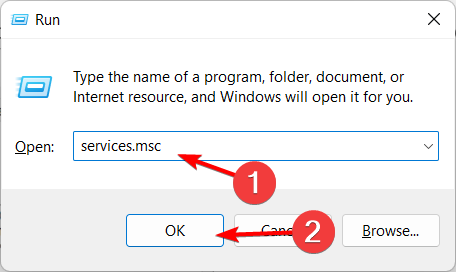
- Press the Windows key + R, which opens Run. Then enter services.msc in the open box, and click the OK button.
- Find the Realtek audio service, right-click it and select Restart.
3. Update the driver
1. Right-click on the Start icon in the Taskbar or press Windows + X to launch the Quick Access menu then select Device Manager.
2. Locate and double-click the Sound, video, and game controllers option. Right-click on the Realtek Audio device and select Update driver from the context menu.
3. Select the Search automatically for drivers option as Windows will find the best drivers on your system. Reboot your PC afterward.
If it isn’t constantly updated, the Realtek HD Audio Driver may stop functioning correctly. Follow these easy steps to correctly update the driver and fix the issue!
We strongly advocate using a specialist program such as Outbyte Driver Updater to do automatic scans for out-of-date drivers.

Outbyte Driver Updater
Safely update the Realtek driver as well as all other outdated drivers on your system.4. Reinstall the Realtek driver or use your manufacturer’s
- Right-click on the Start icon in the Taskbar or press Windows + X to launch the Quick Access menu. Select Device Manager from the list of options displayed.
- Locate and double-click on the Sound, video, and game controllers option. Right-click on the Realtek Audio device and select Uninstall device from the context menu.
- You can now either reboot your PC to automatically reinstall the Realtek driver, or head to your manufacturer’s website and search for an audio driver and download it. For example, here is Lenovo’s support page where you can find all drivers.
After you have completed the procedures outlined above, restart your computer. Windows will automatically update the driver to the most recent version available. It will also remove any corrupted driver files that may have been present.
5. Disable Audio Enhancements
- Press on the Windows key + S, and search for Change system sounds.
- Inside the Sound panel, navigate to the Playback tab, then select the speaker you are having trouble with, and click on Properties at the bottom.
- Click on the Enhancements tab, then tick the checkbox for Disable all enhancements, and click the OK at the bottom to save the changes and close the window.
6. Run the Audio Troubleshooter
- Right-click on the Start icon in the Taskbar or press Windows + X to launch the Quick Access menu. From the list of options, select Settings.
- The System tab will be open by default. Scroll down on the right side of the window and select Troubleshoot from the list of options.
- Tap on Other troubleshooters.
- Locate the Playing Audio troubleshooter and click on Run next to it.
- Select the audio output device you are having issues with and click on Next at the bottom.
Windows will now identify any issues with the device or configured settings and fix them. Instructions will be displayed once the errors are found, so make sure to follow them carefully.
7. Run System Restore
 NOTE
NOTE
- Press on the Windows key + S, search for Create a restore point, and click on the relevant search result.
- The System Protection tab will automatically open. Click on System Restore under it.
- The Recommended restore point will be selected by default, but you can select another one by clicking on the Choose a different restore point option. After this, click on Next at the bottom.
- If everything looks fine, click on Finish at the bottom.
After your system has been successfully restored, the Realtek audio problem will be immediately repaired by the operating system. In case you don’t have a restore point created, check our guide on how to create a restore point in Windows 11.
8. Update Windows
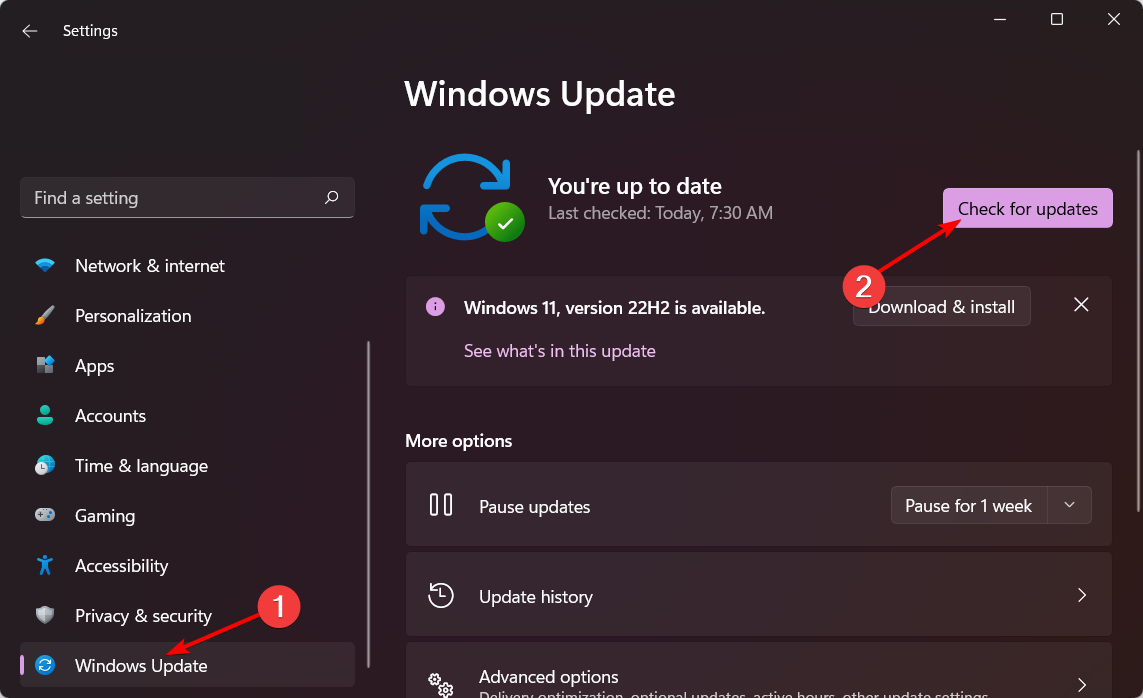
- Press Windows + I to open the Settings app. Click the Windows Update section then click Check for updates on the right.
- Reboot your PC afterward. The Realtek audio driver not working in Windows 11 issue will be fixed.
What to do if there’s no sound at all?
If you notice your sound has been missing altogether after installing Windows 11, you might want to check in with Microsoft’s help center.
The help service will offer you more actions to take in order to solve the sound issues at hand. To talk with its support team, click the Get support link on the Contact Microsoft Support page. Thereafter, click the Contact Support button after entering a description.
However, if you try all of the above-suggested options or read our post on how to solve no sound in Windows 11, you may not need to call any support service.
The previous solutions will be insufficient if no output devices are identified in Windows 11. Instead, check our article on Windows 11 not recognizing output devices, to get a different list of quick remedies.
We hope that these methods were helpful in resolving your Realtek HD Audio Driver issues. Let us know what you think in the comment section below, and which solution worked best for you!


User forum
0 messages