Remove Homegroup on Windows 10/11 [Step-by step Guide]
Apply our detailed procedures right away
9 min. read
Updated on
Read our disclosure page to find out how can you help Windows Report sustain the editorial team Read more
If you have two or more computers, you can use Homegroup to connect them in order to share files between them. This is a great feature, but sometimes, you need to stop and disable file sharing between the PCs in your network.
To do that, you need to remove Homegroup, and today we’re going to show you how to do it on Windows 10.
How can I remove the Homegroup on Windows 10?
Homegroup is a feature first introduced in Windows 7. Due to the simplicity of this feature, it remained a part of all future versions of Windows. Homegroup allows you to share files between the PCs in your home network easily.
You don’t need to enter any passwords; all you have to do is join a Homegroup, and you’ll be able to share files instantly. As you can see, this is a great feature, but sometimes, users want to remove the Homegroup and stop file sharing.
1. Leave Homegroup and disable its services
Creating Homegroup is quite simple, but removing it is simple as well. To do that, you have to enter HomeGroup settings and choose the option to remove the Homegroup. To do that, follow these steps:
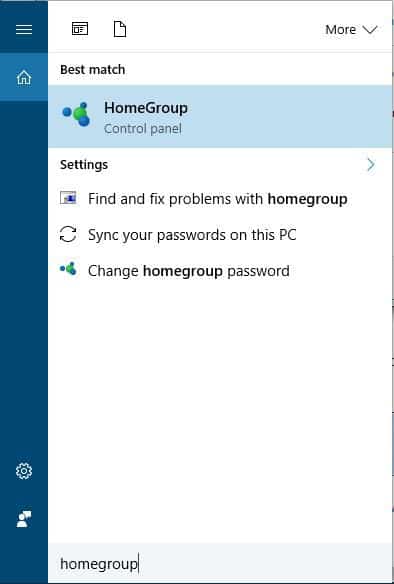
- Press Windows Key + S and enter homegroup. Choose Homegroup from the list of results.
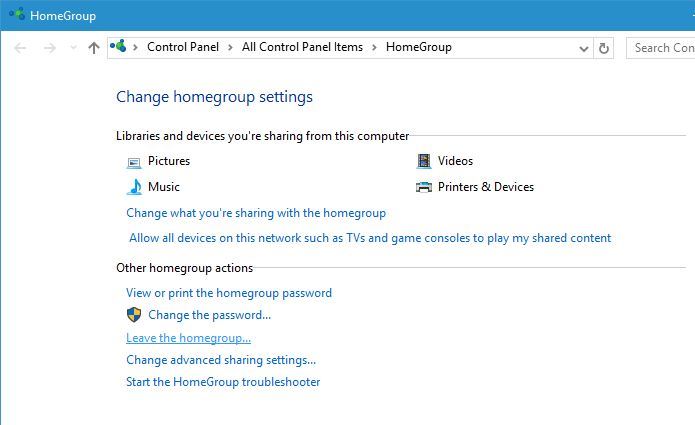
- When Homegroup window opens, scroll down to the Other homegroup actions section and click the Leave the homegroup option.
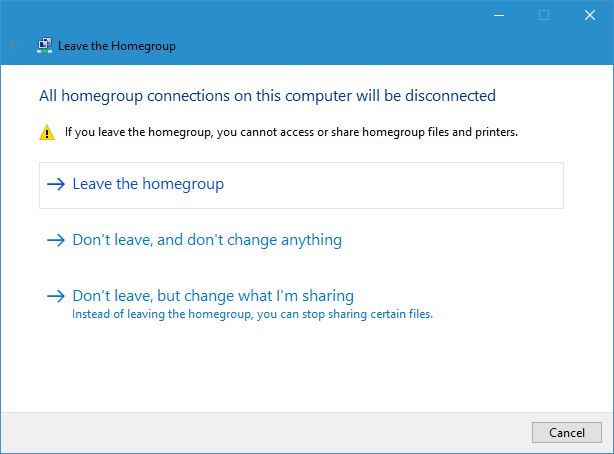
- You’ll see three options available. Choose Leave the homegroup option to leave the Homegroup.
- Wait for few seconds while you leave the Homegroup.
Leaving the Homegroup is simple, but even if you leave it, you’ll still have Homegroup icon available in Navigation Panel in File Explorer. This isn’t a major problem, but if you want to remove it you can do so by following these steps:
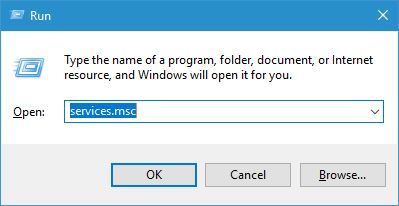
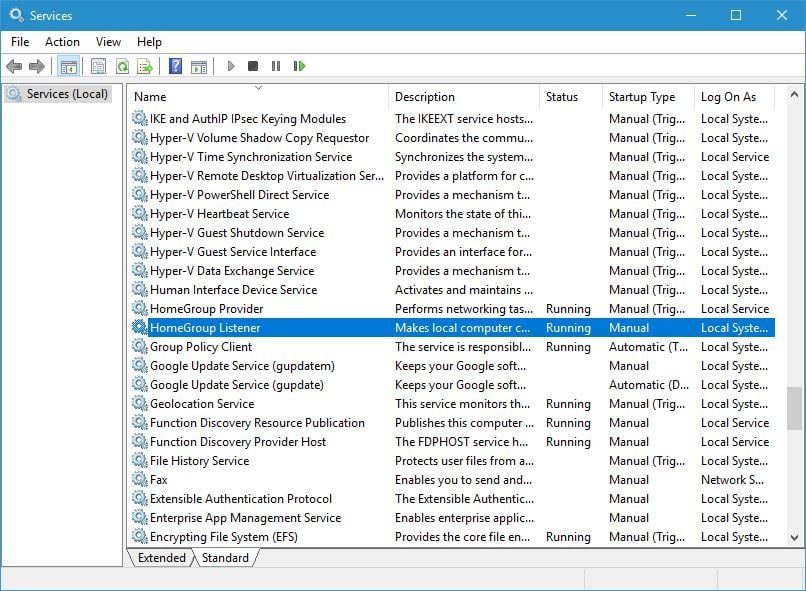
- Press Windows Key + R and enter services.msc. Press Enter or click OK.
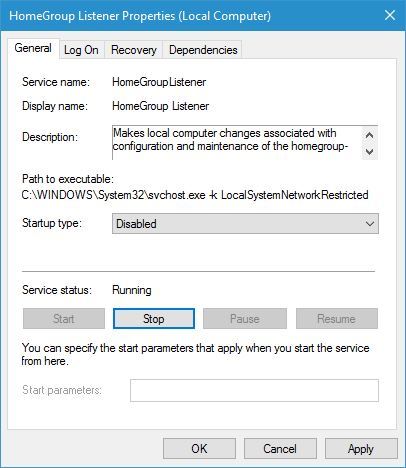
- When Services window opens, locate HomeGroup Listener and double click it to open its properties.
- Set the Startup type to Disabled and click the Stop button to stop the service.
- Click Apply and OK to save changes. Repeat the same steps for HomeGroup Provider service.
After disabling HomeGroup services, the Homegroup icon will disappear from the Navigation Panel completely.
2. Use Registry Editor
If you want to remove Homegroup icon from Navigation Panel, you can do so by using Registry Editor. We have to warn you that Registry Editor is a powerful tool, and if you’re not careful you can cause stability issues with your Windows 10 installation.
If you decide to use this method, it might be a good idea to export your registry and use it as a backup in case anything goes wrong. To edit your registry, do the following:
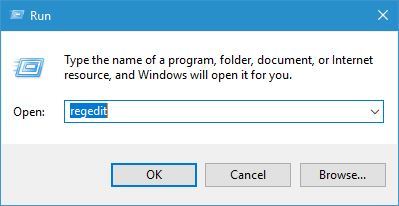
- Press Windows Key + R and enter regedit. Click OK or press Enter.
- When Registry Editor opens, navigate to
HKEY_CURRENT_USER\Software\Classes\CLSID{B4FB3F98-C1EA-428d-A78A-D1F5659CBA93}key in the left panel. - In the right panel locate System.IsPinnedToNameSpaceTree DWORD and change its value to 0.
- After that, close Registry Editor and check if Homegroup icon is removed.
If you have Homegroup icon appearing on your Desktop, you can remove it using Registry Editor. To do that, follow these steps:
- Navigate to the
HKEY_CURRENT_USER\SOFTWARE\Microsoft\Windows\CurrentVersion\Explorer\HideDesktopIcons\New\StartPanelkey in the left panel. - In the right panel select the {B4FB3F98-C1EA-428d-A78A-D1F5659CBA93} DWORD and change its value to 1.
- Close Registry Editor and check if the Homegroup icon is removed from your Desktop.
If you can’t edit your Windows 10‘s registry, read this handy guide and find the quickest solution.
3. Delete the contents of the PeerNetworking folder
If you have a problem removing the Homegroup, you can easily remove it manually simply by deleting the contents of the PeerNetworking folder. To do that, you need to follow these steps:
- Navigate to
C:WindowsServiceProfilesLocalServiceAppDataRoamingPeerNetworkingfolder. Keep in mind that certain folders will be hidden, so you’ll have to reveal them. To do that, simply click the View tab and make sure that Hidden items option is checked. - Once you open PeerNetworking folder, delete all files from it. In order to access this folder, you’ll need administrator privileges, so keep that in mind.
- Restart your PC and try to leave the Homegroup again.
For this solution to work, some users are suggesting to delete the contents of PeerNetworking folder on all PCs that are connected to the Homegroup.
After performing these steps on all computers in your home network, you can remove the Homegroup without any problems.
If you can’t delete the contents of the PeerNetworking folder, check out this useful guide that will help you do it with ease.
4. Turn off all PC connected to Homegroup
Few users reported that they could remove Homegroup simply by turning off all PCs connected to the Homegroup. If there aren’t any PCs connected to the Homegroup, the Homegroup will disappear, so be sure to try this solution.
Remember, you need to turn off all computers on your home network and keep them all turned off at the same time. After doing so, you should be able to remove the Homegroup.
Some users are also suggesting to create a new Homegroup on a different PC while all other PCs are turned off, so be sure to try that as well.
5. Use DISM tool
If you have problems with removing Homegroups, that might be caused by a corrupted Windows 10 installation. To fix this problem, it’s advised that you run the DISM tool and scan your PC with it.
Users reported that you should use DISM tool after you delete the contents from PeerNetworking folder. For more information on how to delete those files, check Solution 3.
To perform DISM scan on your PC, you need to do the following:
- Open Command Prompt as administrator. You can do that by pressing Windows Key + X and choosing Command Prompt (Admin) from the menu.
- When Command Prompt opens, enter the following commands:
- DISM.exe /Online /Cleanup-image /Scanhealth
- DISM.exe /Online /Cleanup-image /Restorehealth
- exit
- Wait patiently while each command finishes. This process can take a while, so be sure not to interrupt it.
After the process is completed, the Homegroup should be removed, and you can create a new one.
If you’re having trouble accessing Command Prompt as an admin, then you better take a closer look at this guide.
6. Search for Homegroup on your C drive
Few users reported that they could remove Homegroup on their PC simply by searching for the Homegroup. To do that, follow these steps:
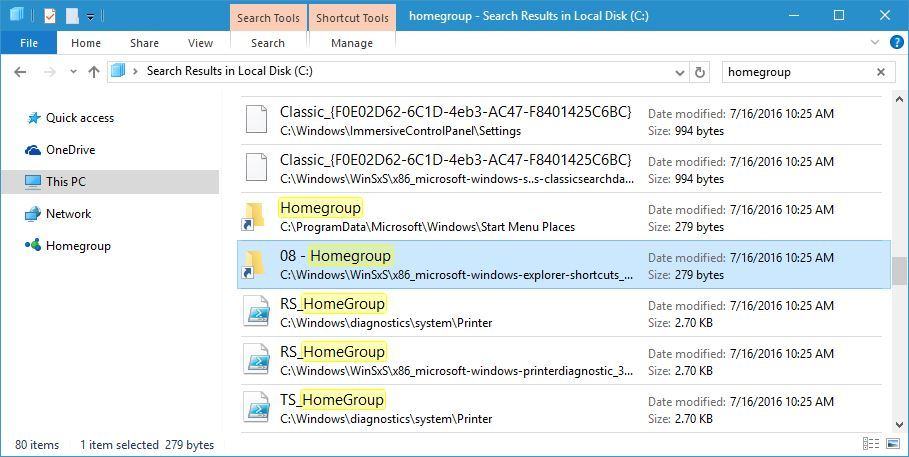
- Open File Explorer and navigate to C drive.
- When C drive opens, enter homegroup in the search field in the top right corner.
- Wait for the search process to finish.
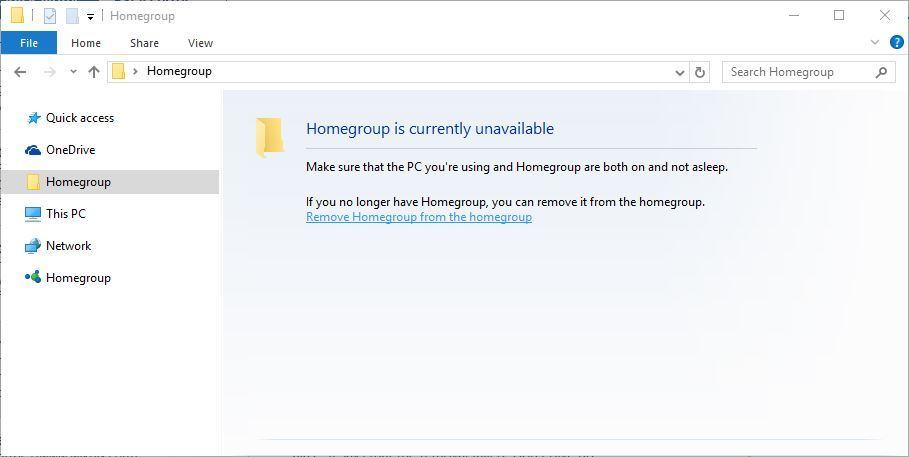
- Search for Homegroup or 08 – Homegroup shortcuts. Open any of these shortcuts.
- You should see Homegroup is currently unavailable message. Click Remove Homegroup from the homegroup.
- Wait while the Homegroup is removed.
Your Homegroup should now be removed. A few users reported that they got a message saying that removal process failed, but despite the message the Homegroup was successfully removed.
7. Change Homegroup advanced settings
According to users, you can stop computers from automatically joining Homegroup simply by changing Homegroup settings.
By default, Homegroups don’t require you to enter password in order to join them, and all PCs on your home network will automatically join the Homegroup.
This isn’t something that users want, and if you want to remove a Homegroup from your PC, you need to do the following:
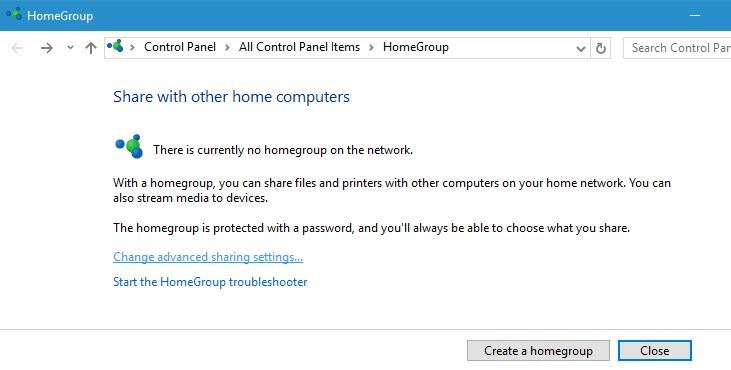
- Open Homegroup settings.
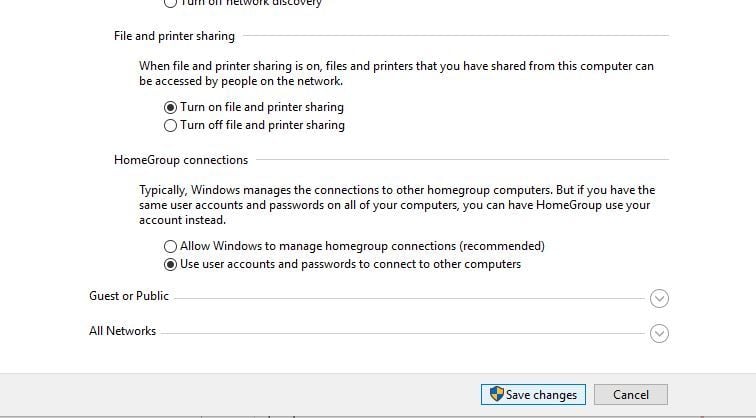
- Choose Change advanced sharing settings.
- Now locate Homegroup connections section and select Use user accounts and passwords to connect to other computers option.
- After that, click on Save changes.
- Restart your PC to apply the changes.
- Now you need to repeat these steps on all other computers that are part of your Homegroup.
After doing so, your PCs won’t automatically connect to the Homegroup, and all your computers will be removed from your Homegroup. If you still want to join the Homegroup, you can do that manually by entering your user account password.
8. Change the security permissions
If you can’t remove a Homegroup on your Windows 10 PC, you might have to change the security permissions of specific folders. To do that, follow these steps:
- Go to C:ProgramDataMicrosoftCryptoRSA folder.
- Locate MachineKeys folder and rename it to MachineKeys-OLD.
- Now create a new MachineKeys folder in RSA folder.
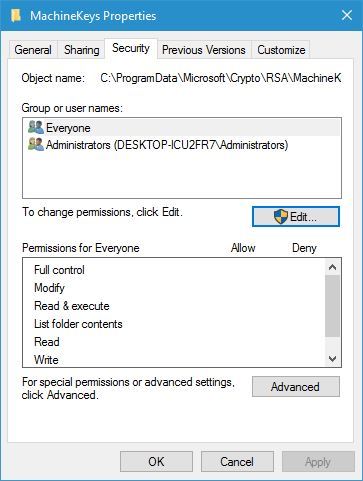
- Right click newly created MachineKeys folder and choose Properties.
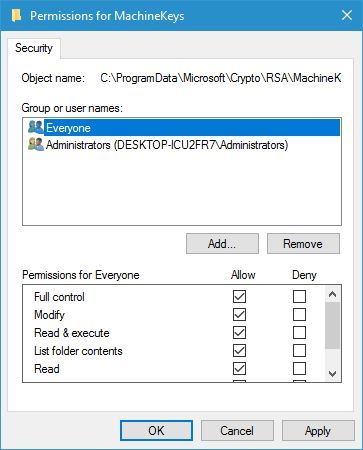
- Go to Security tab and click the Edit button.
- Select Everyone in Group or user names field. In Permissions for Everyone section check Full control option in Allow column. Click Apply and OK to save changes.
- After that, restart your PC and you should be able to remove your Homegroup without any problems.
Solution 9 – Check your firewall
If you want to remove an old Homegroup from your PC, you might have to check your firewall settings. To do that, follow these steps:
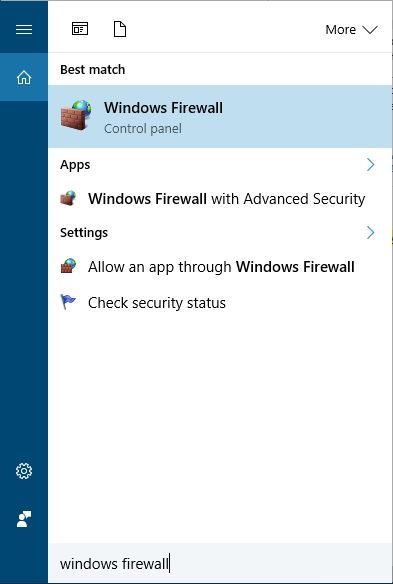
- Press Windows Key + S and enter windows firewall. Choose Windows Firewall from the list of results.
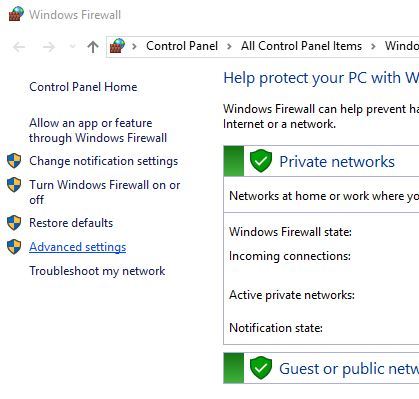
- When Windows Firewall opens, click Advanced settings on the left.
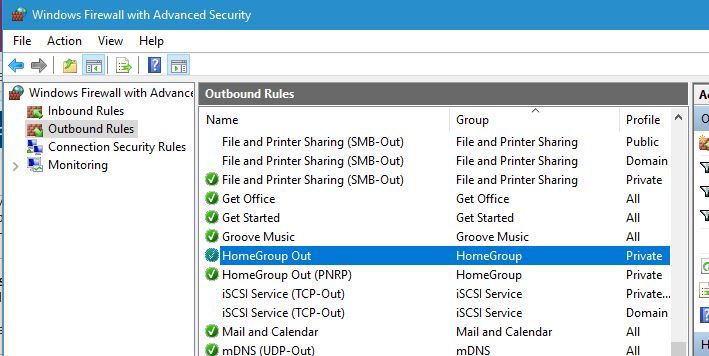
- Go to Outbound rules section in the left panel. In right panel locate Homegroup rules and delete them.
- Now create new rules for Homegroup.
After doing that, the Homegroup will be removed from your PC.
Removing Homegroup from your PC is simple, but sometimes issues can occur. If you encounter any issues while removing a Homegroup, try some of our solutions.
Elsewhere, if you want a decluttered Start Menu, you can remove common group apps, too.
If you have any other questions or suggestions, please leave them in the comments section below.

