How to Switch From AMD to Nvidia GPU in 5 Steps
Replace AMD GPU with Nvidia easily with these tested steps
Key notes
- Replacing AMD with Nvidia GPU is pretty simple, and it can be done in a matter of minutes.
- Firstly, you need to remove any old drivers in order to prevent any compatibility issues.
- After that, you just need to remove your old GPU and insert the new one.

Many Windows users have always wanted to replace their AMD GPU with an Nvidia graphics card on their system.
There has always been a debate over which graphics card is better whether it is AMD or Nvidia since both companies provide the best graphics card possible.
Some users also managed an issue where the AMD graphics card was not getting recognized in the Device Manager on their system.
Can you swap GPUs?
Yes! You can easily swap GPUs on your system these days. The process is incredibly simple and it can be completed in just a couple of steps.
If you haven’t done this before, don’t worry, this guide will show you how to change the AMD graphics card to Nvidia properly.
Do I need to uninstall drivers before installing a new GPU?
You have to uninstall the old GPU drivers completely from the system before going to install the new graphics card drivers.
Otherwise, you might encounter some compatibility issues, so removing the drivers is recommended.
How do I replace my AMD GPU with Nvidia?
1. Uninstall the AMD graphics drivers
- Press the Windows and R keys together to open the run console.
- Type appwiz.cpl in the textbox and then press Enter.
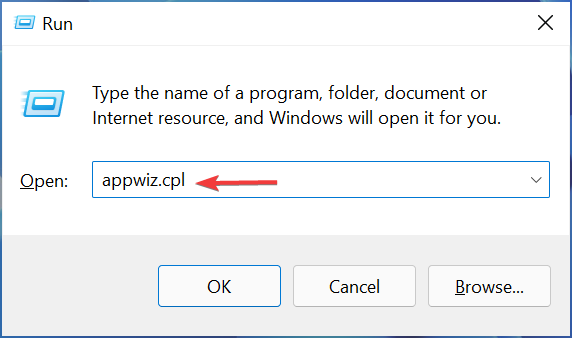
- This opens the Programs and Features wizard.
- Search for the AMD software from the list and select it.
- Click Uninstall from the top of the wizard.

- This starts uninstalling the AMD drivers from the system completely.
For best results, users are recommending using DDU to remove your drivers. If you’re not familiar, visit our how-to-use Display Driver Uninstaller guide for more info.
To completely uninstall AMD drivers, we recommend using automated software. CCleaner is a tool that specializes in uninstalling programs along with all associated files and deep roots within your computer.
2. Turn off your PC and disconnect all the cables
- Click the Start button.
- Next, click the Power button and choose Shut down.

- Once your PC is turned off, disconnect the computer case from the power outlet.
- Disconnect all peripherals that are connected to your case.
3. Remove your AMD GPU
 NOTE
NOTE
- Open the computer case and locate your graphics card.
- Unscrew any screws that might be holding it to your case. Next, disconnect all the cables that are connected to it.
- Carefully remove the old GPU from the slot. Keep in mind that there’s a lock next to the slot that is holding your GPU, so make sure you press and hold it beforehand.
4. Insert a new GPU
- Carefully insert your new GPU into the PCI-E slot.
- Connect the necessary cables, and secure the new GPU to your case with a screw.
- After everything is connected, close the computer case and connect your cables.
- Start your PC.
If you don’t hear any beeping noise and the image is displayed on your monitor, it means that the new GPU is successfully installed.
5. Install the Nvidia graphics drivers
- Visit the drivers download page of Nvidia.
- Select the Product type, Product series, Product, Operating system, Download type, and Language on the download page.
- Then click the Search button.

- This will display all the drivers available for the searched product and its model.
- Download your Nvidia drivers by clicking Download.

- Finally, install them on your system.
Do I need to update BIOS for a new GPU?
BIOS update isn’t necessary when installing a new GPU, so you can just go ahead and install it by following the instructions from this guide.
In some rare instances, you might have to update it if you encounter any issues, but that’s highly unlikely.
As you can see, changing AMD GPU to Nvidia is pretty simple, as long as you know what you’re doing.
Here is the guide if you are facing any problems like the Nvidia graphics card not getting detected in Windows 11 system.
Hope this article was informative. Please share your opinions in the comments section!
Read our disclosure page to find out how can you help Windows Report sustain the editorial team. Read more


Improve this guide


User forum
4 messages