Screen turns red when capturing a screenshot in Windows 10/11
Windows 10 May 2019 Update got a cumulative update recently.
KB4512941 brought a long list of bug fixes and improvements, but it also came with a series of problems.
After installing it, Windows 10 users complained about high CPU usage triggered by a bug with the SearchUI.exe process. Others complained that the update broke their Windows search experience.
Now, a new series of reports show that those weren’t the only problems with KB4512941. Users are saying that the update is causing their screen to turn red when they take a screenshot:
My screen turns red when I capture a screenshot. How can I turn it off? I haven’t changed any settings; yesterday it was fine. I tried using different snipping tools, and the regular PrtSc button. All red. I have the night mode off, and everything else is regular.

And here’s the OPs screenshot:
And this isn’t the only report, as other users confirm the problem.
What can I do if my screen turns red when taking screenshots in Windows 10?
If you’re in the same boat and experience this weird bug, you’ll be happy to know that there are a couple of fixes.
1. Rollback your display driver
It seems like the problem is caused by the display driver, and the first step is to roll back the driver to a previous version. To do that, follow the steps:
- In your Windows search box type Device Manager and click on the first result. Alternatively, you can press the Windows key + X and click on Device Manager.
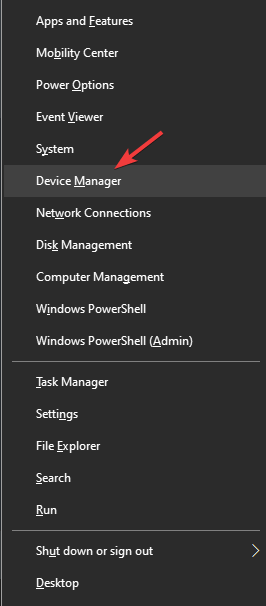
- In Device Manager, expand Display adapters.

- Right-click your display adapter and then click on Proprieties.
- In the new window that appears, go to the Driver tab.

- Now click on Roll Back Driver.
- Restart your PC.
If the rollback option isn’t available, then go to the next solution.
Keep in mind that if the rollback works, you’ll have to prevent Windows from auto-updating the driver in the future. If you don’t know how to do that, check out this useful guide.
2. Update the display driver from the manufacturer’s website
If the rollback option is missing or if it doesn’t solve the problem, then you’ll have to update your driver to the latest version.
Just go to the website of your driver or PC manufacturer and check what’s the latest driver released for your model and OS. If there is a new driver, uninstall the old one and install the newly downloaded driver.
If you need more info on how to update your graphics card‘s driver, we’ve prepared a step-by-step guide that will help you do it with ease.
3. Use a third-party driver updater
The better way to manage all your PC drivers and update them with the latest official versions is by employing specialized driver update tools.
By choosing this alternative, you will efficiently install missing drivers or fix broken ones that can compromise your system functionality. In terms of updating, you only have to select the outdated ones and automatically update them.
Therefore, using the following third-party solution will definitely help you to update GPU drivers correctly, without affecting the system.
⇒ Get PC HelpSoft Driver Updater
After that, the problem should be solved.
Have you encountered any similar issues in Windows 10 v1903?
Share your experience along with any other questions in the comments section below.
Read our disclosure page to find out how can you help Windows Report sustain the editorial team. Read more


Improve this guide


User forum
0 messages