Secure Boot Enabled but Not Active: 3 Windows 11 Fixes
Explore these expert-tested methods to fix the issue
![Secure Boot Enabled But Not Active On Windows 11 [Solved]](https://windowsreport.com/wp-content/uploads/2022/12/Secure-Boot-Enabled-But-Not-Active-On-Windows-11-Solved-886x590.png)
If you see the Secure Boot option enabled in BIOS, but on the system information page, it shows Not Active, then you are not alone. Many users reported that it stopped them from updating on Windows 11, but don’t worry; it can be fixed with the tested solutions below.
What can I do if Secure Boot is enabled but inactive on Windows 11?
Before engaging in advanced troubleshooting steps, you need to update BIOS if outdated. Once done, follow these steps in sequence as mentioned below:
1. Disable the Compatibility Support Module (CSM)
- Press Windows + I to open Settings.
- Go to System, then click Recovery.

- Now click Restart now beside Advanced startup.

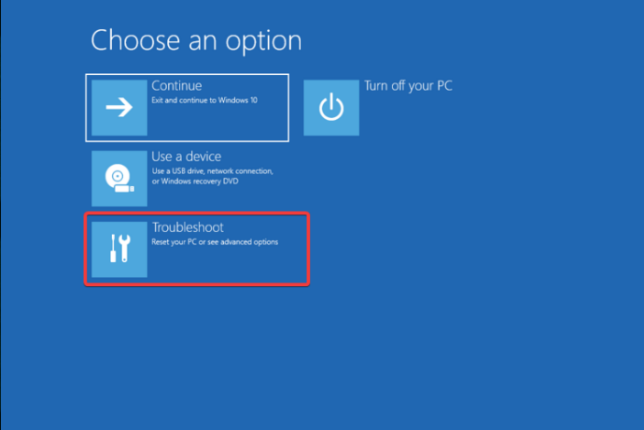
- From Choose an option, select Troubleshoot.
- Now click Advanced Options.

- Select UEFI firmware settings, then click Restart.

- Now select the appropriate option to go into BIOS mode.
- Go to the Boot or Security tab, navigate to CSM and select Disabled for it.

- Once done, click Save Changes & Reset.
2. Change the platform
- Go to BIOS mode by following the steps from method 1.
- Locate the System Mode, and select User instead of Setup.
- Go to Secure Boot Mode. If it stays Standard, switch it to Custom.

- Now change it back to Standard and accept Factory Defaults.
3. Enable Secure Boot
- Go to BIOS mode by following the steps from method 1.
- From the Security or Boot menu, locate Secure Boot.

- Select Enabled. Now select Save changes and exit to confirm the changes.
Why is Secure Boot enabled but not active?
There could be various reasons why the error occurs on your computer, some of them are mentioned here:
- Secure Boot feature disabled – If the Secure Boot option in UEFI firmware settings is set to Disabled, the feature will not work, even if it is technically enabled.
- CSM enabled – If CSM is enabled in UEFI settings, you might face the error. You need to disable this setting to fix it.
- BIOS is outdated – If BIOS is not up to date, it may not support the Secure boot feature. You need to update BIOS to get the feature enabled.
So, these are methods that you need to follow to fix secure boot enabled but not active on Windows 11. It is crucial that Secure Boot is enabled at all times otherwise, you’d be exposing your device to errors like the tpm-wmi 1796 or the SECURE_BOOT_VIOLATION error.
Some modern games now require Secure Boot to be active as part of their anti-cheat systems, for instance, Battlefield 2042 enforces Secure Boot to launch the game properly.
We also have a complete guide on how to deal with Secure boot enabled but not active on Windows 10 and what to do if Secure Boot is grayed out on Windows 11.
Try them and let us know what worked for you in the comments below.
Read our disclosure page to find out how can you help Windows Report sustain the editorial team. Read more


Improve this guide


User forum
0 messages