Secure Boot Can be Enabled When System in User Mode [Fix]
Learn to enable Secure Boot on your Windows PC without issues

Many readers have reported receiving the System in Setup Mode! Secure Boot can be enabled when System in User Mode. Repeat operation after enrolling Platform Key(PK) error message. It is an error message that usually comes after trying to enable Secure Boot through your MSI motherboard.
If your system uses the old boot framework and secure boot is not enabled, the Secure Boot state will be unsupported. This happens even if your motherboard includes the Secure Boot option. The solutions work perfectly on Secure Boot unsupported issues for all devices, including HP, Dell and Lenovo laptops or ASRock and Gigabyte motherboards.
How can I fix the Secure boot can be enabled when System in User Mode issue?
To begin, check to see if your PC is supporting Secure Boot without entering BIOS before trying to proceed with other steps to power it in user mode. This should help you if there would be a requirement issue.
You may enable Secure Boot for Windows 11 in user mode from BIOS after verifying its reliability. When you get the Secure Boot can be enabled when System in User Mode error, go to the BIOS screen to enroll platform keys, then repeat the start-up in Secure Boot.
1. Check the UEFI firmware settings
- Click on the Start button, go to the Power icon and hold the Shift button on your keyboard while you select Restart.

- Select Troubleshoot from the Advanced Startup window.

- Click on Advanced Options.

- Choose UEFI Firmware setting.

- Click the Restart button to restart your PC and open the BIOS settings.

With firmware updates, many manufacturers update their device’s UEFI support and the system settings menu options.
Furthermore, it’s important to have the latest updates from the manufacturer installed on your Windows 11 PC, for a good overall performance.
After your PC reboots, continue with the next solution to change the BIOS settings.
2. Change Legacy BIOS to UEFI custom
- Enter BIOS Setup with the corresponding key on the screen.

- Look for the Secure Boot option. In most situations, it will be under the Boot or Security tabs, though the location will change based on your PC.
- Change BIOS from Legacy to UEFI.

- Enable Secure Boot in user mode (UEFI).
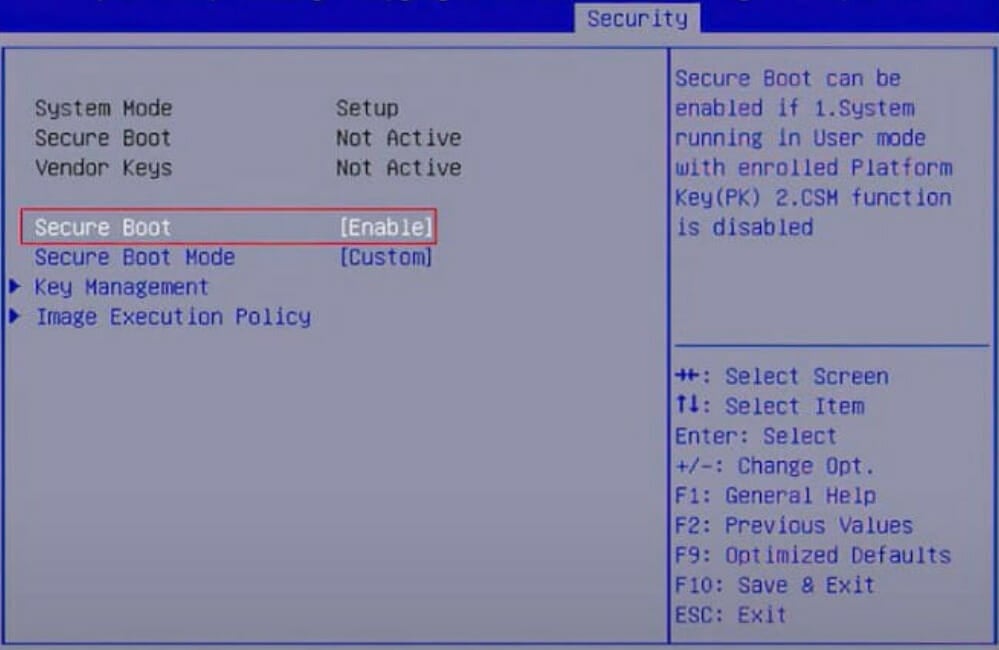
- Press the Save & Exit corespondent key on the screen, and you are done.
It’s important to change the PC’s boot mode from Legacy BIOS (also known as CSM Mode) to UEFI BIOS.
After making changes to the settings, restart your computer. This will re-enable Secure Boot on your PC, and the supported value should appear in System Information.
Secure Boot is now enabled on your computer. Use PC Health Check to determine whether your PC meets the Windows 11 system requirements to make an upgrade or a new installation.
3. Convert your partition to GPT, if supported
 NOTE
NOTE
- Right-click the Start button and select Disk Management.

- Now, right-click your drive and select Properties.

- Next, click on the Volumes tab and look at Partition style. If it shows GPT all is well and you can end here. If it shows MBR instead, continue with this solution to change it.

- Close the window, click on the Search icon, type cmd, and select Run as administrator.

- Type the following command and press Enter to run it:
mbr2gpt.exe /convert /allowfullos
- After the conversion process completes, check the partition style in Disk Management as instructed above and it should now read GUID Partition Table (GPT).
Why should I enable Secure Boot on Windows 11?
Secure Boot is a function that activates on the latest PC models. This is a UEFI platform feature that replaces the traditional PC BIOS.
Enabling Secure Boot increases the security of your computer and protects it from virus attacks. It would merely protect your computer and have no negative impact on performance.
Secure Boot ensures that a desktop or laptop only opens trusted software, firmware, and apps. Thus, it is perfectly safe to enable Secure Boot on a Windows 11 PC.
Why is certain software enforcing TPM and Secure Boot?
Following these steps to ensure Secure Boot is enabled in Windows 11 in user mode, will also define if you can install and run certain apps that enforce the usage of this feature.
The main reason that apps require TPM 2.0 is for security and safety on the players’ ID. The TPM control assists in preventing hijackers from using cheat codes. TPM is all about security and protocols.
When TPM is applied and they receive a ban, the entire device or hardware ID is blocked. This prevents scammers from spoofing their device to act as another device with a different ID.
To resolve the TPM problem on Windows, simply enable secure boot and then enable TPM on your device.
You may also check Windows 11 ready-laptop choices to help you better understand the compatibility between a computer and how Windows 11 works on it.
Hopefully, we cleared out how to enable Secure Boot. If you encounter other issues, please let us know in the comment area below.
Read our disclosure page to find out how can you help Windows Report sustain the editorial team. Read more


Improve this guide


User forum
0 messages