FIX: Skype auto sign in problems on Windows 10/11
7 min. read
Updated on
Read our disclosure page to find out how can you help Windows Report sustain the editorial team. Read more
Key notes
- Skype is a great instant messaging app, but even great apps have certain issues.
- Some users reported that the auto sign-in option isn’t working properly on Windows 10.
- To fix this issue, check your Skype settings and make sure that the auto sign-in option is enabled.

Millions of Windows 10 users rely on Skype every day for communication, but it seems that they are having some issues with it. According to them, there are various problems available with Skype and the auto sign-in option on Windows 10.
How can I fix Skype auto sign in problems on Windows 10?
Skype is one of the most popular instant messenger services, however, issues with Skype can occur and prevent you from logging in. Speaking of issues, these are some of the most common problems that users reported:
- Skype auto login not working – According to users, sometimes this issue can occur due to your antivirus or firewall. To fix the issue, make sure that Skype is allowed through your firewall.
- Skype for Business not automatically signing in – This issue can occur in Business version of Skype, but most of our solutions can be applied to Business version as well, so feel free to try them.
- Skype auto sign in just keeps loading – According to users, sometimes Skype keeps loading while trying to sign in. If you have this problem, simply reinstall Skype and check if that solves the issue.
- Skype sign in error – There are various errors that can occur while trying to sign in to Skype. However, you should be able to fix these errors with one of our solutions.
1. Check the Skype options menu
- Start Skype.
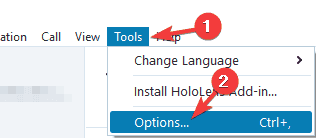
- Go to Tools > Options.
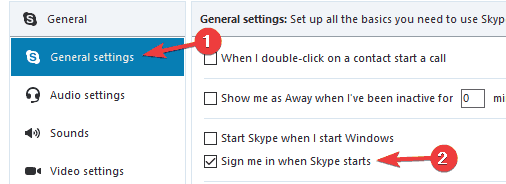
- Locate Sign me in when Skype starts option and uncheck it if you want to disable this option or check it if you want to turn it on.
- After you’re done, click the Save button to save changes.
3. Use Sign in with Facebook option
According to users, the auto sign-in button will appear on the main screen if you use Sign in with Facebook option.
Although this is a simple workaround, it won’t work if you don’t have a Facebook account or if your Skype isn’t connected to Facebook.
3. Reset all Skype settings
- Close Skype completely. If needed, close Skype from Task Manager.
- Press Windows Key + R and enter %appdata%. Click OK or press Enter.
- When Roaming folder opens, locate Skype folder and rename it to Skype.old.
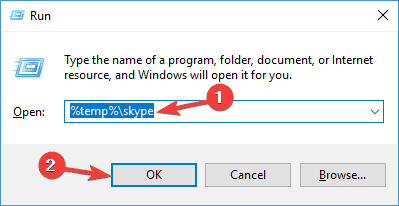
- Press Windows Key + R and enter %temp%skype.
- Delete the DbTemp folder.
Try starting Skype again and check if the issue is resolved. Bear in mind that your chat logs will be deleted by using this solution, but you should be able to restore them from Skype.old folder if you need them.
Windows won’t end a task in Task Manager? If you’d like to fix the problem when Windows 10 won’t end task, there are ways to resolve it.
4. Check your antivirus
Sometimes your antivirus can interfere with Skype and that can cause problems while signing in. To fix the issue, you need to disable certain antivirus features such as your firewall and check if that solves the problem.
If the issue still persists, you might have to temporarily disable your antivirus.
Sometimes disabling the antivirus won’t help, so you’ll need to uninstall your antivirus. If uninstalling the antivirus solves the problem, you should consider switching to a different antivirus solution. There are many great antivirus tools available that offer great protection if you have any problems without interfering with other programs.
For the Norton users, we’ve got a dedicated guide on how to completely remove it from your PC. There’s a similar guide for McAffe users, as well.
If you’re using any antivirus solution and you want to completely remove it from your PC, you can safely uninstall it using the best uninstaller software for your Windows PC.
5. Disable Skype notifications
- Open Skype and go to Tools > Options.
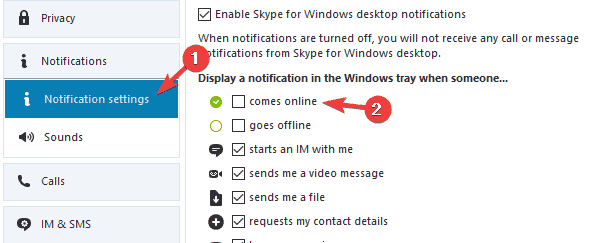
- Go to Notification settings and make sure that comes online option is not checked.
- Click Save to save changes.
This looks like a strange solution, but few users claim that it works, so it won’t hurt you to try it.
6. Use ListFix
- Completely close Skype.
- Download ListFix.
- After the tool is downloaded, extract it.
- Run the tool.
- Select and shared.xml and click Clear Skype names.
- After the process is completed, click on Clear Skype cookies.
- Close ListFix application and try to run Skype again.
7. Unlink your Microsoft and Facebook account
- Go to https://login.skype.com and log in with your Skype account.
- Now go to Settings and unlink both your Microsoft and Facebook account.
After doing that, both your Microsoft and Facebook accounts will be unlinked and you’ll be able to sign in automatically to Skype.
Keep in mind that this method might not work if you signed up for Skype with your Microsoft or Facebook account.
8. Reinstall Skype
According to users, if Skype keeps auto signing in, you can fix that simply by reinstalling it. Users reported that after uninstalling and reinstalling the Skype application this problem was resolved, so be sure to give it a try.
There are several ways to uninstall an application, but usually, the best is to use uninstaller software. If you’re not familiar, uninstaller software is a special application that can easily remove any software from your PC.
In addition to removing the program, these tools will also remove all files and registry entries associated with it. This is perfect if you want to completely remove an application from your PC.
If you’re looking for uninstaller programs, it’s very likely to resolve the issue using the best uninstaller software for your Windows 10 PC.
If you need more info you can learn easily from a short guide on how to uninstall Skype on Windows 10.
9. Check if your username and password are correct
According to users, if have auto sign-in problems with Skype, your username or password might not be correct.
Before trying to sign in, be sure to check if everything is in order with your username and password.
If you suspect that your Skype account might be hacked, be sure to reset your password and try to sign in with a new password.
10. Check if your Internet connection is working
If you have problems signing in to Skype, the issue might be your Internet connection. To fix this problem, it’s important that you check if your Internet connection is working properly.
If other websites work without any problems, it means that everything is in order with your network connection, so the problem is most likely with Skype.
To check if Skype and its services are working properly, be sure to go to https://support.skype.com/en/status.
From there you can see which Skype services are working properly. If there’s an issue with any of these services, Microsoft will try to fix them as soon as possible.
11. Try Skype for Web
According to users, sometimes this problem can occur due to issues with your Skype application.
To check if your application is the problem, you might want to try using Skype for Web. Simply go to Skype for Web page and sign in with your Skype credentials.
If Skype for web works, it means that the issue is related to your Skype application. To fix the issue, you should try some of our other solutions.
12. Check if your account is restricted or suspended
If you have problems signing in to Skype, the issue might be caused by your account. Sometimes your account can be temporarily restricted and suspended.
This can occur if there’s any unusual activity on your account associated with a security breach.
If you suspect that your account is blocked due to a security breach, you should contact Skype support to resolve this issue.
Skype auto sign-in option can be useful, but it can also cause all sorts of problems for the users. If you’re having any issues with the Skype auto sign-in option on Windows 10, be sure to check some of our solutions.
If you’re having additional problems with Skype, be sure to check our Skype hub where we post all sorts of useful guides.
If you have any other suggestions or questions, feel free to leave them in the comments section below.






User forum
0 messages