FIX: Skype DXVA2.DLL is missing on Windows PCs
This Skype error is usually caused by a recent app update
Key notes
- If the latest .NET Framework 4.0 pack isn’t installed, you’ll also get the dxva2.dll file is missing error.
- When the dxva2.dll is missing on Windows 7, the cause might be your antivirus.
- So installing the missing system files, disabling the antivirus, or resetting your app are all viable solutions to fix the error.

If your main operating system is still Windows XP, and you’re using Skype on it, you might receive an error message that says Skype failed to load library dxva2.dll, after the most recent update.
Alternatively, the error might read dxva2.dll is missing from computer file location.
As you can probably imagine, when this error message occurs, Skype doesn’t start and you’re unable to sign in.
It’s important to know that this issue was not reported on newer versions of Windows. But if it would be, the solutions would probably be the same.
In this article, we’re going to show you the steps to troubleshoot this error, while also explaining why it occurs.
How can I restore the Skype dxva2.dll missing file?
1. Run a third-party DLL fixer
With each update that Microsoft brings to Skype, it’s likely that it becomes incompatible with your OS version.
But with the right specialized software, you can make sure that such system errors are quickly fixed by performing this action automatically.
2. Install .NET Framework 4
With the newer Skype version, the app uses DirectX Video Acceleration 2.0, which requires .NET Framework 4.0 installed in order to function normally.
Since a lot of users (especially Windows XP users), don’t have .NET 4.0 installed, they get this error message.
The dxva2.dll file was introduced on Windows Vista, so it’s not installed on older systems by default, and you have to download .NET Framework 4.0 to have this DLL file.
You can download it from the official Microsoft location. Afterward, you should be able to sign in to Skype normally again.
3. Disable your antivirus
Your antivirus and firewall software may block your Skype.exe file, preventing the tool from launching. Disable your security software and test if you can use Skype in this way.
Since we don’t recommend running Windows without adequate protection, especially if the system is no longer supported by Microsoft, you should consider switching to a different antivirus solution.
Many professional tools can automatically repair this type of error and provide your computer with stronger and more secure protection.
4. Reset Skype settings
- Close Skype from Task Manager.
- Open a Run window and enter %appdata%. Hit Enter.

- In the new Roaming folder, locate Skype and change its name to Skype.old.
- Open Run and enter %temp%skype.
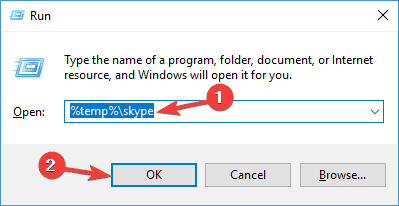
- Now simply remove the DbTemp folder.
5. Reinstall Skype
If nothing worked, you should try to reinstall Skype. This solution is usually the last resort and fixes many technical issues.
So these were the steps to restore your Skype app functionality on older Windows operating systems.
We also strongly recommend that you upgrade to Windows 10 as soon as possible to avoid similar events in the future.
If you’re concerned that your device can’t support Windows 10 because of resources, you might also want to consider an affordable new laptop, with just the apps & programs you need.
Read our disclosure page to find out how can you help Windows Report sustain the editorial team. Read more


Improve this guide


User forum
1 messages